

Complete Guide to Growing Your Business on Facebook
Complete Guide to Growing Your Business on Facebook
Table of Contents

Facebook Page
I. How to Create Your Business Facebook Page
II. Adding Valuable Information on your Facebook Business Page
III. How to Add Your Team and Manage Page Roles
IV. Adding Your Profile and Cover Photo
V. Inviting People You Know to Like and Follow your Page
VI. Creating a Custom Username
VII. Using a Correct Call to Action Button

Facebook Group
I. How to Create Your Business Facebook Group
II. How to Add Admins and Moderators
III. Adding your Facebook Page as an Admin

Facebook Ads
I. How to Set Up Facebook Ads Manager
II. How to Create Your Ads
III. Monitoring your Ads

Facebook Events
I. How to Create Facebook Events

Facebook Story

Facebook Shop
I. How To Change Your Default Page Template into Shopping Template
II. How to Add a Shop Section to your Facebook Page
III. Adding your Products

Facebook Live
I. Setting up a Live broadcast
I. Messenger Chatbots to get Leads
II. Right Tools to Use
III. Best Time to Post
IV. How to Monitor Your Competitors
V. Conclusion
Facebook Page
Introduction
Facebook is a social media giant. It is a tool for connecting people. As with any other social media tool, digital marketers have an opportunity to use Facebook to grow their online footprint and engage with customers directly. Many of the world’s biggest and most respected brands are using social media as a cost-effective way to engage with consumers and drive word of mouth about their products and services.
Why opt for Facebook? 67% of Facebook’s users or 968 million people log in to Facebook every day. That’s almost three times the total U.S. population. Hence, it is a perfect place to start building your brand and connecting with many people in new and interesting ways.
Facebook Pages are meant for businesses, and it can become the voice of your business. For you to know how to use Facebook to grow your business, this guide is made for walking you through everything you need to know about starting and managing your business Facebook Page. This guide is all about setting up your Facebook business page so you can get found by people trying to search for your products and service. Furthermore, you can also connect and engage with potential and current customers, create a community around your business, and promote other content. Setting up your Facebook business page is an absolute no-brainer.
(DISCLAIMER: this guide is provided for free but it is up to the reader to continue to learn and work hard at implementing the tactics in this guide to help you grow your business! We make no guarantees to results you may obtain, and you should always do your own research and dedicate yourself to always growing and learning. Your results will be determined by your actions!)
I. Creating your Business’s Facebook Page
Grow your audience by reaching out to the world through Facebook. There are billions of Facebook users worldwide, and creating your own business’ Facebook page is an opportunity to connect your brand to the populace. Facebook pages are undeniable a must-have business marketing tool. But even with billions of active Facebook users, growing your Facebook page’s reach takes time, and will need the right marketing strategies. But before everything else, you have to make the giant step of creating one. Here is how you can create your business’ Facebook page.

1. Log In
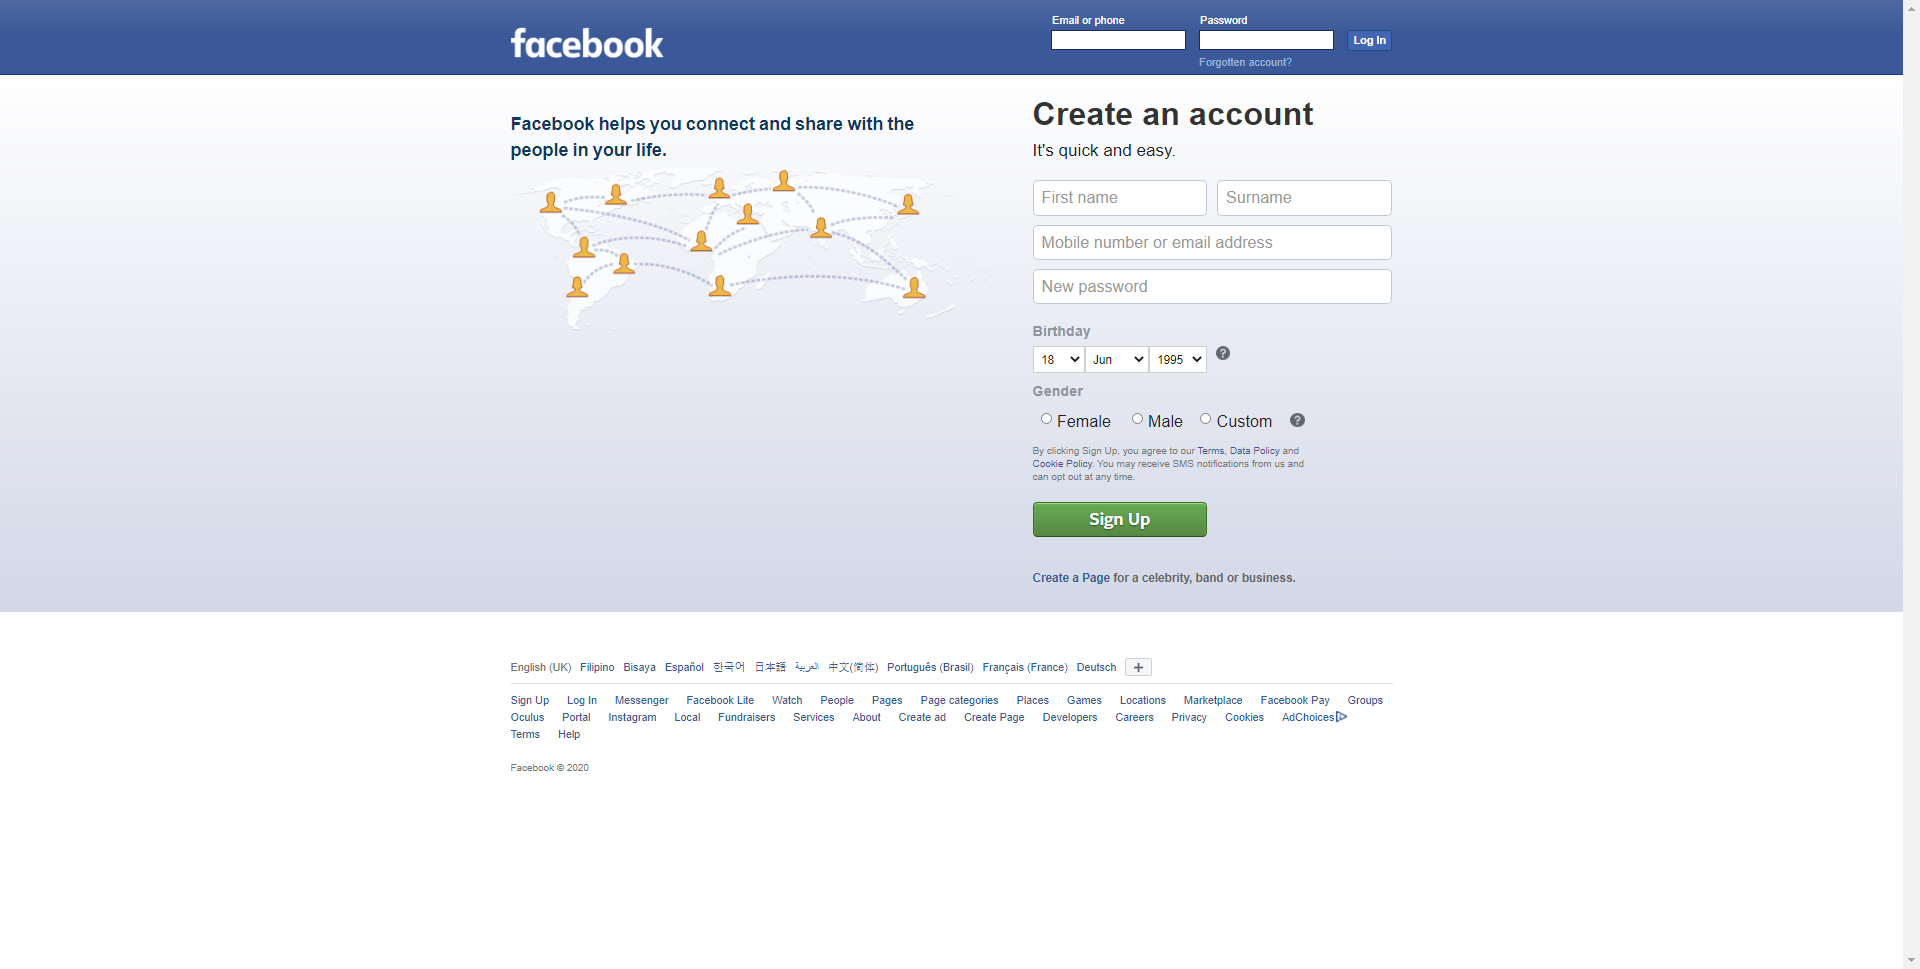
Go to https://www.facebook.com/ and log into your personal Facebook account. If you don’t have a personal profile, you need to create one by filling out the required information and follow a couple of simple steps.
2. Create Page
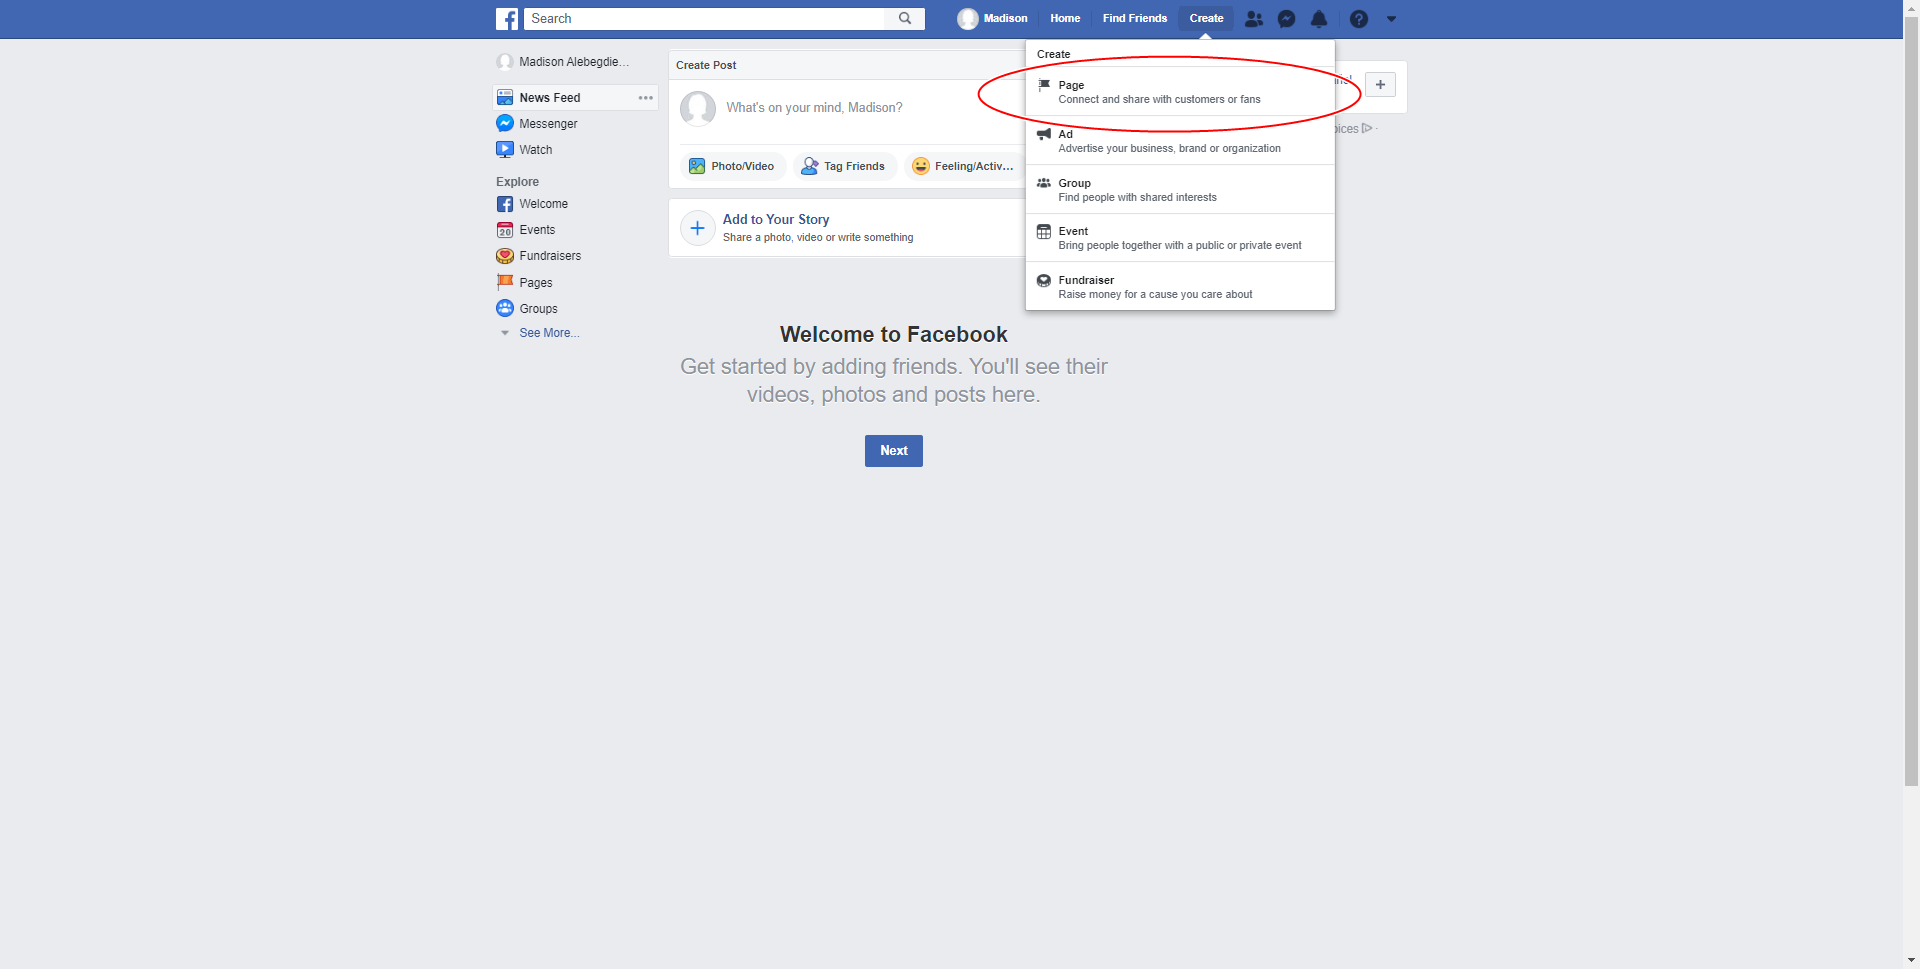
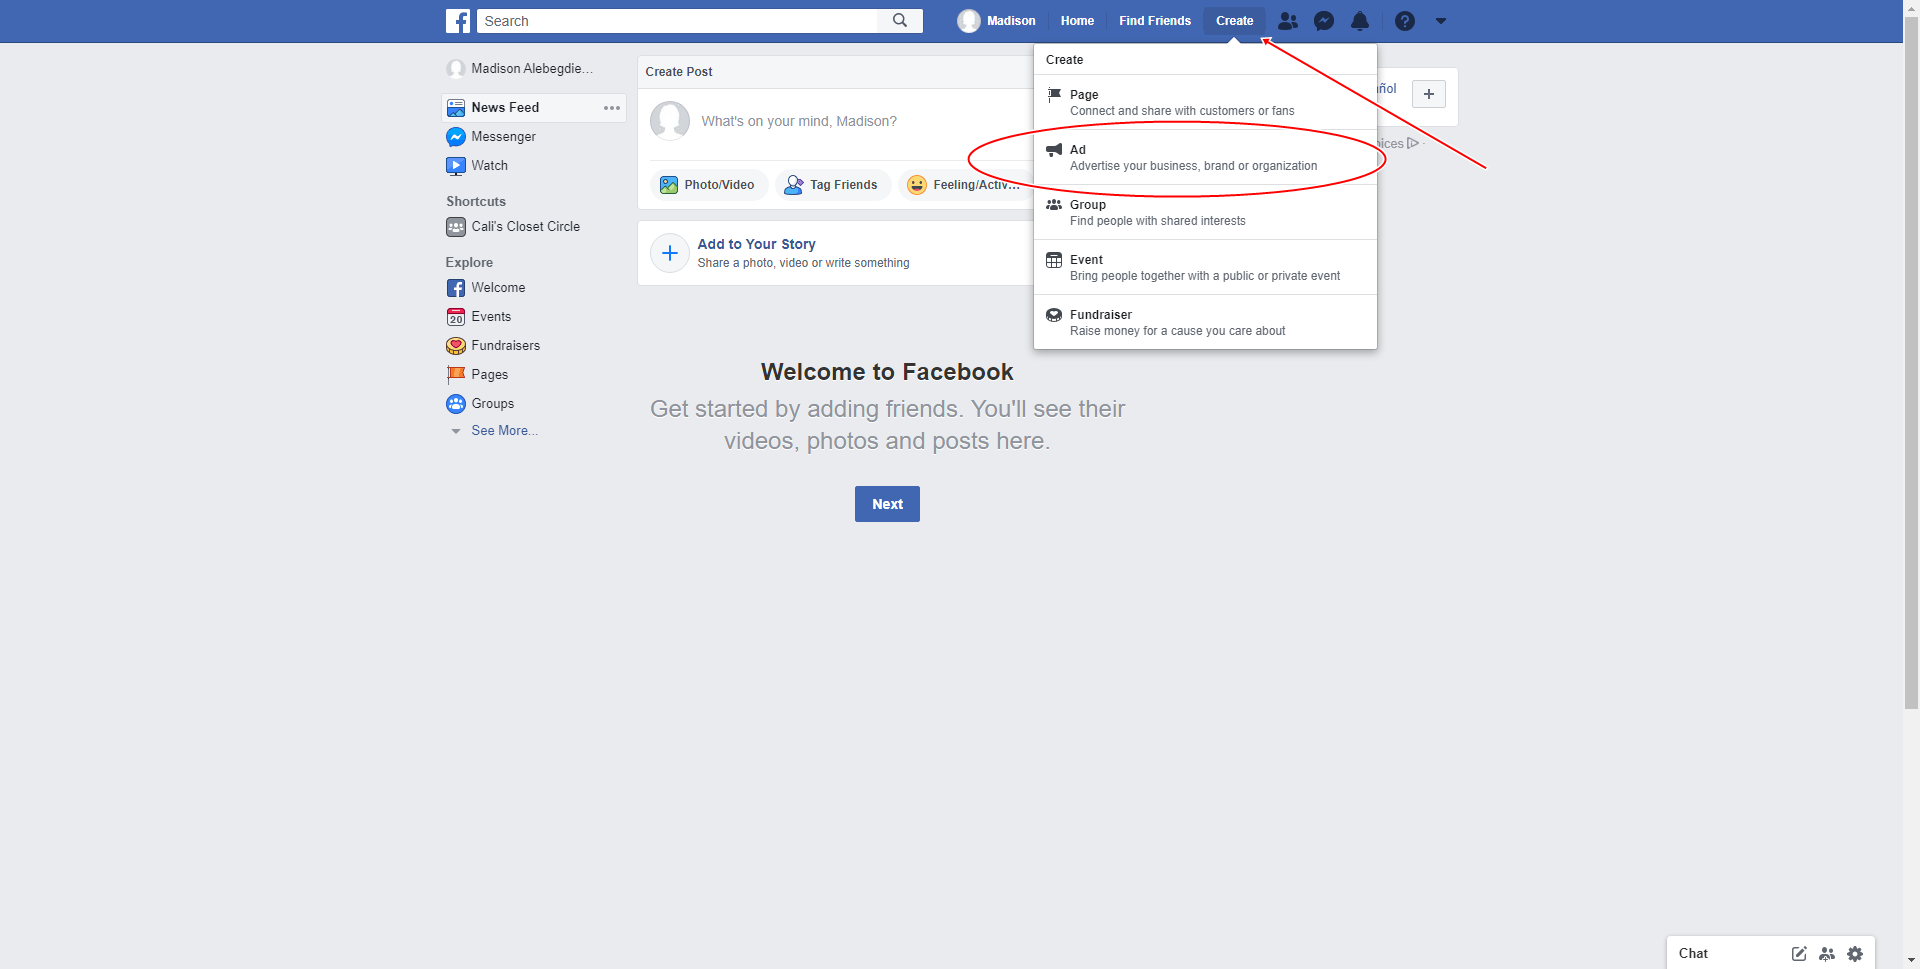
Go to facebook.com/pages/create. You can click on “Create” on your top menu and then click on “Page.”
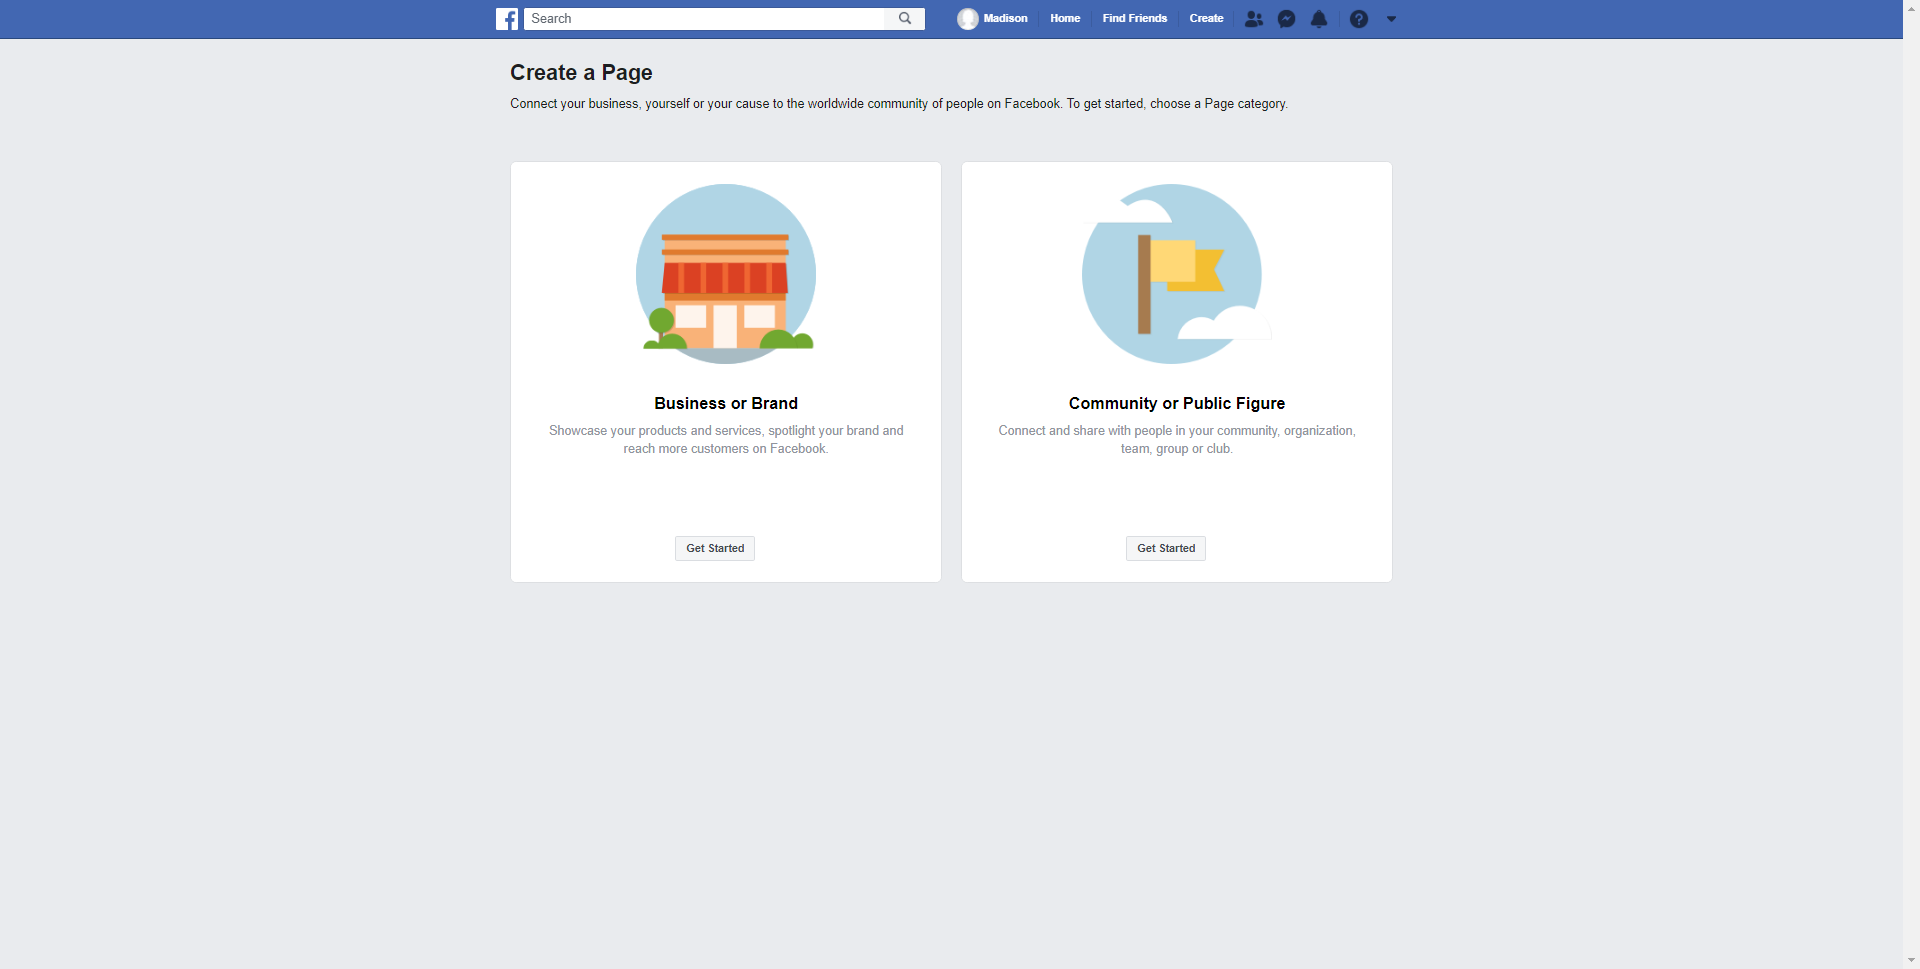
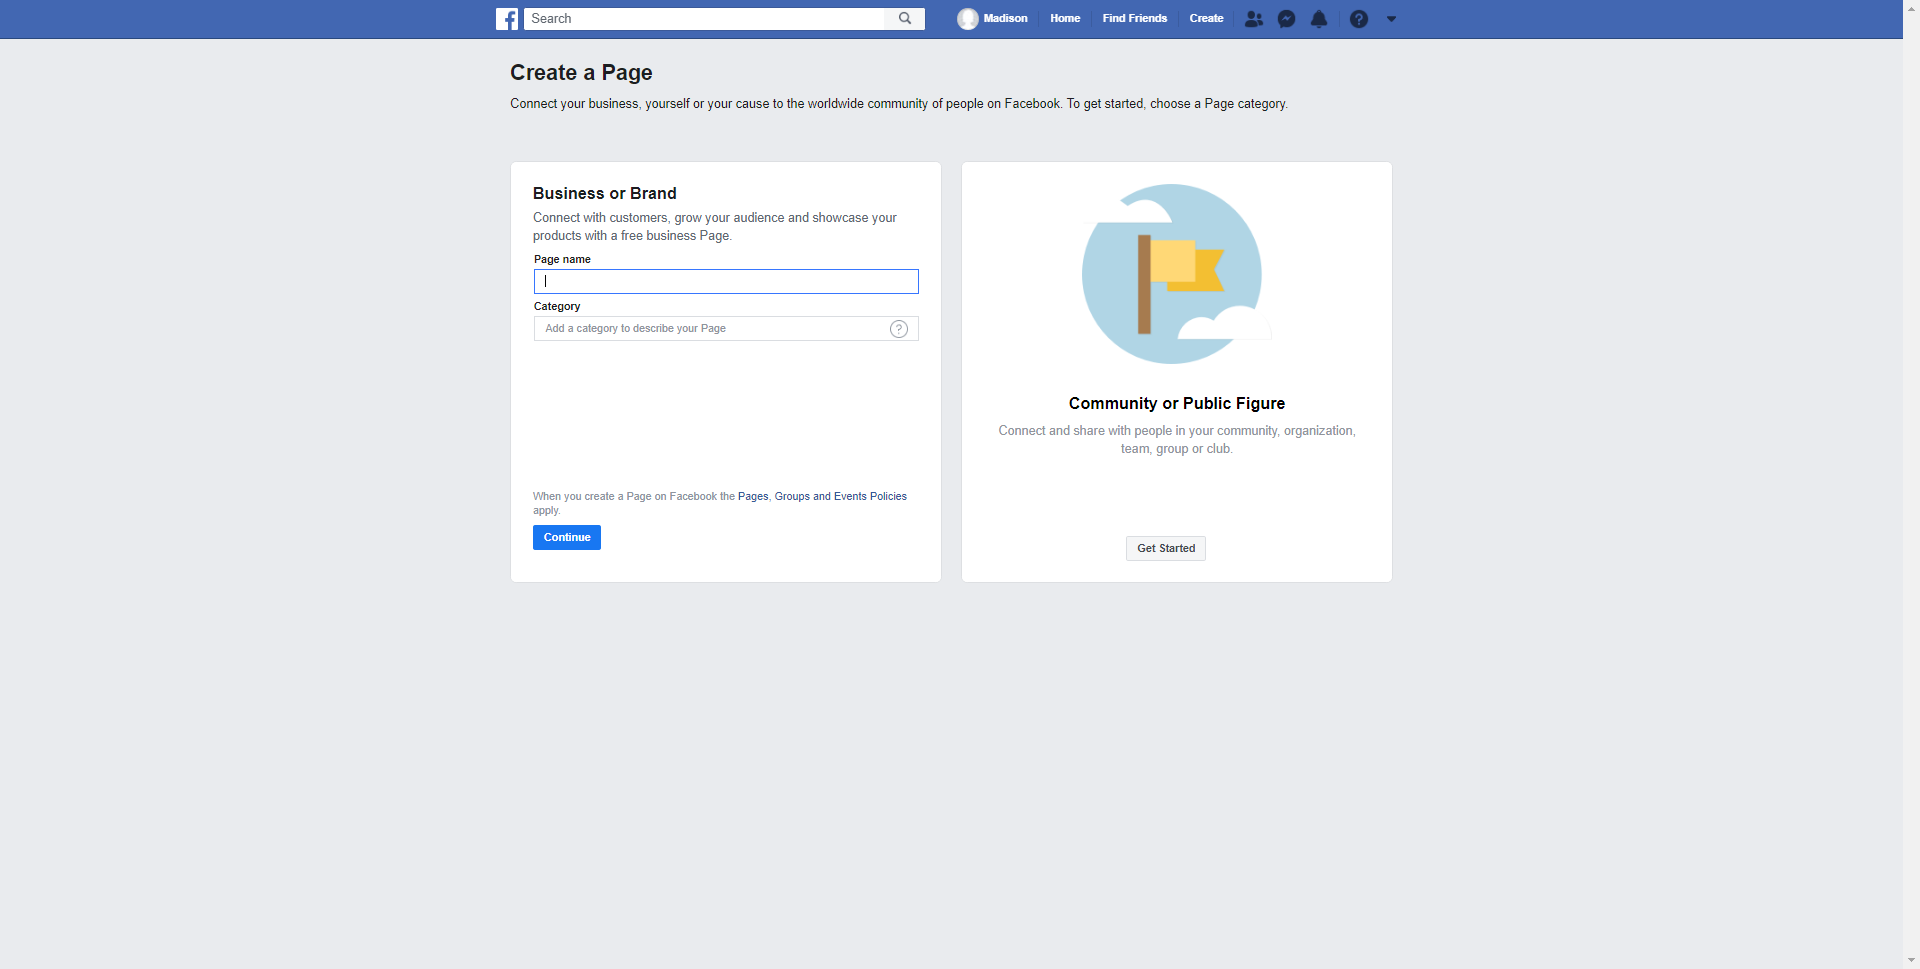
3. Get Started: Select Business or Brand
You will be prompted to choose your page category. Since your goal is to get more massive business awareness, choose Business or Brand; click the “Get Started” button under it.

4. Enter Your Business Information
You will be required to enter your business’s name and choose a category. An additional field will appear after you enter your business’ category. Enter all the required information. Don’t worry if your business is yet to be finalized; you can still change these fields later. Also, refer to page name guidelines here: https://www.facebook.com/help/519912414718764.
Click continue when finished.
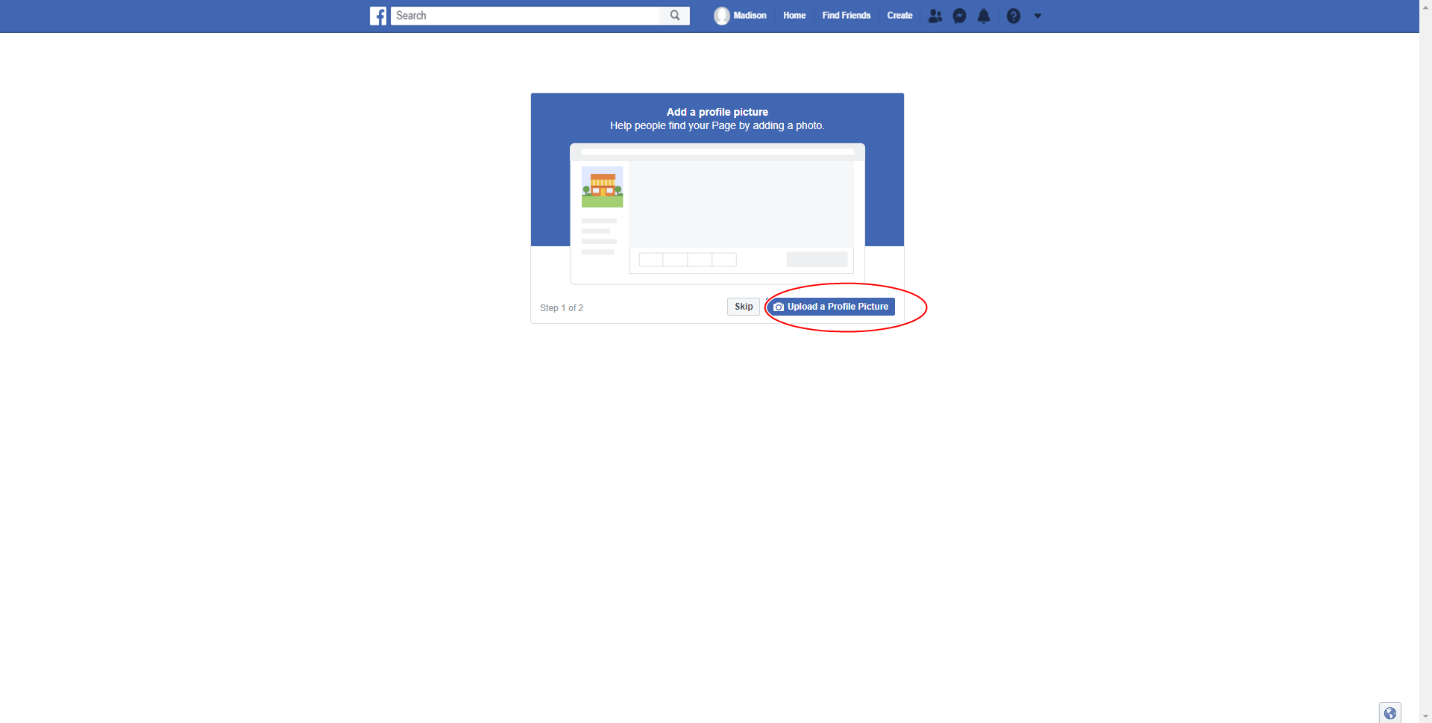
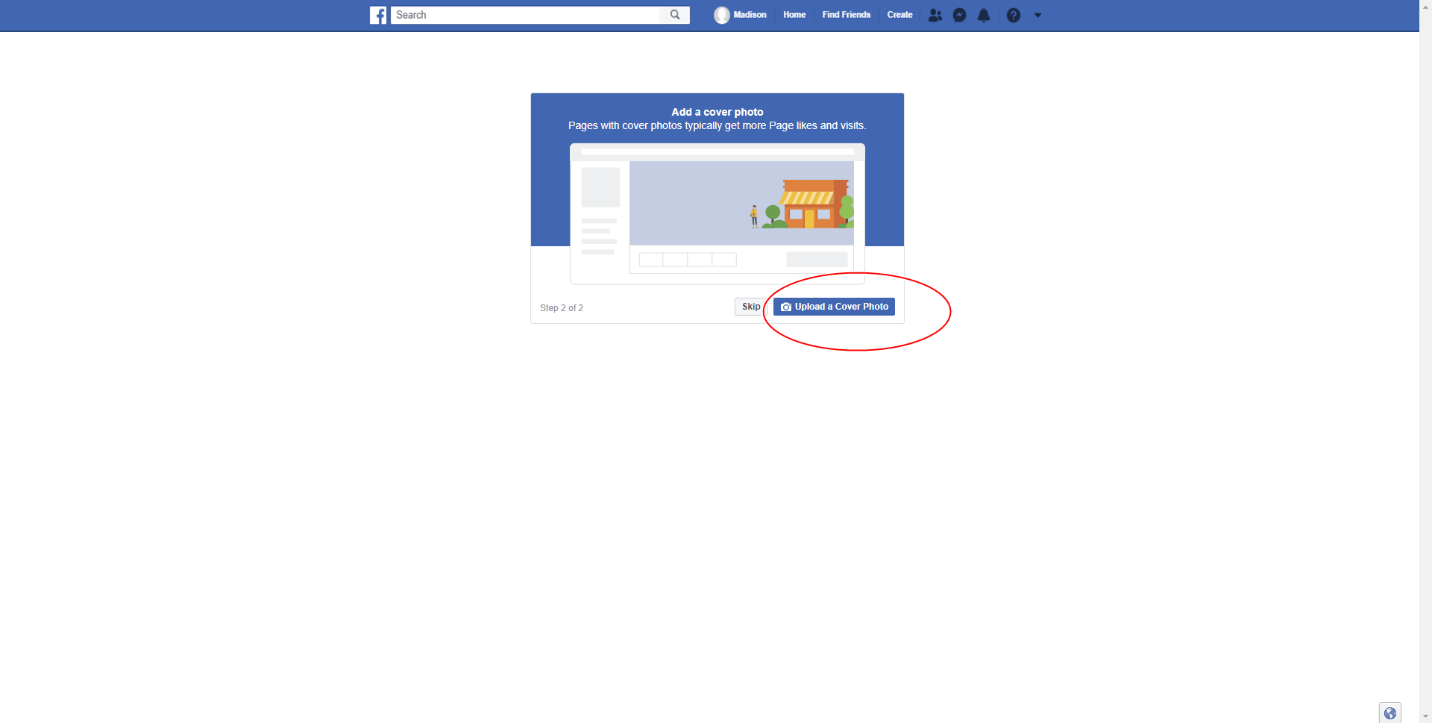
5. Upload a Profile Photo and Cover Photo
Facebook will ask you to upload a profile and cover photo for your page. These are very important because they both give an impression about who and what your brand is.
If you still don’t have a compelling profile and cover photos, you can skip this step and come back later when you have a well-designed profile and cover photos.
6. Finish
You will then be redirected to your completed page. Congratulations!
You can now begin building up and do some twitches on your Facebook business page.
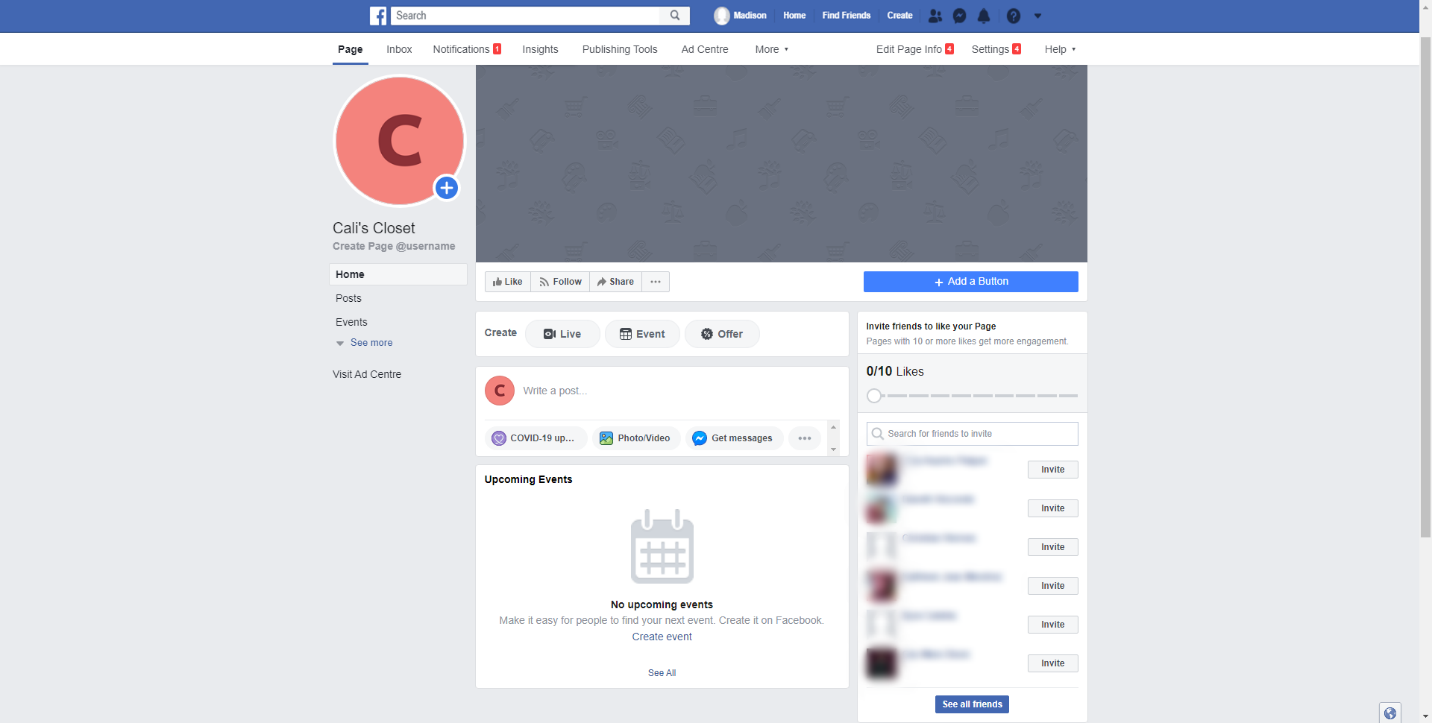
Now you’re done creating your Facebook business page. Your page is now visible to the public. Your next move shall be adding your business’s valuable information for the public to know your business and what you offer.
II. Adding Valuable Information On Your Facebook Business Page
Creating the page is easy-peasy, but filling out your business’s valuable information may be severe and require time and thinking. Remember, your Facebook page may be the first place people look when they want to know more about your business and what you offer, making your page information-rich and credible. Also, this is the place where people will know more about how to connect or contact you. Don’t miss out on the chance to connect and engage with your potential and current customers.

If your business is still in progress, you can opt to do this later. You can easily access your page any time by doing the following:
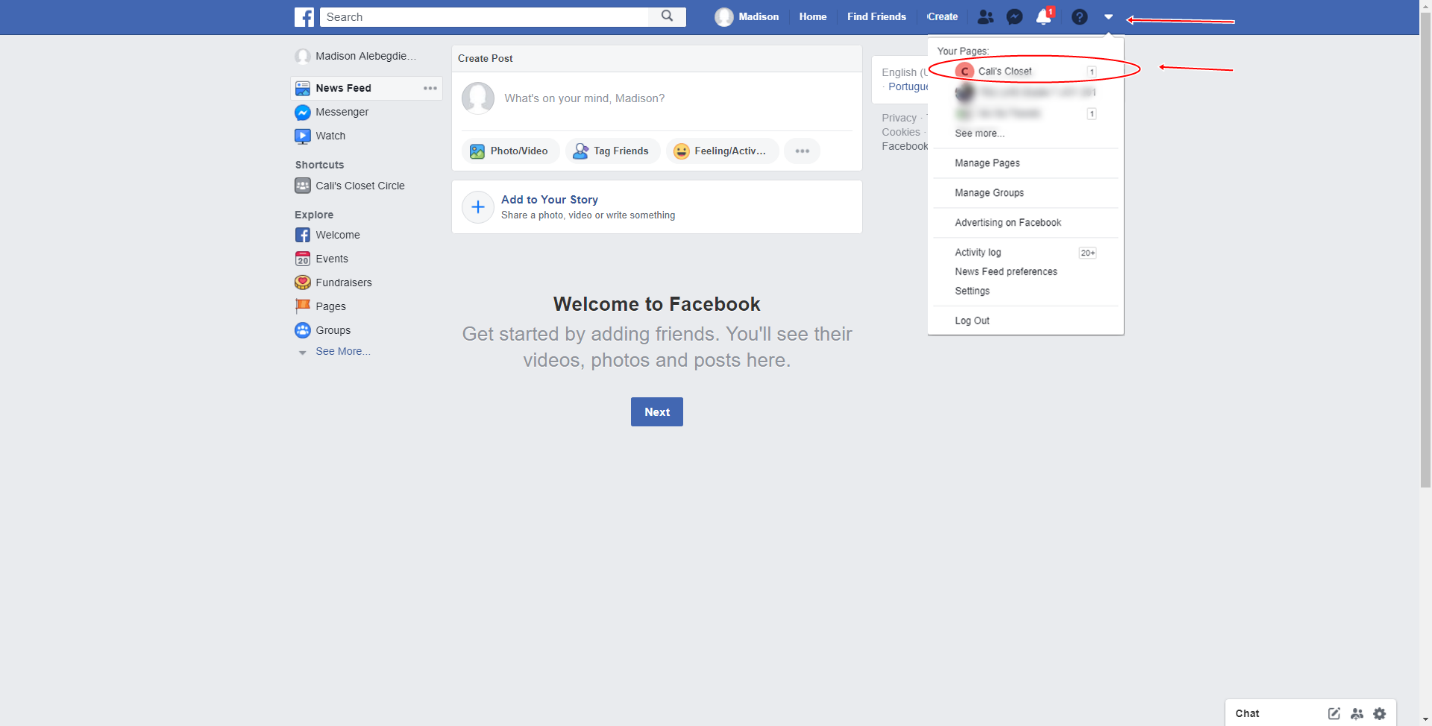
1. Log into your personal Facebook account.
2. There is a drop-down arrow on the top right corner of your window. Under “Your pages,” you will see all of your Facebook pages.
3. Click on your Facebook business page, and you will be redirected.
But if all of your business information is well-prepared, proceed with filling out the necessary business information to get the most out of your Facebook business page. Here’s how you add valuable information on your Facebook business page.
About Section:
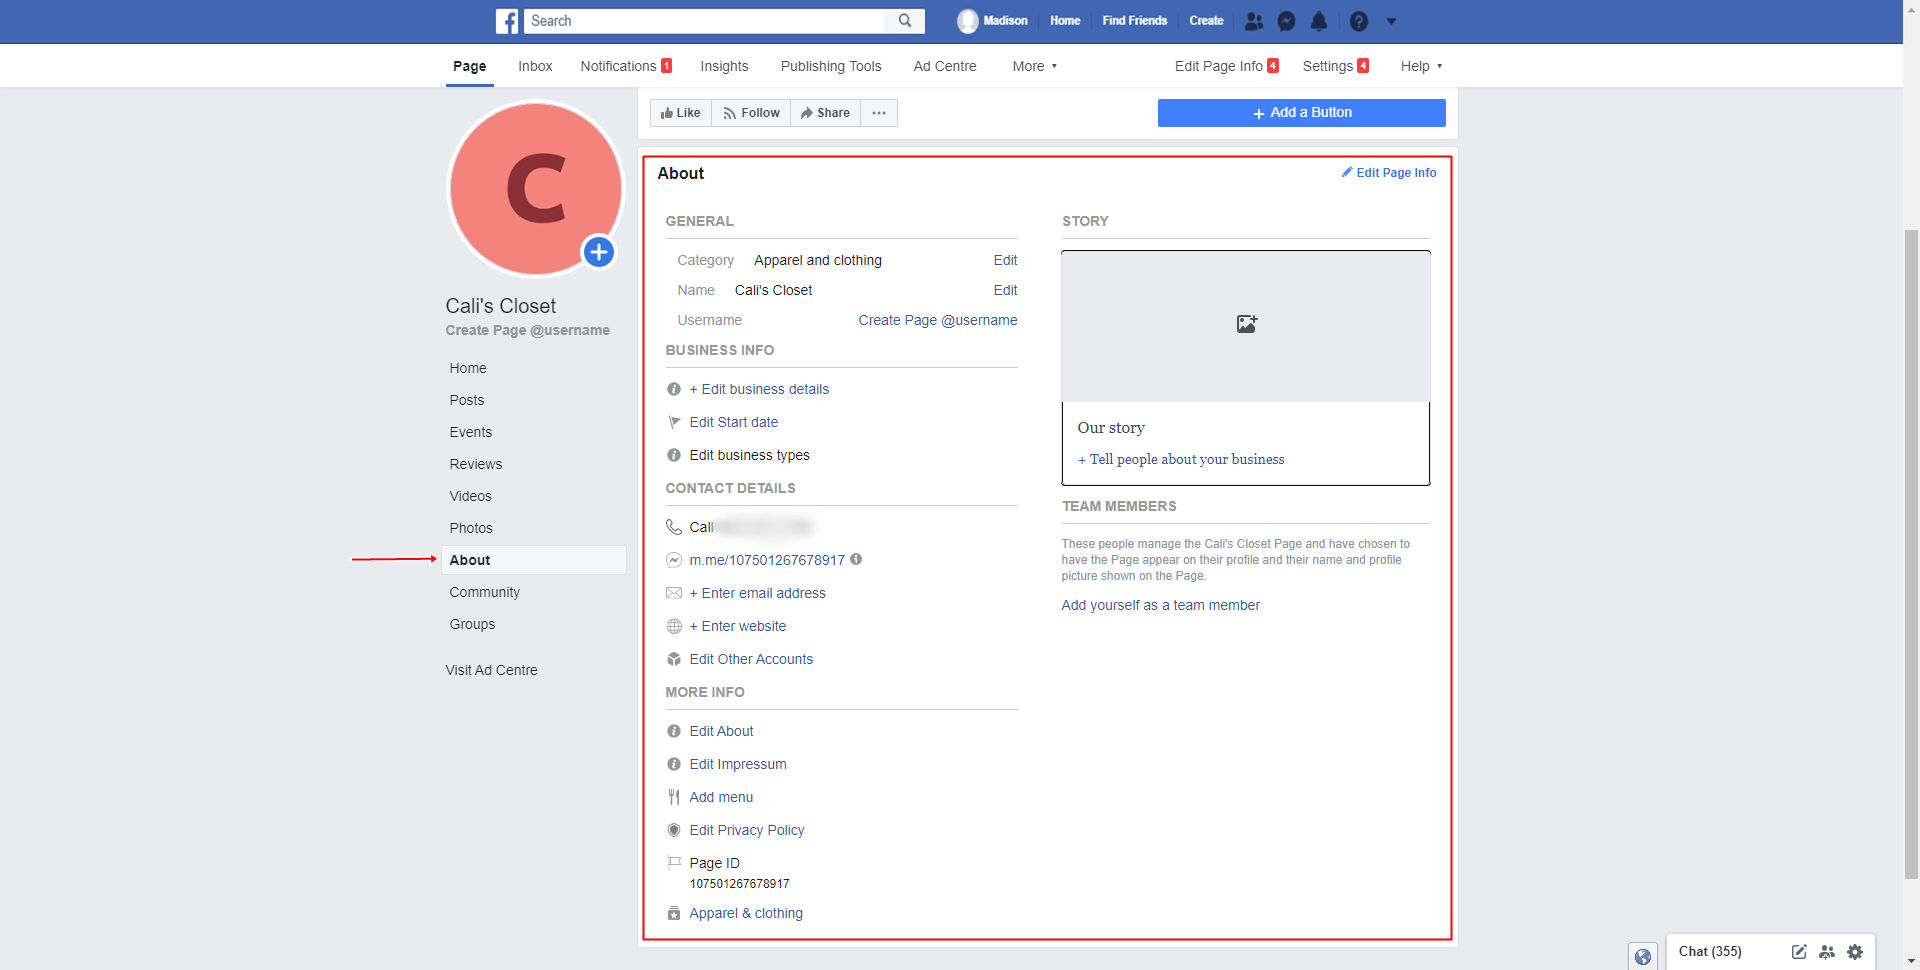
1. Under your profile picture, you may need to click See More, then click on “About.”
2. Edit all information that you want your visitors to see. The attached screenshot below (fb-page-business-information-2) shows all fields that you have to fill out. Note that the more valuable information you put, the more comfortable it is for people to discover you through organic search.
Guide in filling out business information:
General
● You can edit your business category, business name, and username.
Business Info
● Edit business details: this option may or may not appear depending on your business category.
● Edit start date:
● Edit business types: select whether your business sells good or it just represents a company.
Additional Contact Info
● Enter email: enter your business email here.
● Enter website: link your website here if you have,
● Enter other accounts: link other social media accounts of your business here.
More Info
● Edit About: You can add a short description (155 characters) about your business. This will be picked up by the search engine, so make sure you describe it with proper keywords.
● Edit Impressum: You can use this to write a more elaborate description of your business. This is not required unless you are in specific countries where it’s required by law. It must contain your business name, address, contact information, name of owner and manager of page, registration or license number, and links to your company’s Terms of Conditions pages.
● Edit Company Overview: Enter a good overview about your company- what you do, what you offer, and whom you offer your services.
● Edit General Information: Enter your business’ general information.
● Edit Founding Date: Put your business’ founding date.
● You can also add your awards, products, or menu list, product transit, and edit your privacy policy.
Story
● Our story: This is a long description of your company. You can include the founding story, and your vision, mission, goals, and values.
● Add a button: You can add a call to action for your page. When you click this, you will open a Popup, and there will be guides and steps on how to create a call to action button for your business page. This is excellent if you want to redirect visitors to your business website to make a purchase.
After adding your business information, it’s time to add your teammates.
III. Add Your Team and Manage Page Roles
It is wise to have a team of editors and administrators that can help manage, monitor, and engage with your audience. If you are the only admin of your page, you will have to worry about scheduling posts, changing images, replying to comments and feedback, messaging people, accessing your ads, and many more. It’s wise to have help when it comes to your social media marketing. Having a team and assigning specific admin roles for each member is extremely useful for improving your page management and organization’s efficiency.

Below are the steps on how to add team members to your Facebook business page.
1. Go to your Facebook business page.
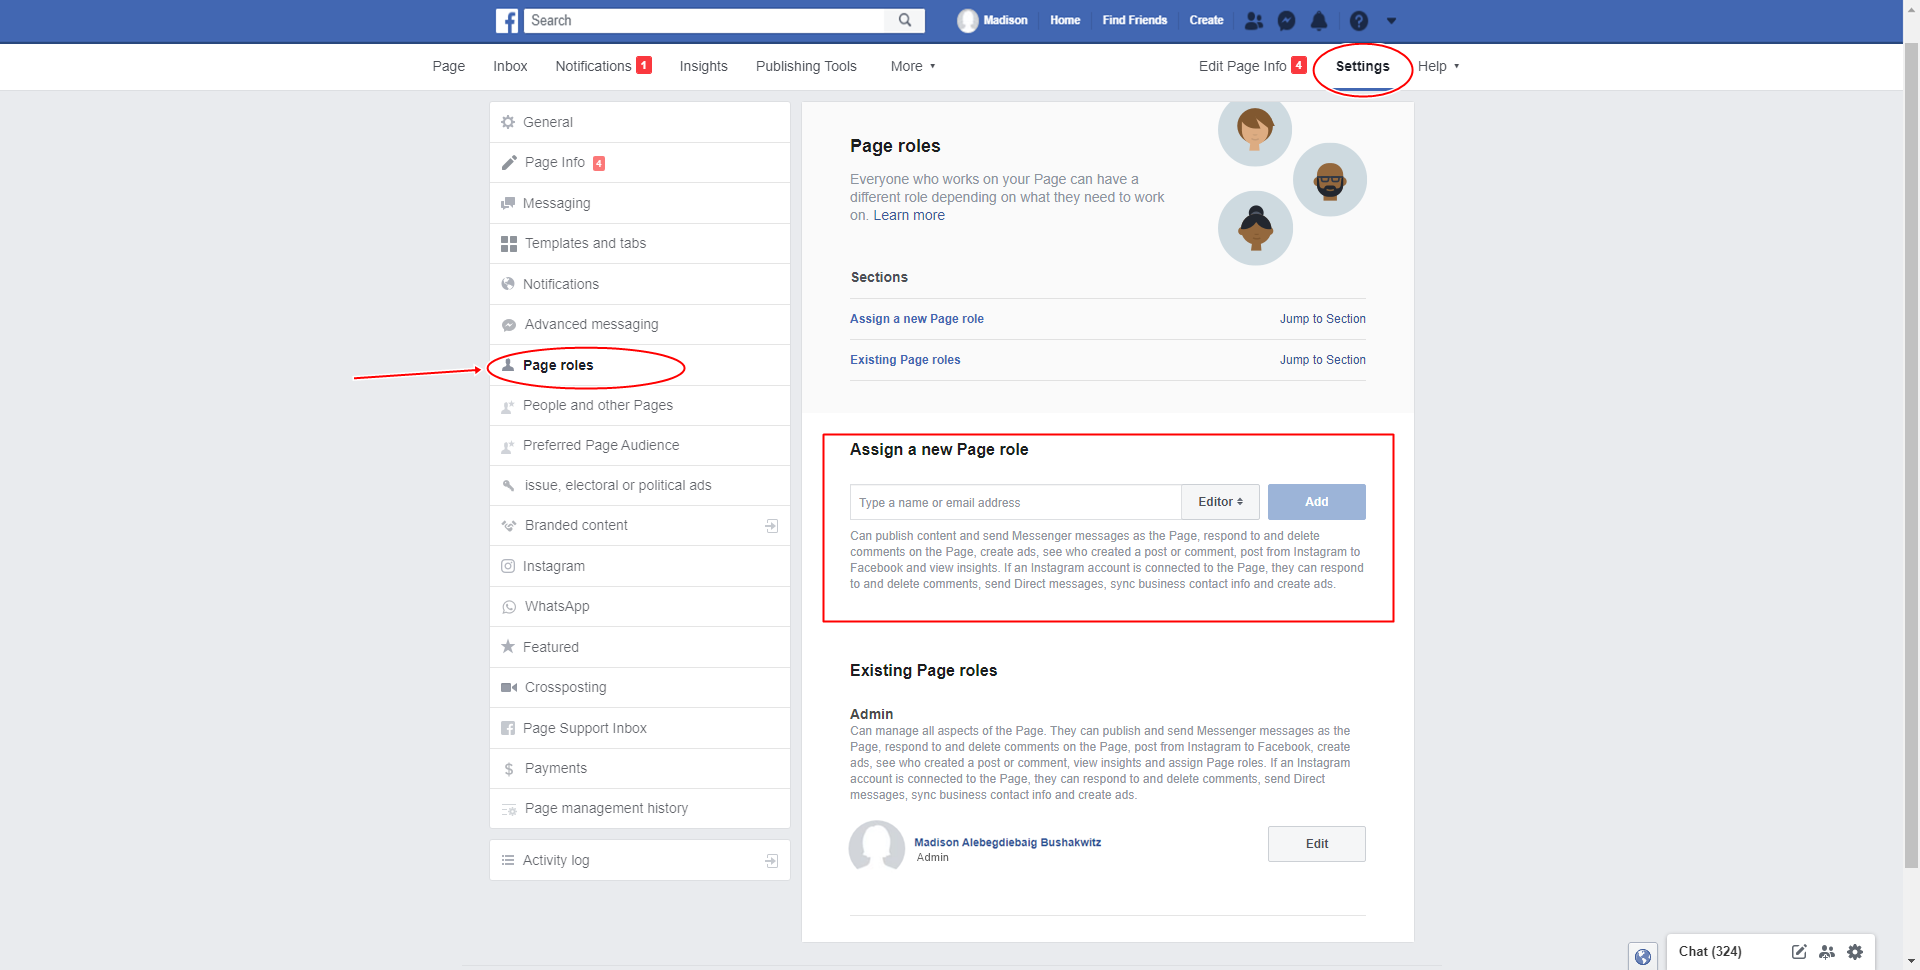
2. Look at the top-right corner; find and click on “Settings.”
3. Click on “Page Roles” on the left column.
You can add members whom you will entrust on managing your Facebook business page. Type in their names, assign their roles, and click “Add” to add them and confirm by typing in your password. Each member of your team will be notified and will gain access to your page, and features depending on their role.
Note that the person you will add must have a personal Facebook account.
The Different Page Roles:
Admin: When you create the page, you are automatically the admin. Only an admin can add a team and assign roles. This is also the most potent role because an admin has overall control over the Facebook page. That’s also why you should only assign an admin role to a person whom you completely trust.
Editor: Reserve this role for someone who can manage your Facebook page’s daily activities and postings. They share the same features and access as admin roles, except adding and managing page roles and adjusting the page’s settings.
Moderator: They are engagement officers. Moderators can only reply to comments, make ads, boost content, view insights, and ban people.
Advertiser: Advertisers monitor ads, promotions, and boosted posts for the page.
Analyst: They can only view insights and see who publishes on the page. This role is reserved for someone who can analyze the ideas and page quality.
Jobs Manager: They can only create ads, view insights, manage and publish jobs, and turn on job features on a post.
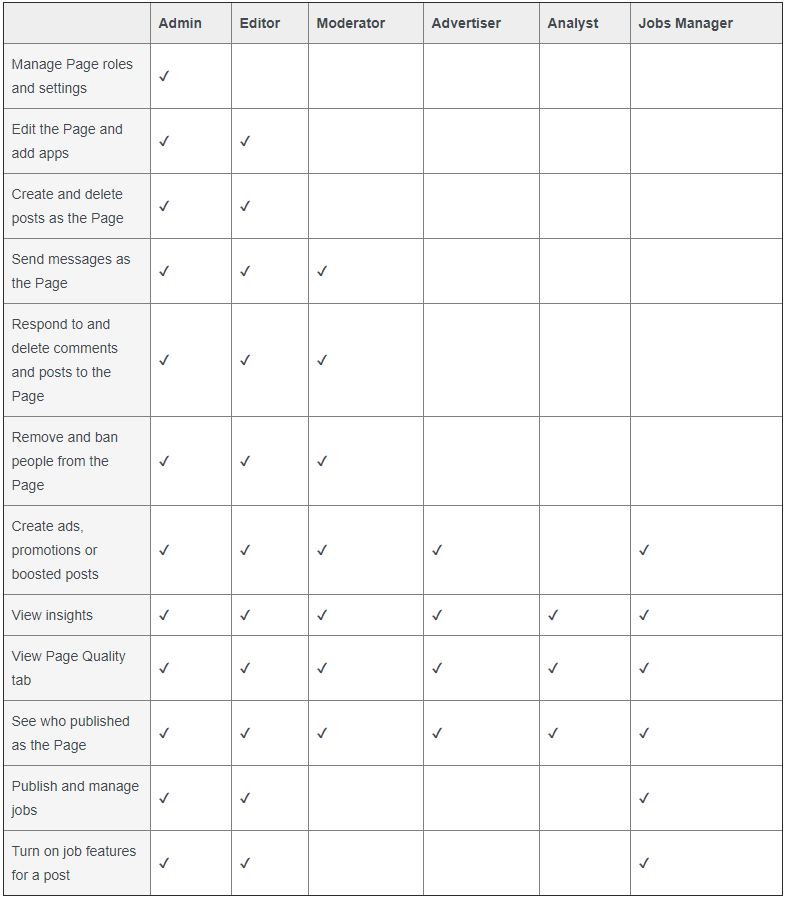
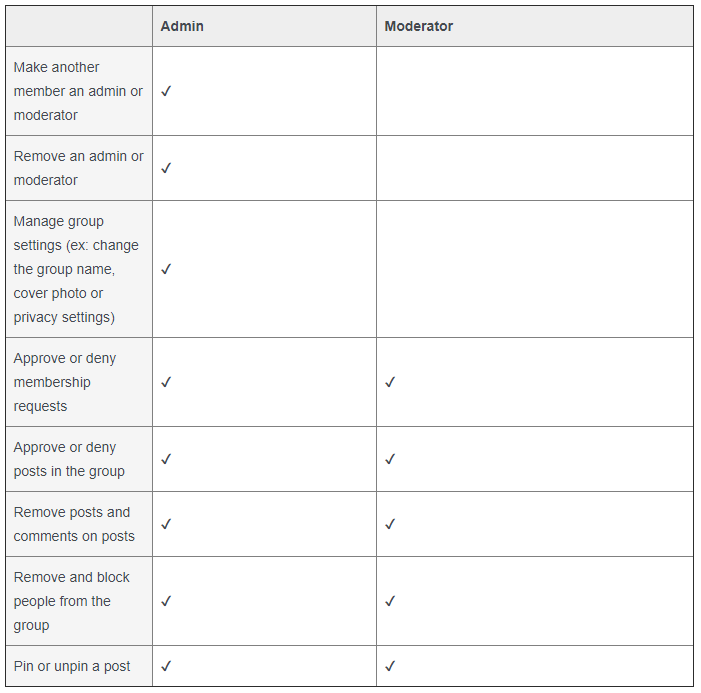
The table below (fb-page-roles) shows the 6-page roles and what they can do.
You can also read more about page managing and page roles here: https://www.facebook.com/help/1206330326045914/?helpref=hc_fnav
You are done adding your team that will manage your page and brings your business to new heights. Work towards your goals closely with them to bring efficiency and organization to your Facebook page.
If you haven’t added your business’s profile and cover photo, now is the time.
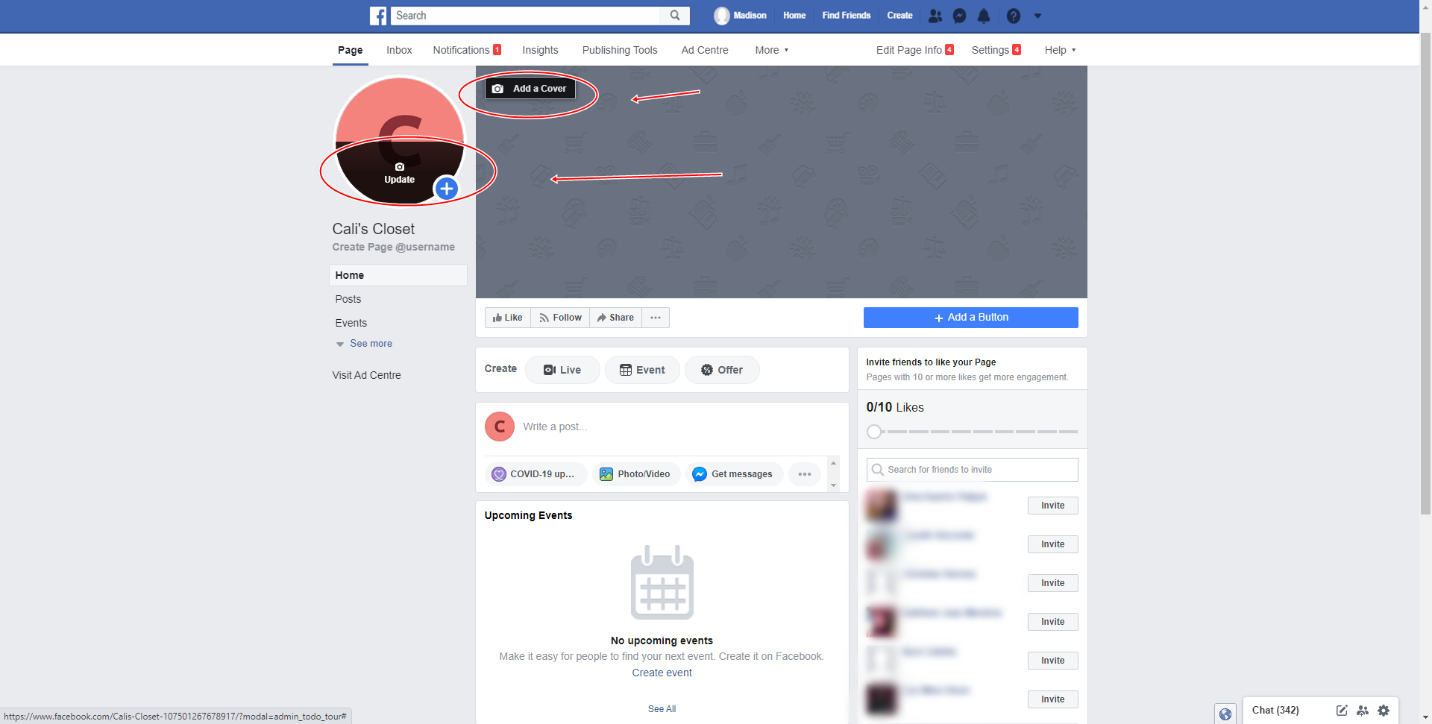
IV. Add Your Profile and Cover Photo
Your page’s profile and cover photos are the first things that will catch your visitor’s eye. This will also be the one to appear whenever you engage with your audience, whether you are commenting, replying, or looking in search results. Profile and cover photos create an impression. It may be used to judge whether to leave your page or scroll more on it. It also gives sneak peek on what to be anticipated at your site. So, make your profile and cover photo attractive and adequately scaled.

Profile and Cover photos have their size specifications:
● Profile Picture: 180 x 180
● Cover Photo: 820 x 312
Your Facebook page is now fully set-up; you just have to get people to like and follow your page. A big audience boosts your brand’s credibility. Your next mission is to get people like your page and grow your social community.
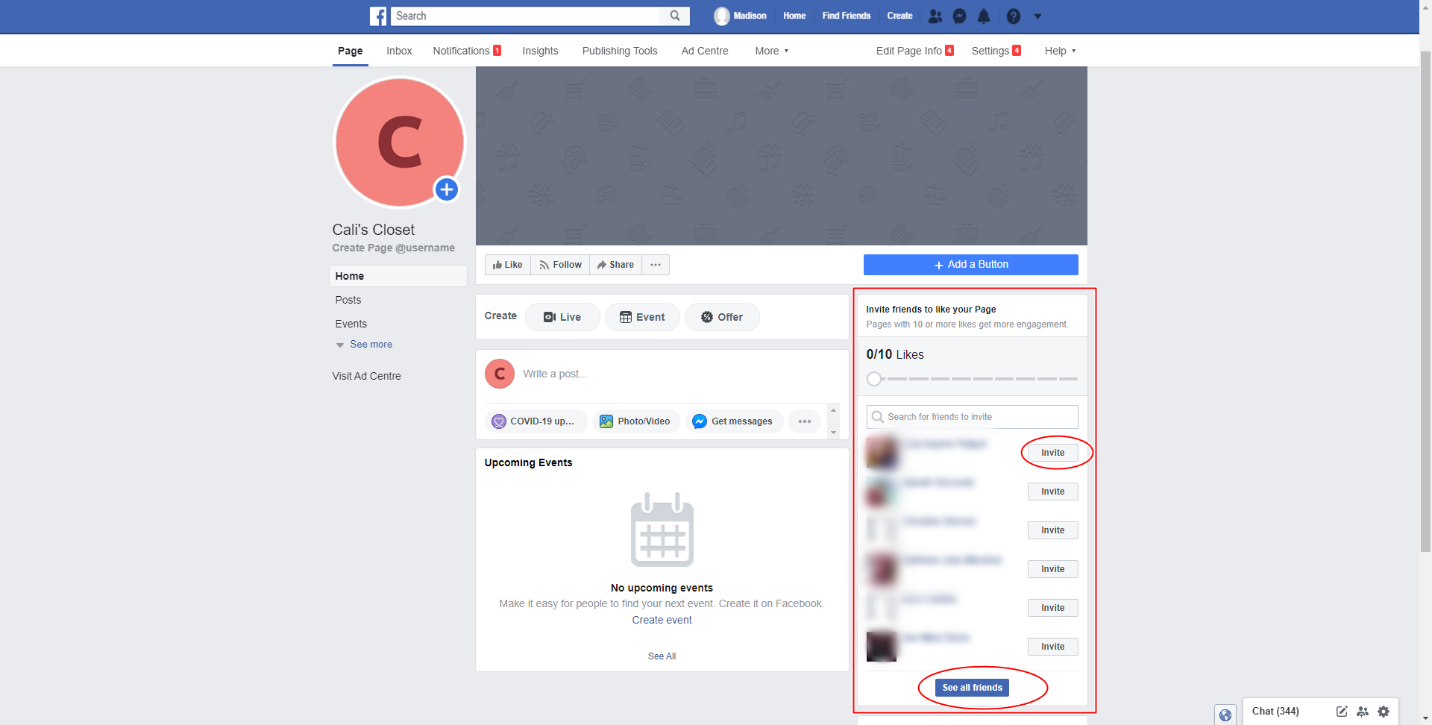
V. Inviting People You Know to Like and Follow your Page
Facebook likes drives business value, credibility, and business results. Start inviting people to like and follow your page. Start on your friend’s list. Your friends are your fans since they already know you and support you. Follow the instructions below:

1. Go to your page.
2. Find “Invite Friends to Like Your Page” and then click “Invite” next to your friend’s name.
3. Or enter your friends’ names and then click the box “Send Invites” next to their name.
You can also invite people who react to your posts. To do so, follow:
1. Find your posts with several react engagements.
2. Click the reaction sections to see the names of those who reacted to your post.
3. Click “Invite” to invite them to like your page.
Note: This works if your page has less than 100,000 likes.
Wait for them to accept the invitation to like your page, and you’re done with this section. Remember, however, that building a good relationship with your followers/likers is more important than the number of likes/follows.
Your next step now is to create a custom username for your Facebook business page.
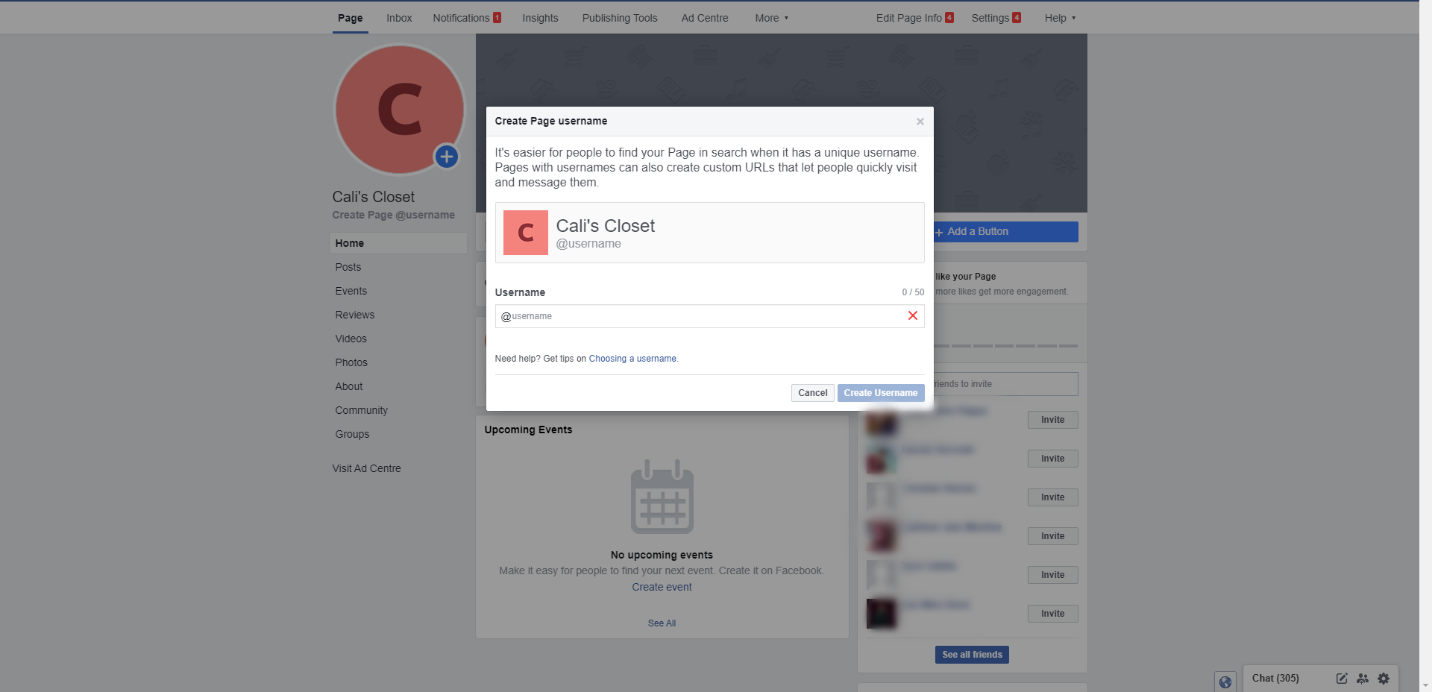
VI. Create a Custom Username
Do not be content with the default username Facebook gave you. Having a custom username makes it easier for people to search and recognize your business. It will help your page rank better in searches. Without a custom username, your page might be a little difficult to find, and people may eventually give up on looking for you and may start following your competition. Your username will also appear in your page URL, so make it straightforward and straightforward. An example of a username is @CaliCloset if your page name is Cali’s Closet. Follow the steps below to create your custom username.

1. Go to your page.
Note: You need to be an admin to create a username.
2. On the left side of your page, click “Create Page @Username.”
3. Enter your username.
4. Click “Create Username.”

Your username must be unique because usernames cannot be identical to others. Make sure that you follow the Facebook guidelines for custom usernames. Some important notes:
● Usernames must only contain alphanumeric characters and periods (“.”).
● Usernames must be at least five characters long.
● Usernames shouldn’t impersonate someone else.
● Periods and capitalization do not differentiate usernames. For instance: CaliCloset and Cali. Closets are considered the same.
Read more about Facebook Username Guidelines here: https://www.facebook.com/help/105399436216001.
Congrats on your custom username. Use it well because it is a key aspect for your business to have easy search-ability, get higher search ranking, and get you more followers and potential customers.
Now, it’s time to create and select the best call-to-action button for your business page.
VII. Use a Correct Call to Action Button
If your Facebook business page’s goal is more than just getting likes and comments, you should create a Call to Action button. It is a button specifically designed to bring the most important objective a business has. It will link users to any destination, on and off Facebook. It adds functionality, and with it, you can direct your page’s visitors to shop on your website, book a reservation, and more. Below are simple steps to add your Call to Action buttons:
1. Go to your Page.
Note: You must have a Page role that allows you to
2. Below your cover photo, click “+Add a Button.”
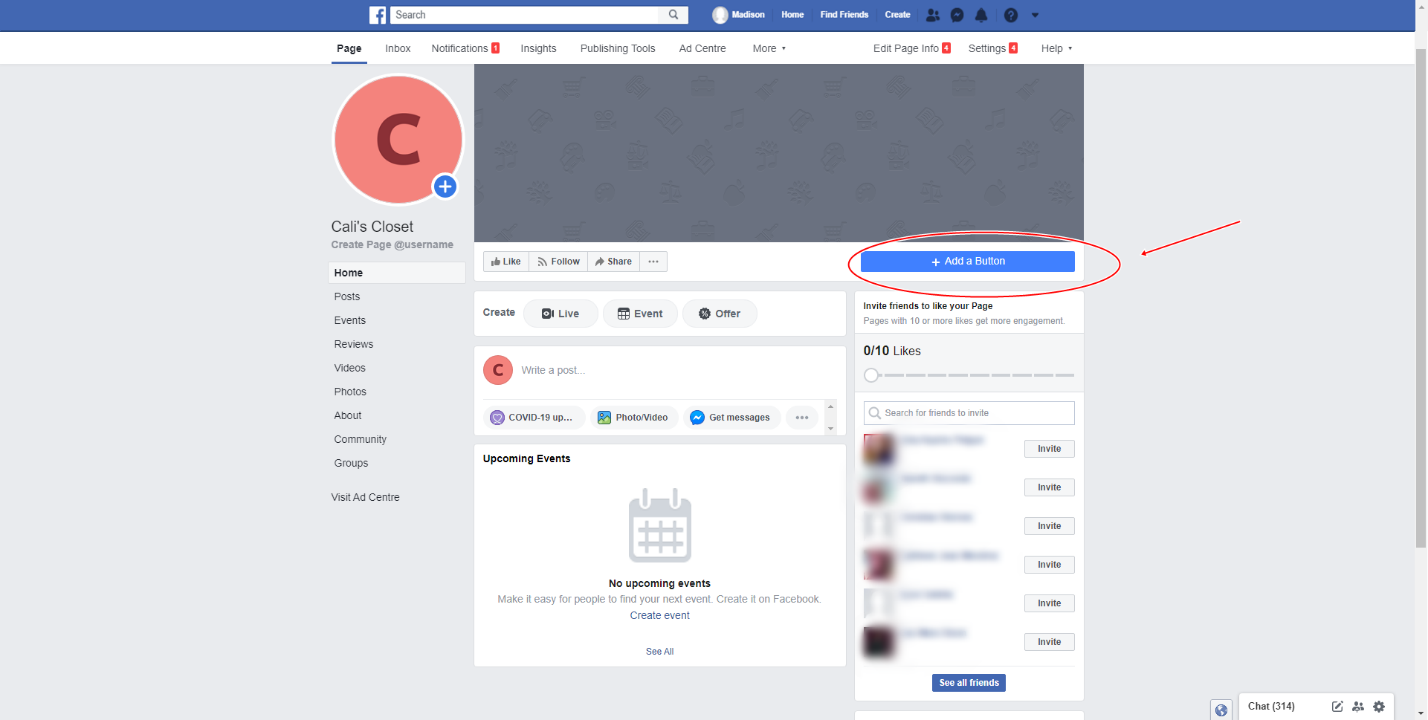
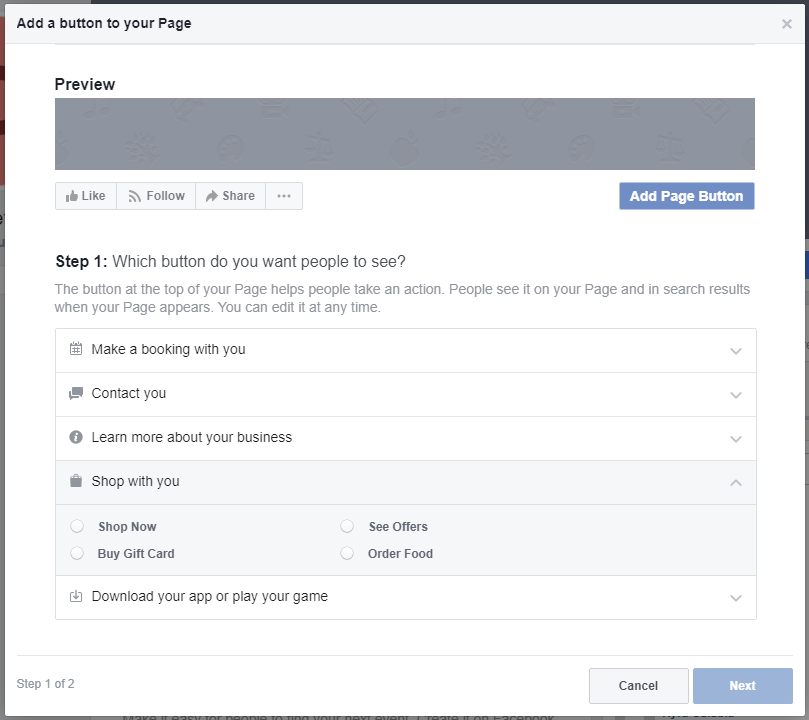
1. Select a button from the dropdown menu (see: fb-page-add-button-2). Select the one that fits your goal. For example: if you want people to purchase from your shop, click “Shop with You.” You can further customize the button by answering questions and following the on-screen instructions.
2. Click Finish.
Once your Call to Action button has been created, you can test it:
1. Click your Call to Action button.
2. Select the Test Button.
Congratulations, your Facebook business page is all-set. You can now begin to architect your content to attract users, engage with them, and introduce your brand to the whole world.
Facebook Group
Introduction
Facebook Groups are tremendously valuable and can have a huge impact in your marketing strategy. Groups allow you to showcase your products or services and your dedication to your customers. You can build a social community where your customers can interact with you and the other members. They can share their experiences, and their reviews, which add to word-of-mouth marketing. They can also write their feedback and can ask questions. By interacting with them, you generate network opportunities, and you are forging personal connections. You are building a sense of community that can keep your customers coming.
In Facebook groups, there is better engagement and reach. Groups can increase visibility and commitment because the chances of users seeing your posts are higher. After all, the group falls in the area of the user’s interest. A watch party feature is also a feature of Facebook videos to utilize. Members of the group get notifications to watch the video. This increases your video engagement and organic reach.
To secure that your group members stay connected, you can run various giveaways and contests, or organize events on your Facebook group. These activities can ensure customer retention and can excite your followers.
Explore Facebook Groups and how it can help you market your brand and improve your Facebook presence. In this section, we’ll teach you how you can set up your business’s Facebook Group.
I. Creating your Business’s Facebook Page
Facebook Groups is a place where your followers/customers can join and bond around. This is a place for healthy discussions and fun engagement. This can be a place where you can interact with your customers and share your products or talk about the services you offer. There are three types of groups with different privacy settings:

- Public Group: Anyone can join and view content.
- Closed Group: This group appears on search listings, but contents are hidden to non-members. To join, a person must wait for a moderator’s approval.
- Secret Group: The group doesn’t show up on the search results page, and one can only join through a member or a moderator’s invitation.
Each of these has its advantages. A public group is accessible, hence, a more significant opportunity to grow your membership base. Making your Facebook group exclusive has strong points too. The community within tends to be more reliable and more authentic because members get that feeling that they are unique. See what works for your business. You can try creating and managing a public group for a few months and then change it to closed or private—Compare, which offers better results.
Should you decide to create a Facebook group for your business, follow the steps below:
1. Click “Create” on your top menu and then click on “Group.”
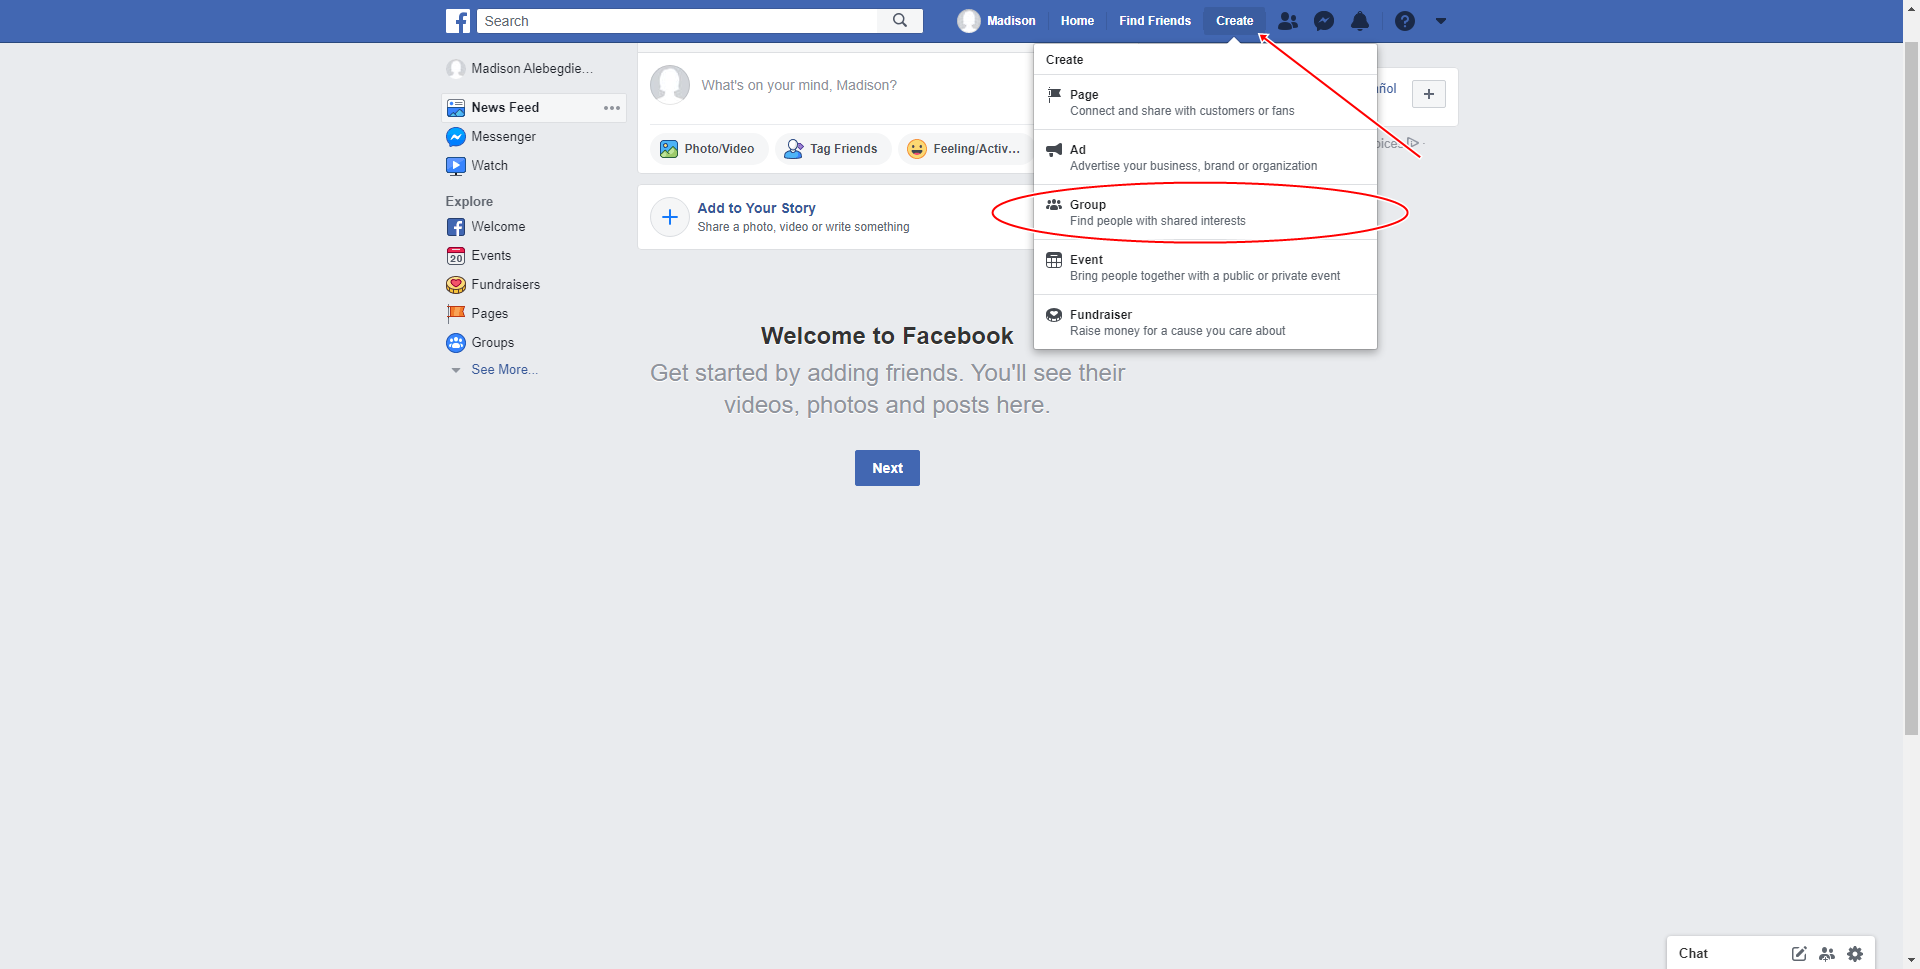
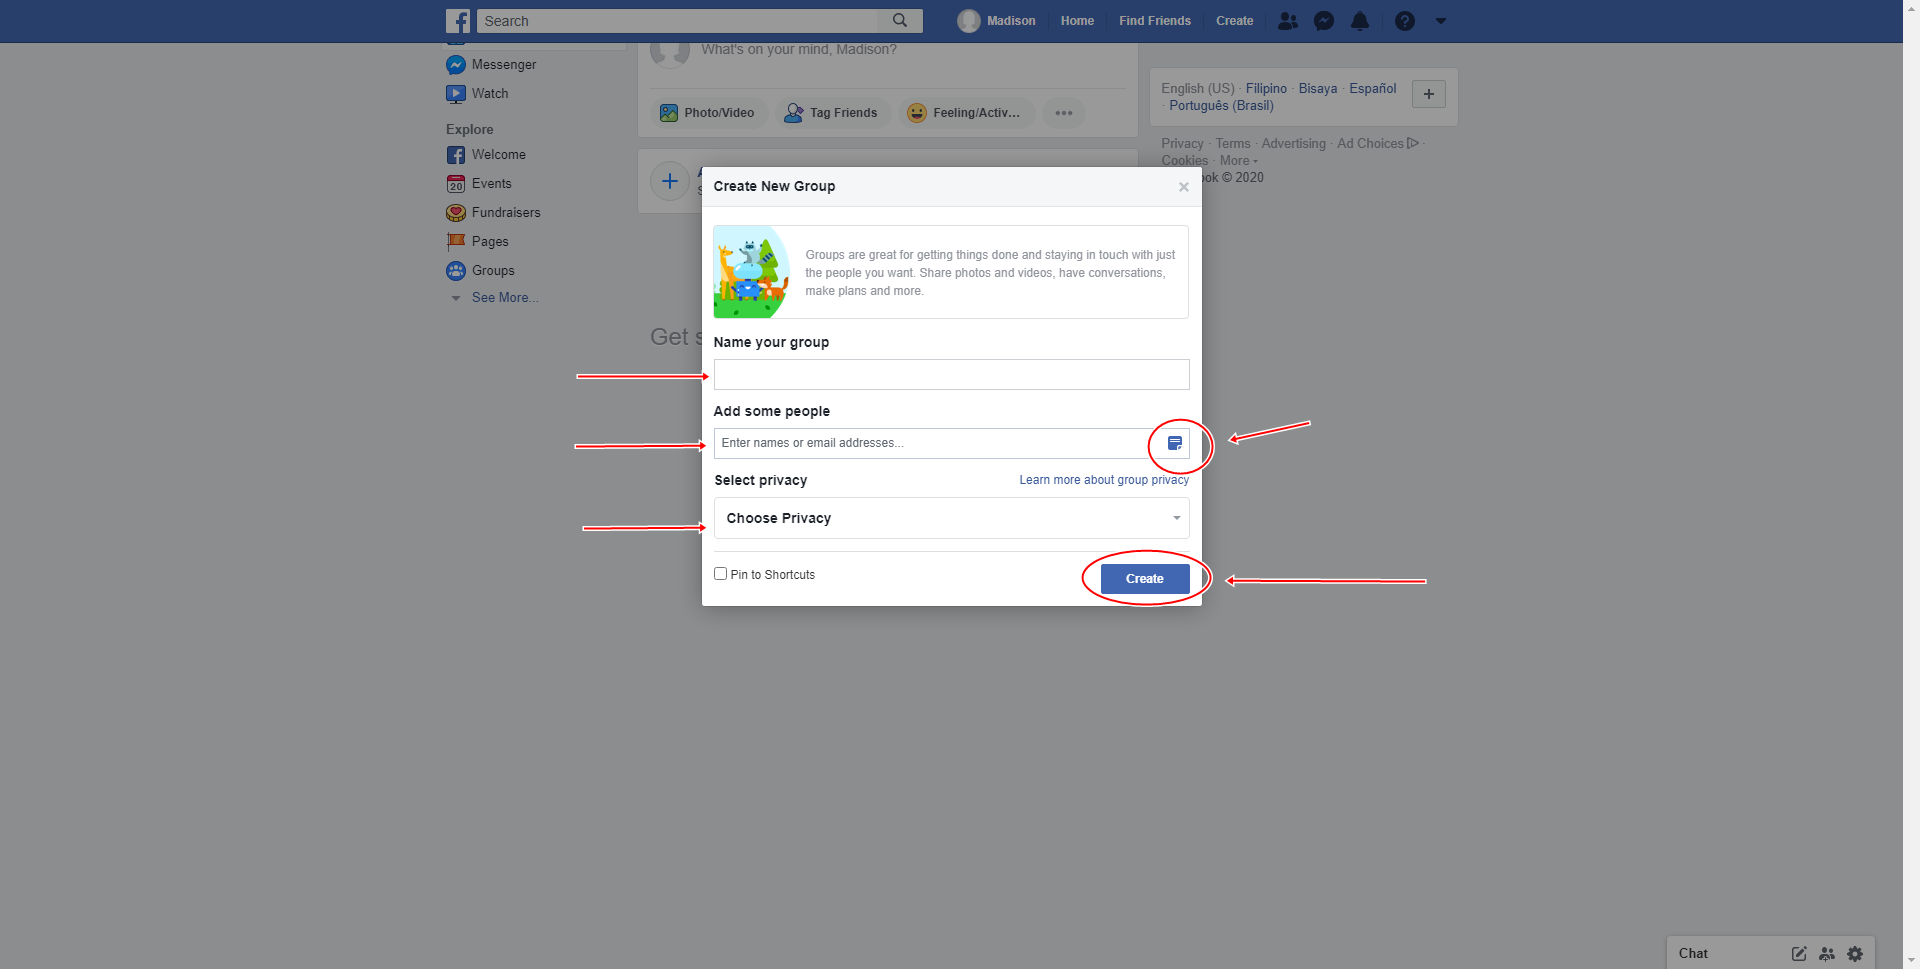
2. Name your group and add some people.
You also can personalize your invite note by clicking on (optional but encouraged).
3. Select your privacy setting as well. Choose between:
● Public: everyone can see the member list and contents.
● Private: only members can view the member list and contents.
Note that if you choose a private setting, it can’t be changed to public. This complies with Facebook’s data privacy policies. Learn more on https://www.facebook.com/help/286027304749263?ref=learn_more.
Group admins, however, can choose to make their groups visible or hidden.
4. Click “Create.”
5. Upload a good cover photo, and set a sensible but straightforward description.
It is necessary to indicate your group’s purpose and any general rules and policies, so people know what to expect in your group, and how they should behave.
6. Click on “Moderate Group” on the left menu.
7. Click on “Create Rules.” Read the sample rules so you can have an idea of what to set.
8. Click on “Get Started.”
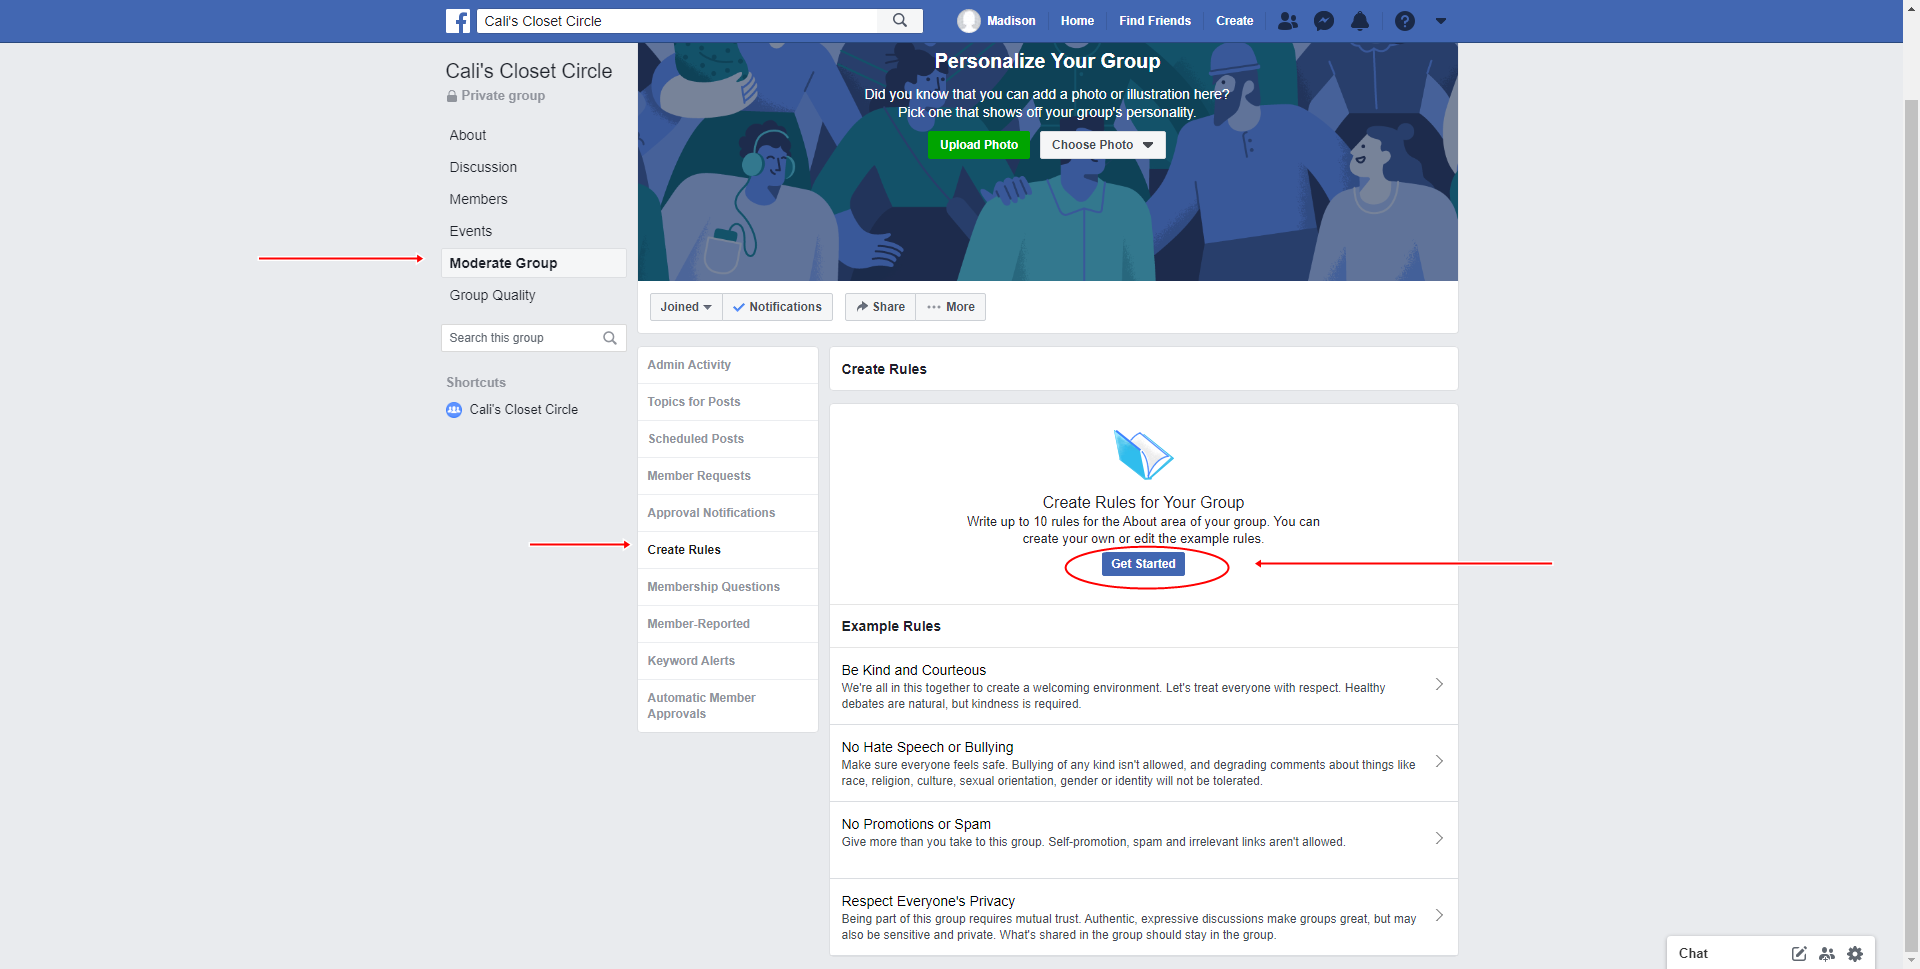
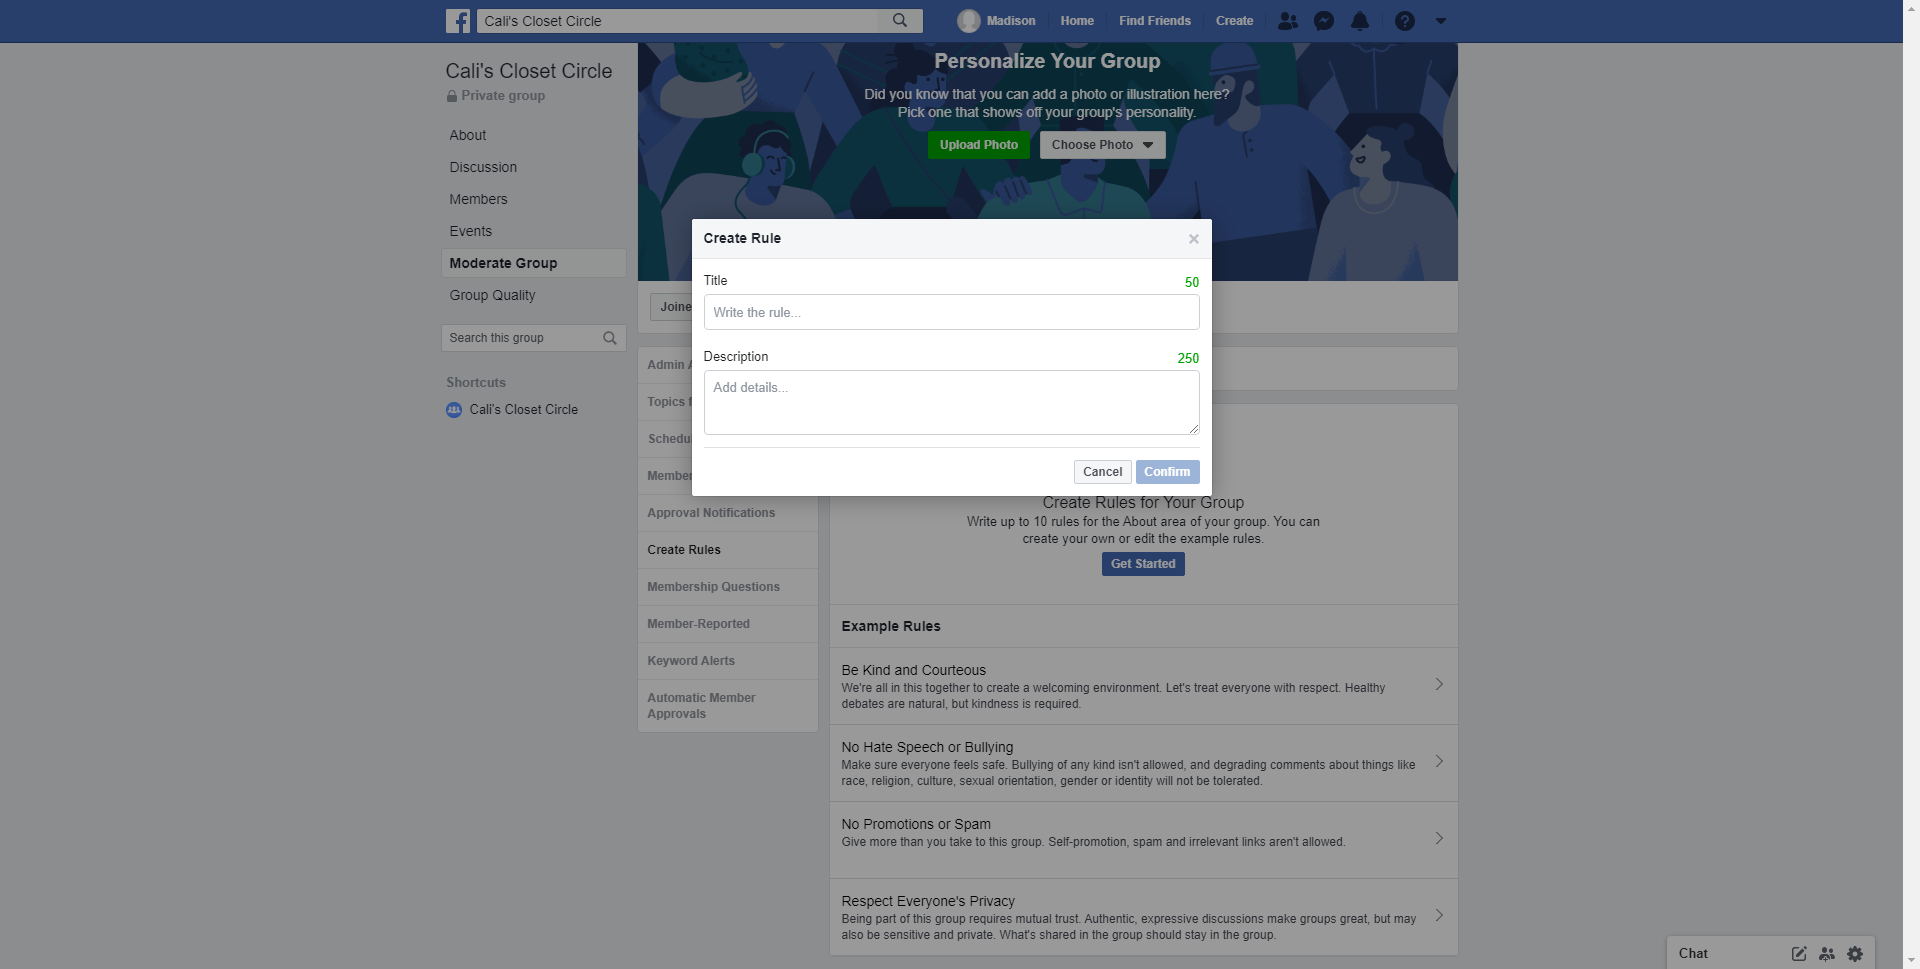
9. Write your rules. Limit the title to 50 characters and your description to 250 characters. You can add more, edit, and remove later.
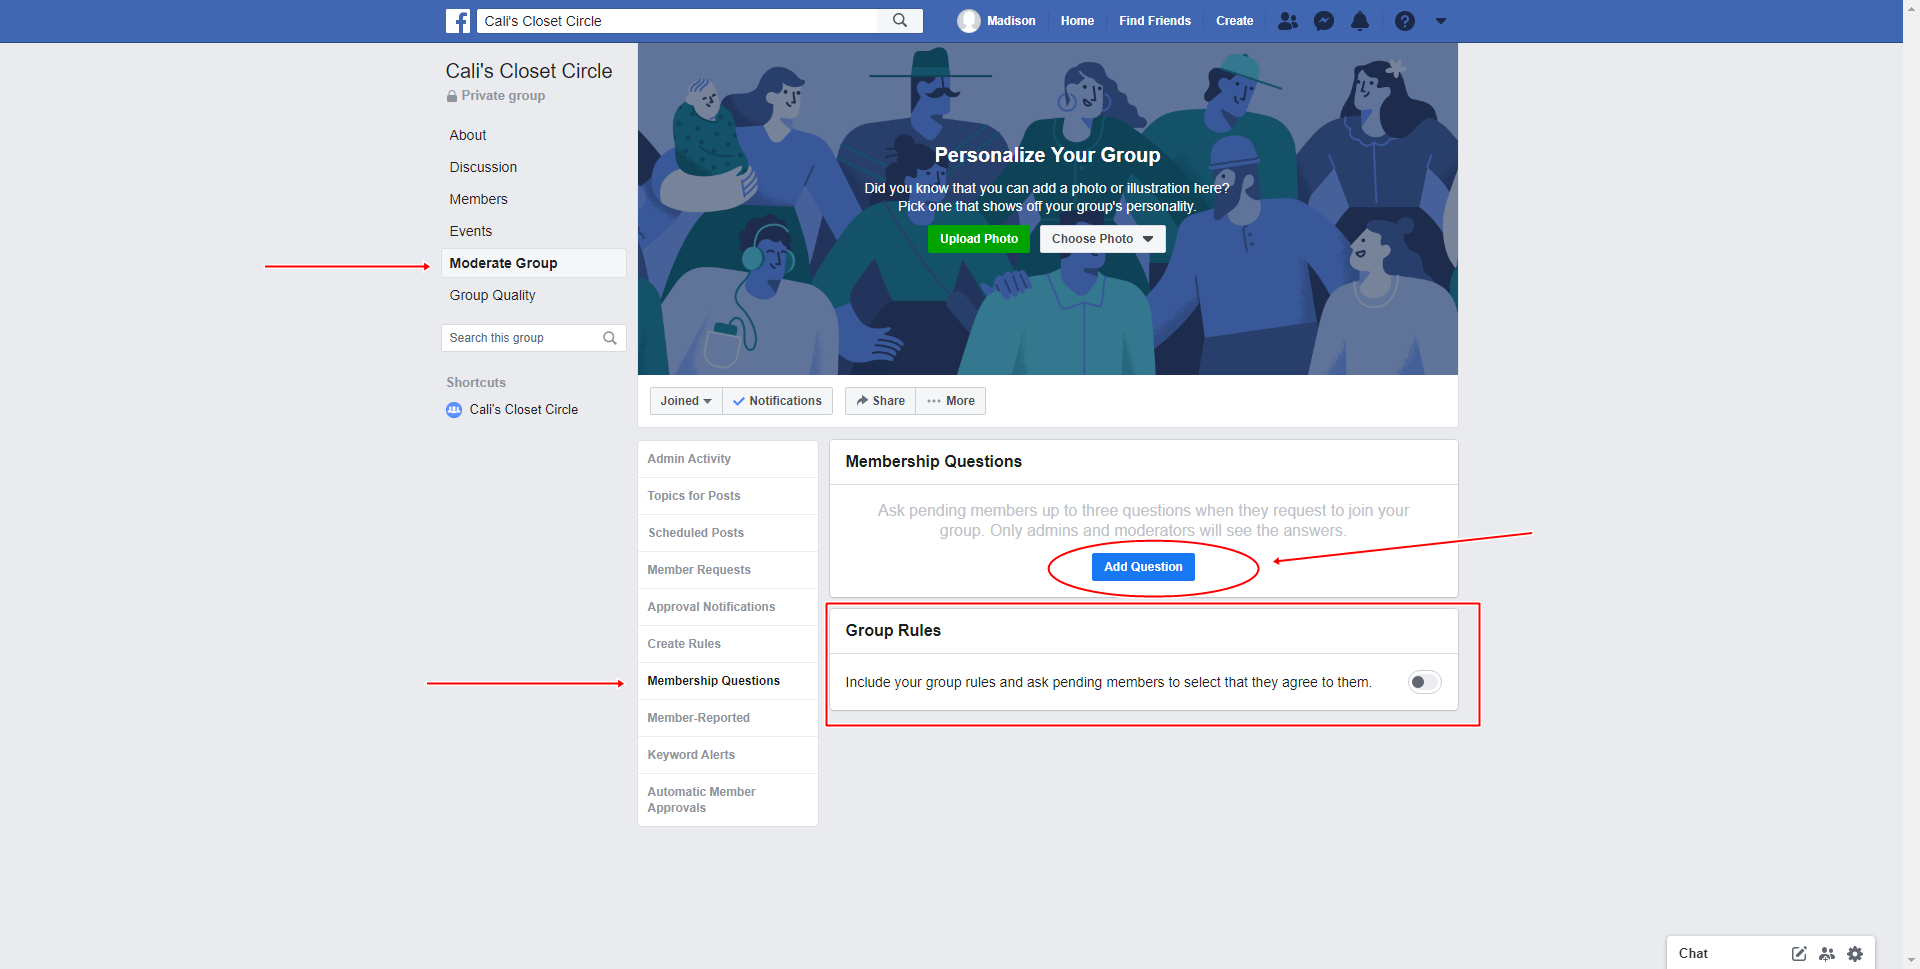
You can also set membership questions to screen potential members. This will ensure that they are fit for the group and contribute healthily to the discussion, not just spam.
10. From the Moderate Group, click on “Membership Question.”
11. Click on “Add Question.”
12. You can also enable Group Rule that includes your group rules and asks pending members to agree.
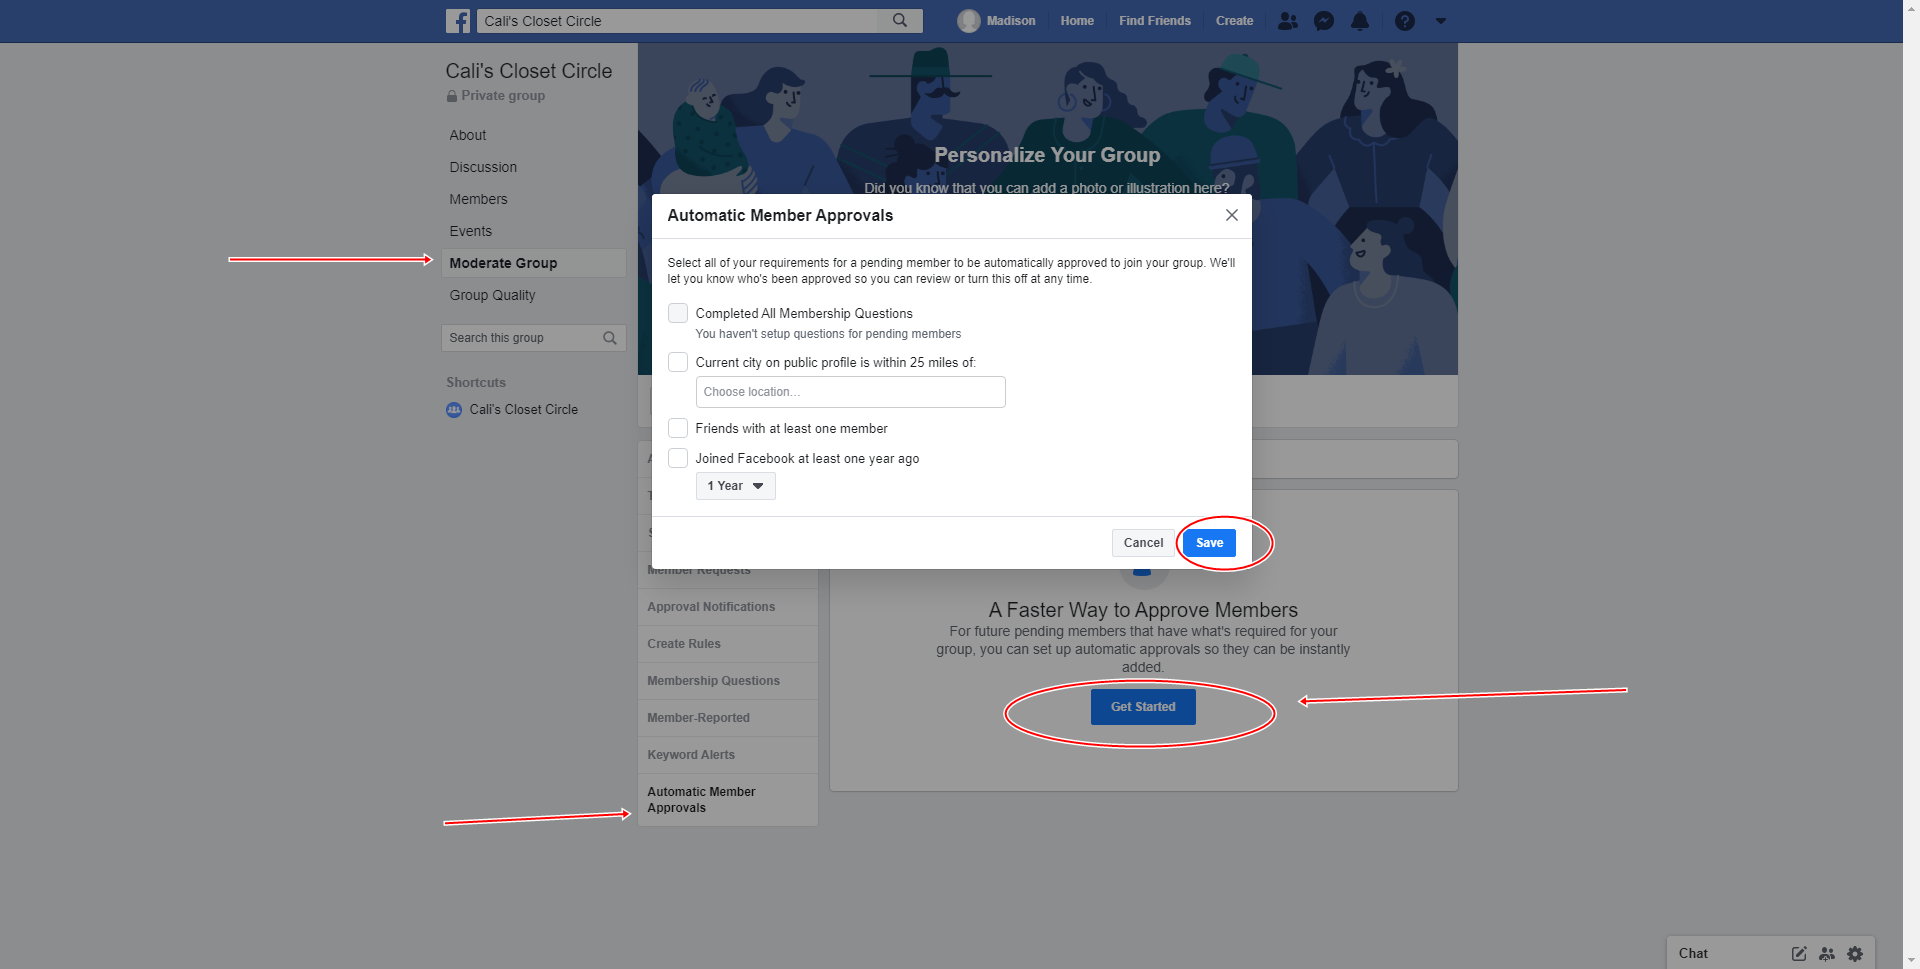
If you feel that screening bulks of new membership requests will take up too much of your time and do not have the workforce to screen them all and approve them manually, you can make the membership approval automatic by setting up conditions. Checking new membership requests is time-consuming for admins.
13. From the Moderate Group, Click on “Automatic Member Approvals.”
14. Click “Get Started.”
15. Select all of your requirements for a pending member to be automatically approved to join your group.
16. Click “Save.”
Your Facebook Group has been created. Just like the Facebook page, managing everything is a bit stressful and too much for one man. It’s wise also to add admins and moderators in your group. The next section would be about adding your team/friends that will help you manage the group.
II. Adding Admins and Moderators

To make someone an admin, he or she must be a member of the group.
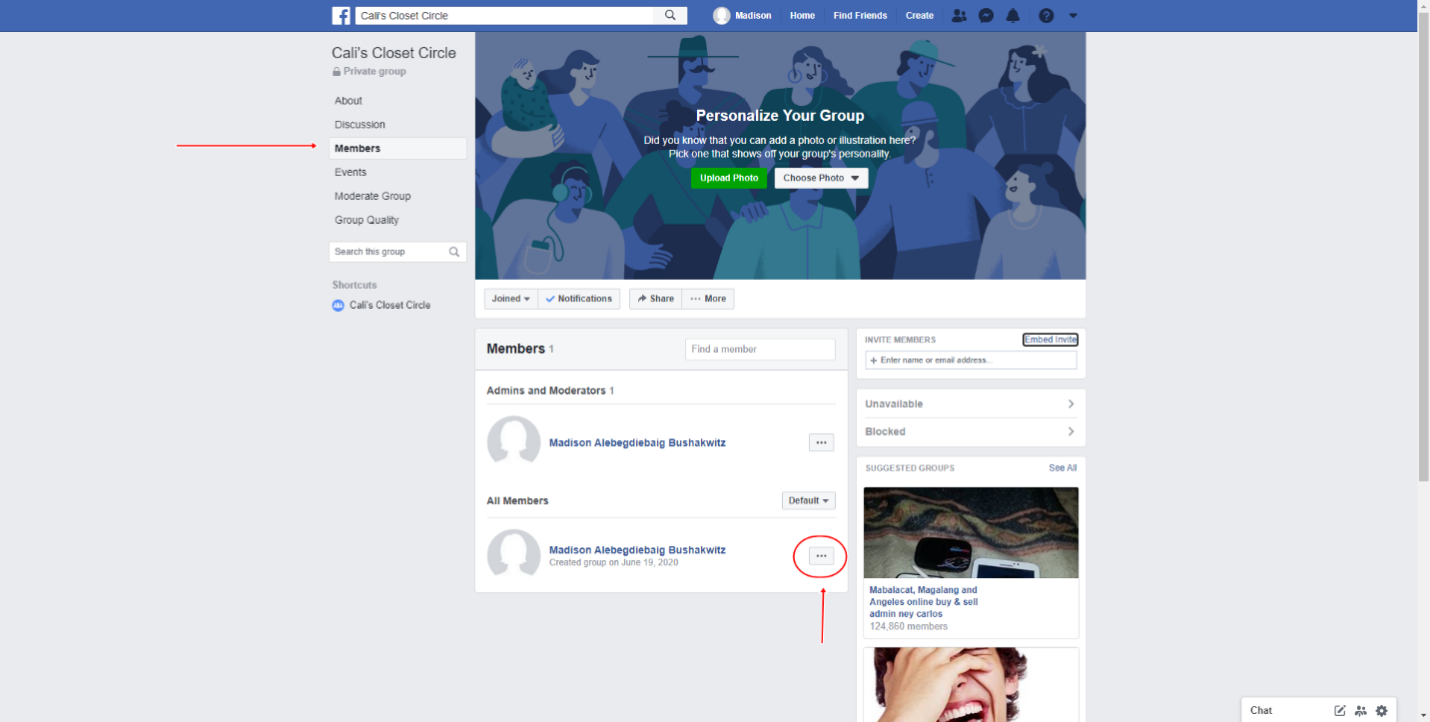
1. Click Members on the left menu, just below your group’s photo.
2. Click the button next to the person that you want to make an admin or moderator.
3. Select “Make admin” or “Make moderator.”
See the attached photo (fb-group-admin-moderator) below to know the difference between the two.
4. Click “Send Invite.”
Learn more on https://www.facebook.com/help/901690736606156
Your groups are almost set. Your next mission now is to add your Facebook page as an admin.
III. Add Your Facebook Page As An Admin
If you are an admin to both a page and a group, you can add your Facebook Page as an admin to your group. Vise versa, you can make a group with your page as an admin.

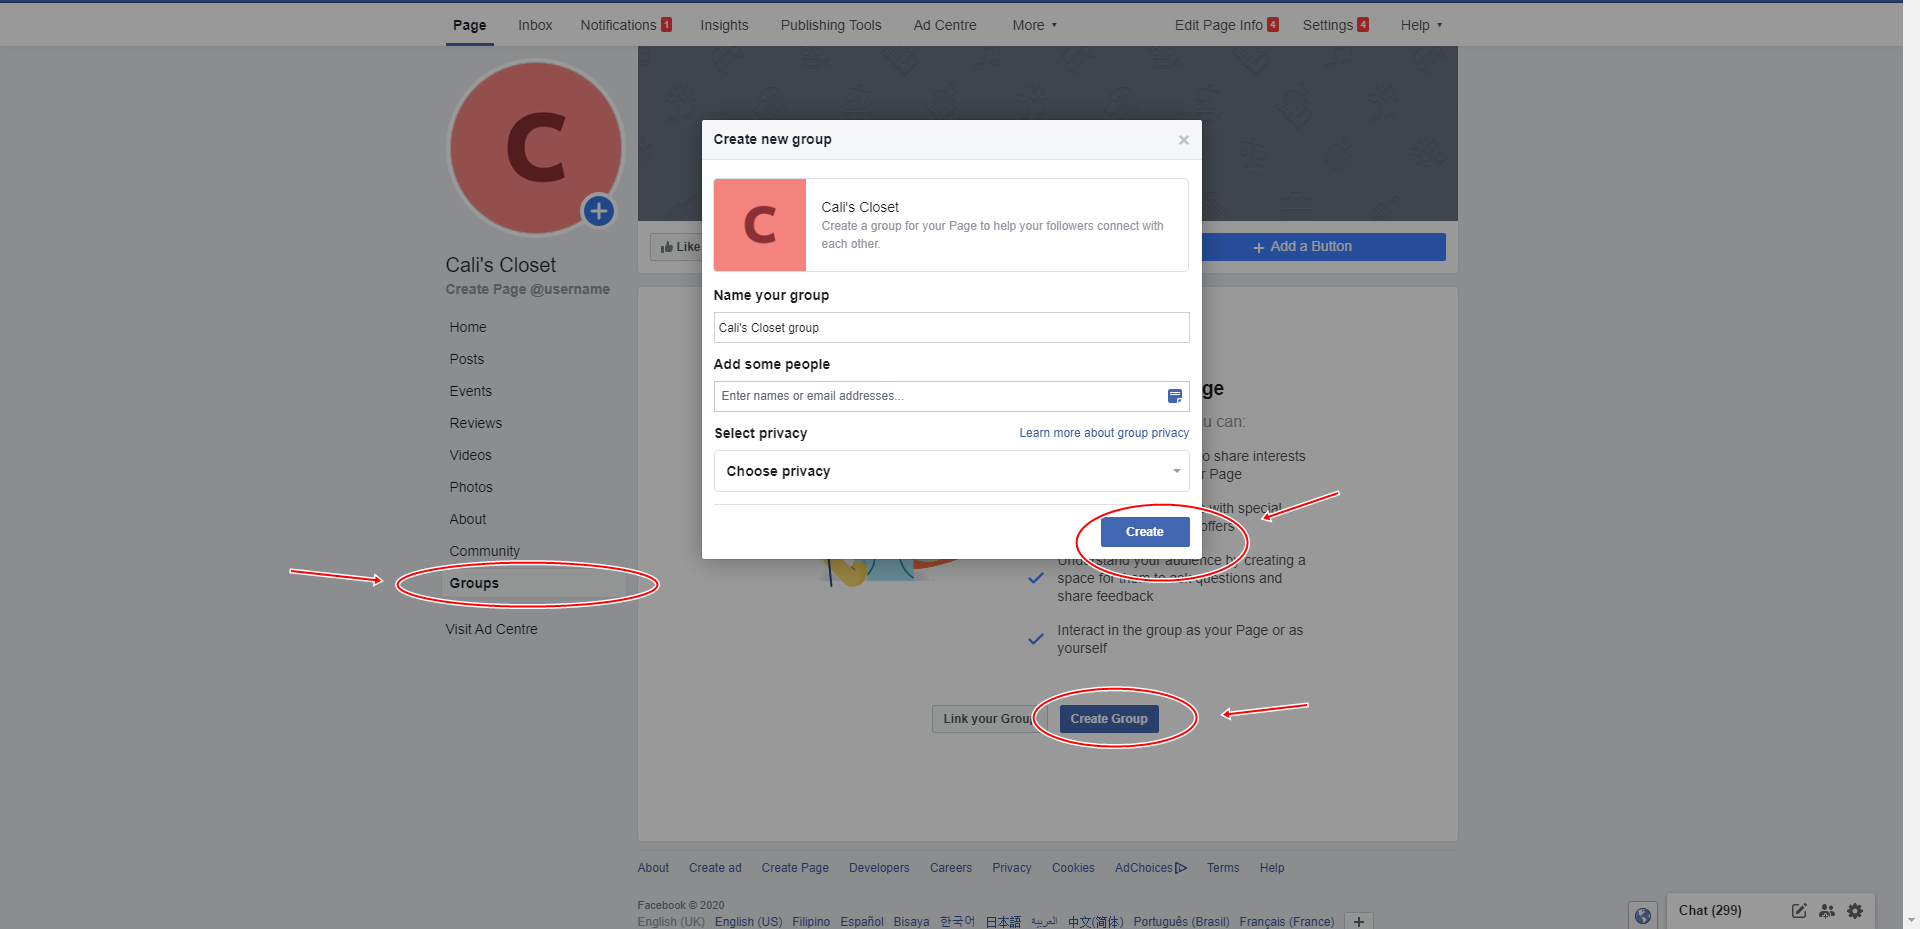
To create a group with your page as admin:
1. Go to your Page.
2. Click See More below your page photo, then click Groups.
3. Click “Create Group.”
4. Fill out the required fields.
5. Click “Create.”
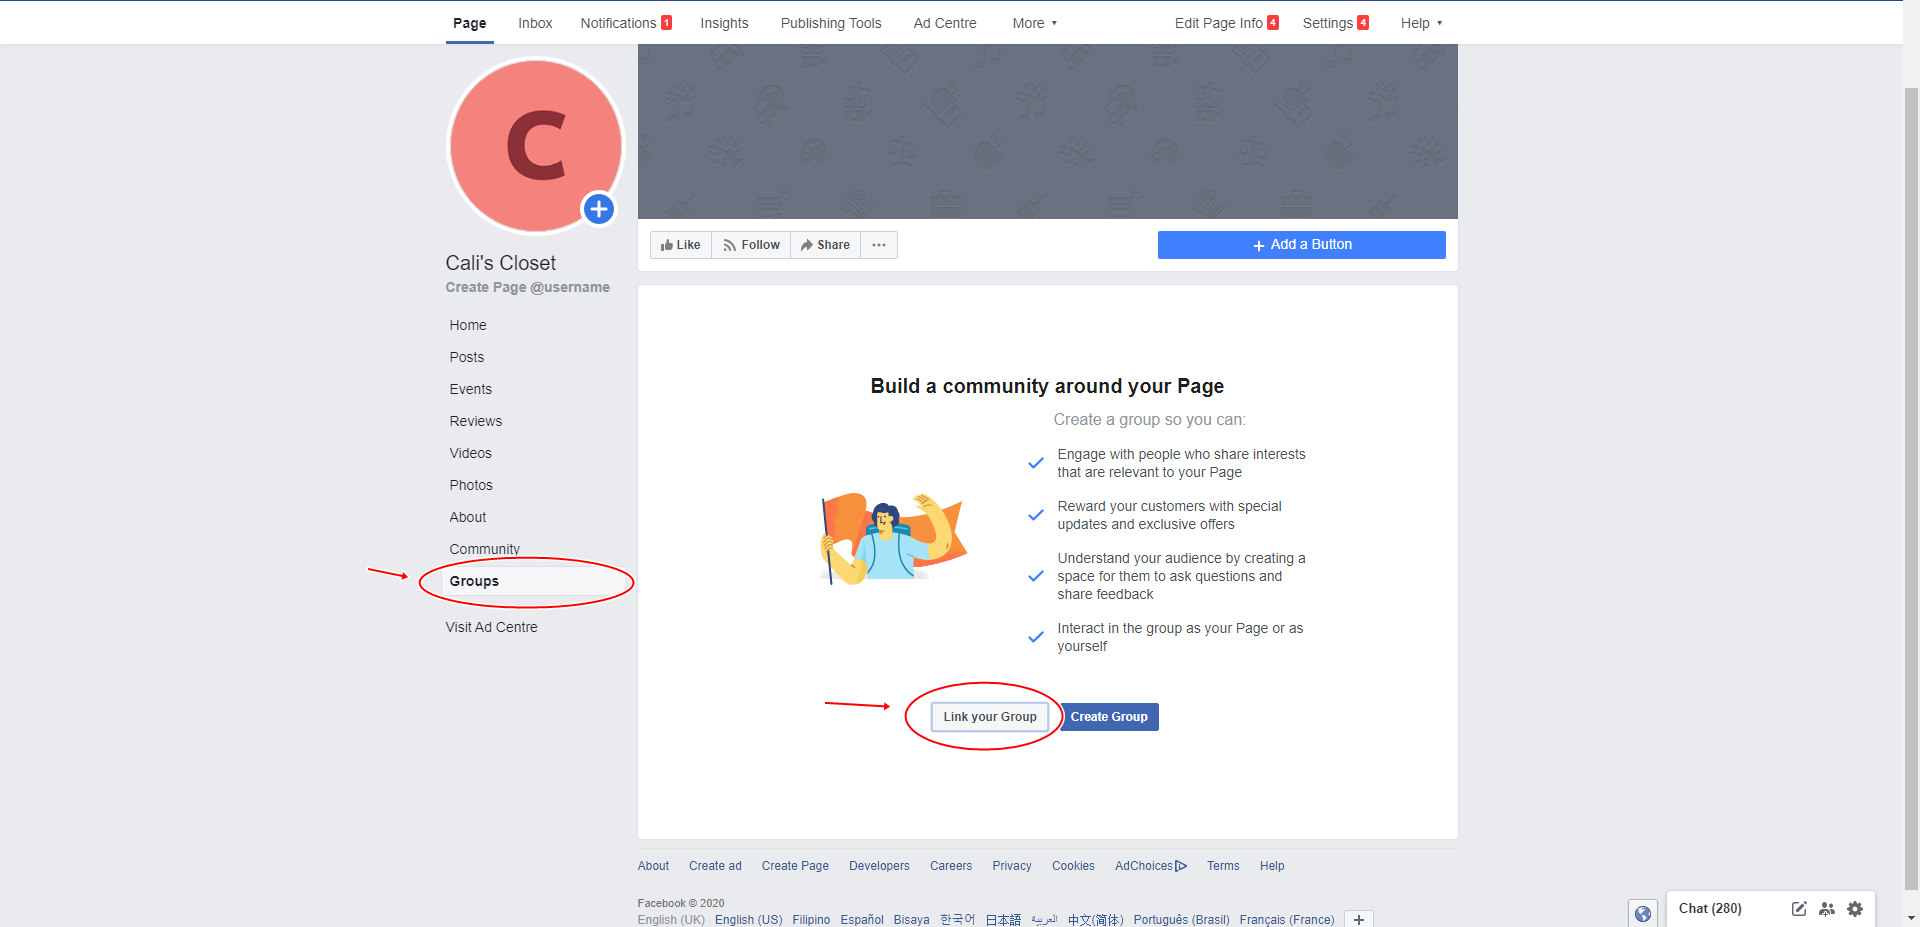
To make your page as an admin to your created group:
6. Go to your Page.
7. Click See More below your page photo, then click Groups.
8. Click “Link Your Group.”
9. Click Link next to the group you want to link your page to (you must be an admin to the group you are selecting).
10. Click “Link Group” to confirm.
Linked Groups will be listed on your page.
Congratulations! You’re Facebook Group is now ready. You can now invite people to become members and start posting interesting stuff on it or start a campaign.
Facebook Ads
Introduction
Facebook Ads Manager is a tool that allows you to set up, manage Facebook ads campaigns, and get reports on results. One major strength of Facebook ads manager is its targeted form of advertising. Advertising with Facebook Ads can let you reach your exact audience. You pick the demographics or groups of people you would like your ads to contact, either by age, location, interests, behavior, and gender.
Facebook advertising is fast. 60% of the 1.5+ billion Facebook users go online every day. Hence, you can reach thousands of people in one day. It can significantly build your business’s brand awareness, and the more familiar people are with the products/services you offer, the higher the chance of them purchasing your product/service. Facebook ads can arguably drive your revenue, sales, and leads.
In this section, we’ll teach you step-by-step how to set up your Facebook ads manager, create your ads, and monitor your ads. Please contact us if you need assistance with Facebook Marketing.
I. Setting up Facebook Ads Manager
You give your business an excellent opportunity to reach and engage with a broader audience when using Facebook Ads. You increase the chances of a larger audience view of your promotional materials by paying to reach a specific persona (either based on demographics, interests, etc.). Facebook Ads Manager also provides transparency, allowing you to monitor your ads’ performance, learn from the results, and adjust your strategy.
With Facebook Ads Manager, you can also:
● Build and increase brand awareness
● Drive traffic, engagement, video views, and lead generation
● Increase product sales and store visits.
To create your Facebook Ads, follow the steps below.
1. Click Create on your top menu and click on “Ad.”
A new tab will open and will lead you to Facebook Ad Manager. Facebook Ads manager lets you create and manage your campaigns. You can use Facebook Ads Manager to:
● Create, modify, and monitor Facebook Ad campaigns
● Handle and control Facebook ad bids
● Set your target audience
● Continuously improve your Facebook ad campaigns.
● Monitor and analyze your campaigns’ performance
● A/B test your Facebook ad campaigns.
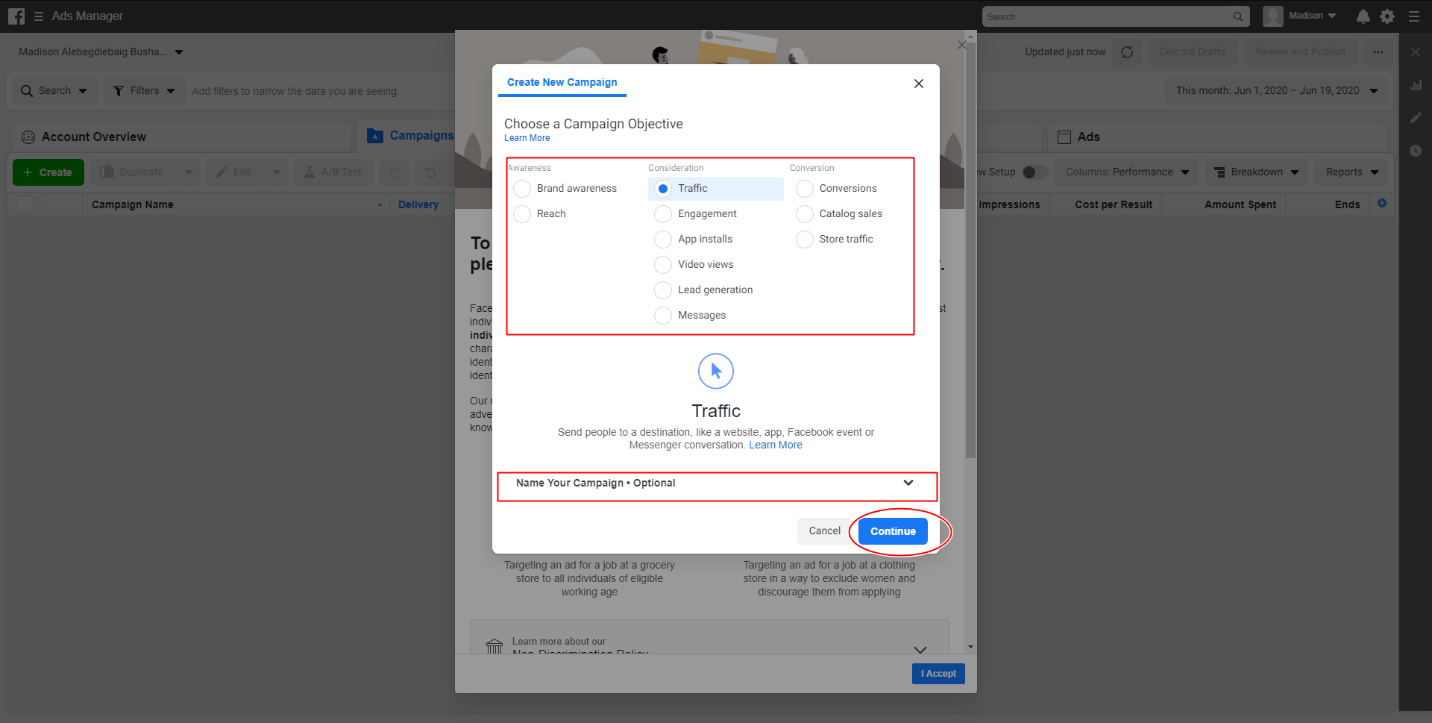
2. Select your campaign objective.
● Awareness campaigns: inform people about your business and generate interest in your product or service
● Consideration campaigns: allow people to engage with your business by sparking their interest, and letting them click on specific links for more info
● Conversion campaigns: entice the audience to a call-to-action (e.g., click to purchase, sign up for a promotion).
3. Name your campaign.
4. Click Continue.
5. When prompted about Facebook’s Advertising Policies, just click “I Accept.”
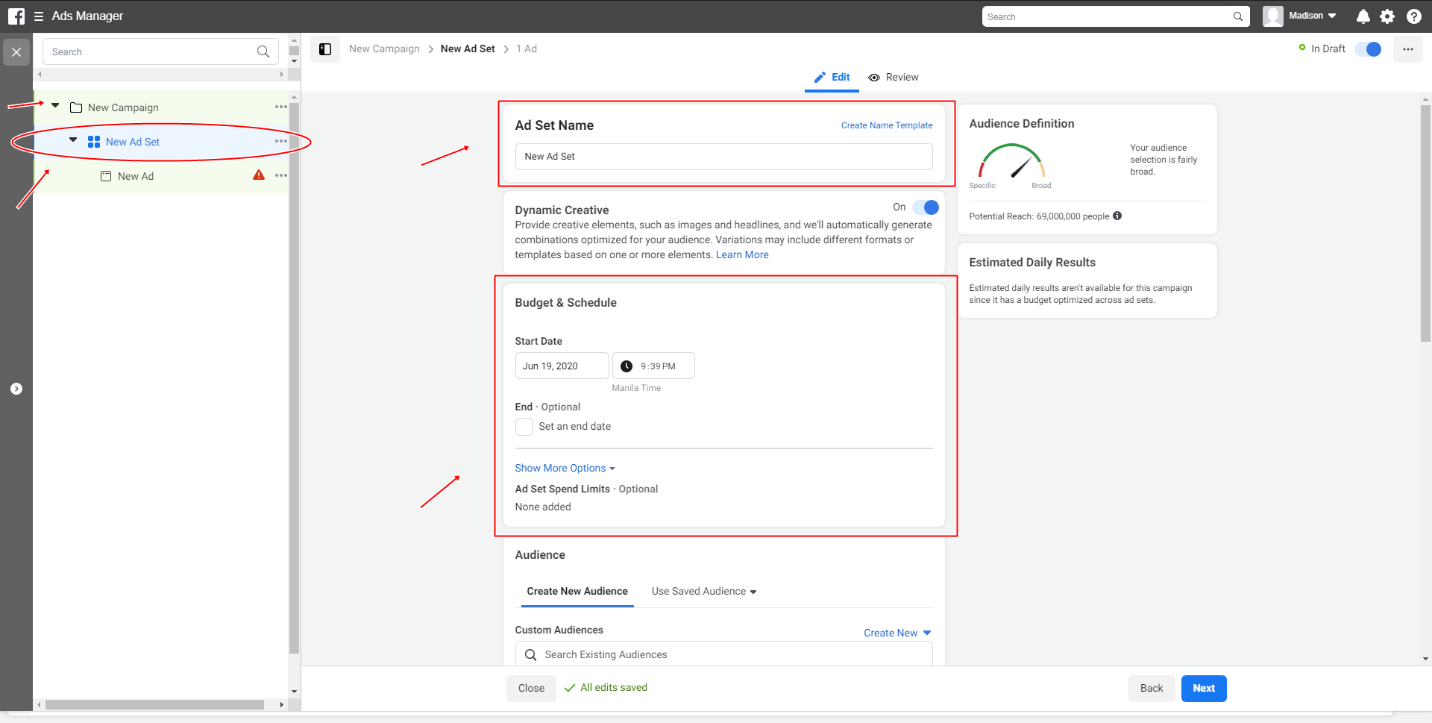
6. Click the drop-down arrow at the left of “New Campaign” (or the name of your campaign, if you renamed it).
7. Click on “New Ad Set.”
8. Enter your desired name on the Ad Set Name field.
9. There will be other options that you will have to decide on, depending on your chosen campaign objective. For instance, if you select brand awareness, you will have the opportunity to turn on Dynamic Creative (see: fb-ads-name-budget&schedule).
Read carefully on the options; decide which will suit your goals.
10. Set your Budget & Schedule.
Facebook allows users to control how much they are willing to spend on each ad. The two main ways to allot your media spend:
● Daily Media Spend the average dollar you are willing to spend per day on an ad.
● Lifetime Media Spend: how much money you are willing to spend over a set duration of time on an ad.
Facebook recommends a $20.00 daily budget, but you can always adjust your budget as the campaign goes live. A rather useful rule of thumb is to spend at least $5.00 each day on an ad for at least seven days. Through that, you can monitor its performance across the week; advise its behavior because results vary depending on the day of the week. From the results, you can adjust your marketing strategy.
Also, know the difference between CPM and CPC. CPM is the cost per 1,000 impressions or for every 1,000 times your ad is displayed, while CPC is a cost per click; you pay whenever someone clicks your ad, which redirects them to your website or app. According to Facebook, if your goal is to build awareness, CPM might be the best choice, while CPC is suitable if your objective is to drive traffic or leads to your website or app.
Remember that you can completely do your tweaks and twitches in Facebook Ads Manager. You have complete control over your budget, placements, and your audience preference.
11. Select Your Audience
Filter your target audience. Here are a few ways to do so:
● INCLUDE: include people who are in at least ONE of the following (type a specific
● EXCLUDE: Exclude people who are in at least ONE of the following
● Location: set country, state, zip code, or mile radius
● Age and Gender
● Detailed Targeting: education, interests (pages they like), behaviors, digital activities, net worth, languages
Create the most relevant audiences by adding people from the sources that matter to you. To create a custom audience:
1. Click Create New from the Audience section.
2. Select the Custom Audience.
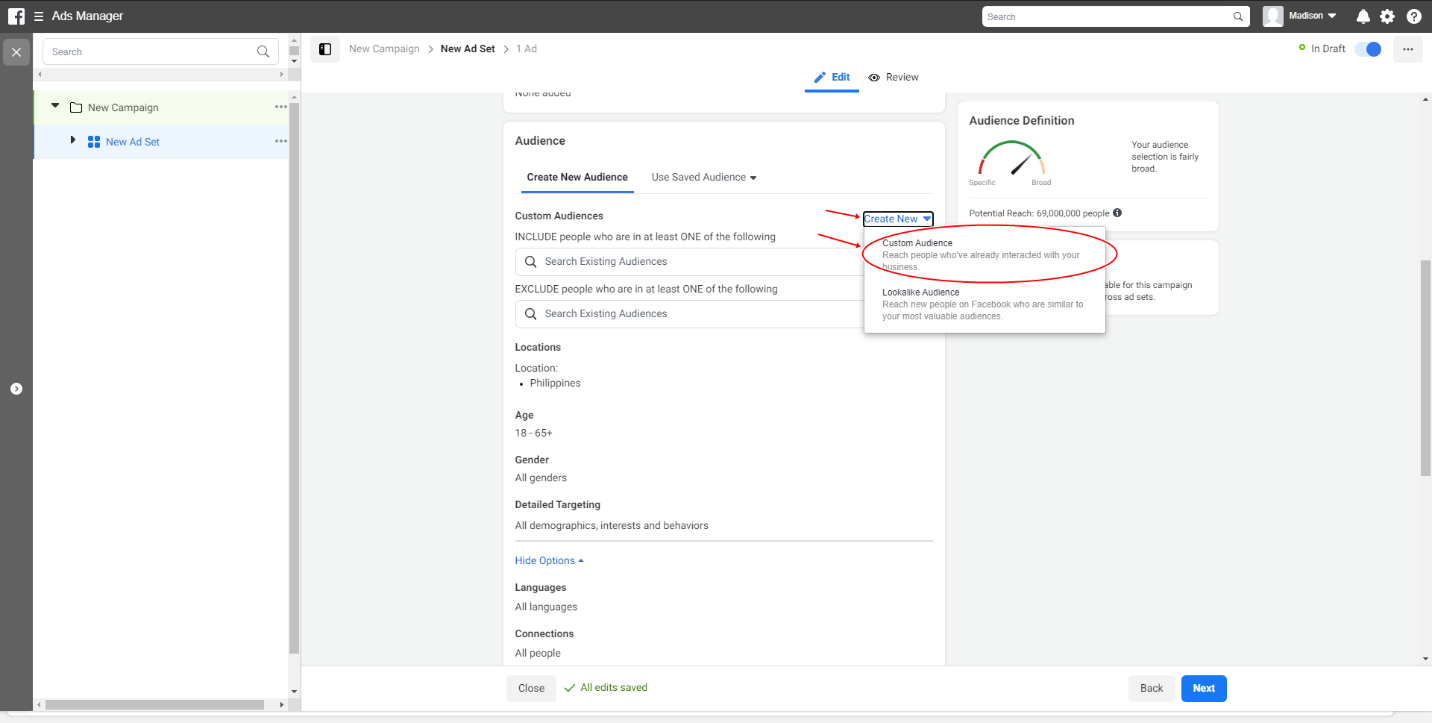
You will see a list of options on how you can make your custom audience.
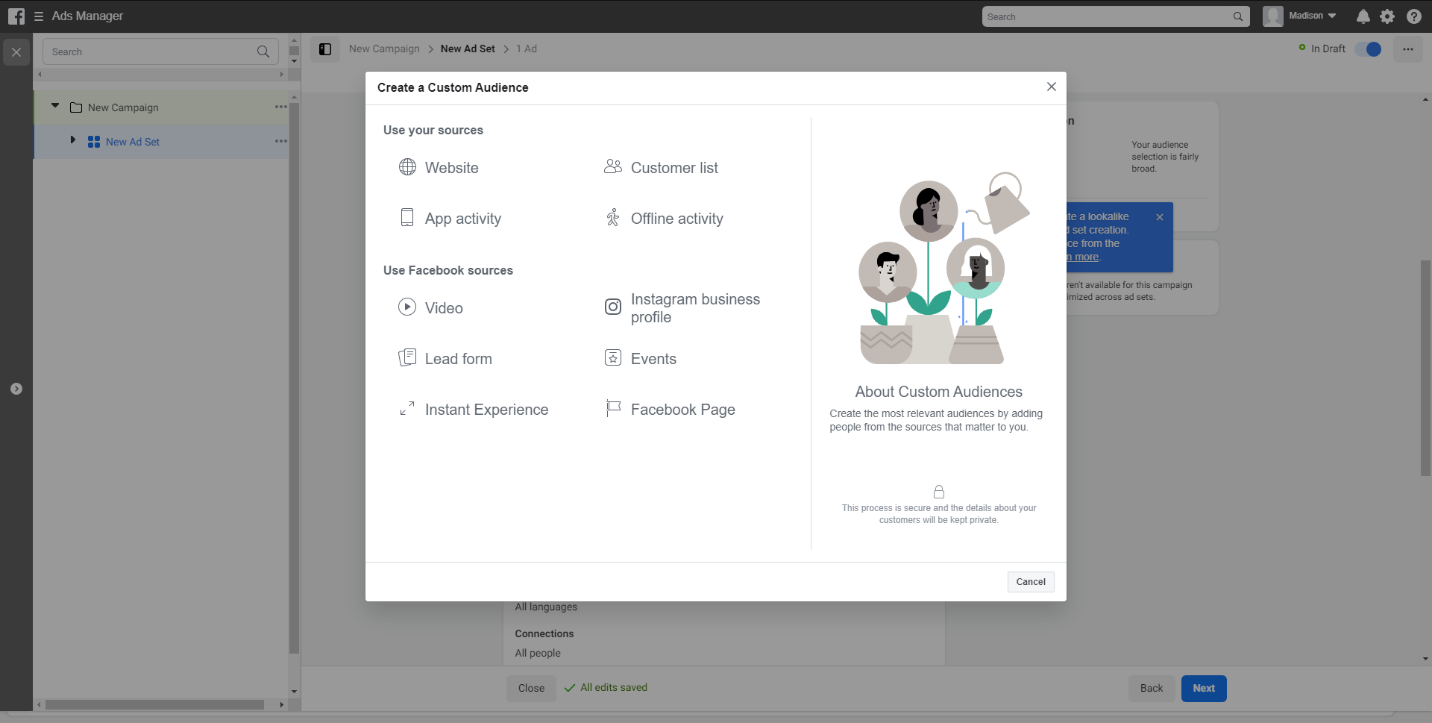
Choose from the following options:
● Website: Create an audience based on website visitors from your Facebook pixel. Tailor your audience based on events you want to focus on, such as purchases. Read about Facebook Pixel here: https://www.facebook.com/business/help/742478679120153?id=1205376682832142
● App Activity: Create an audience of people who launched your app.
● Offline Activity: Create an audience of people who have visited your physical store, or have made contact with you through offline channels like phone calls.
● Customer List: Create an audience by uploading a list of customers (.csv or .txt file) who’ve interacted with your business. Information in this list is hashed into anonymized code before it reaches Facebook.
● Video: Create an audience of people who watched at least one of your Facebook videos.
● Lead Form: Create an audience of people who opened one of your lead generation ads on Facebook.
● Instant Experience: Create an audience of people who opened your Facebook’s Instant Experience.
● Instagram Business Profile: Create an audience of people who visited your Instagram profile.
● Events: Create an audience of people who interacted with one of your Facebook events.
● Facebook Page: Create an audience of people who follow or interact with your page.
3. You may need to fill out the required information based on the option you chose. After filling them out, click “Create Audience.”
Another option is to use a Lookalike Audience. Lookalike audiences are Facebook users with similar qualities or interests. You can create a Lookalike Audience, by identifying your initial criteria or upload a custom audience list, and the Facebook Ads manager will automatically identify their commonalities, then find similar people. To use a Lookalike Audience:
1. Click Create New from the Audience section.
2. Select Lookalike Audience.
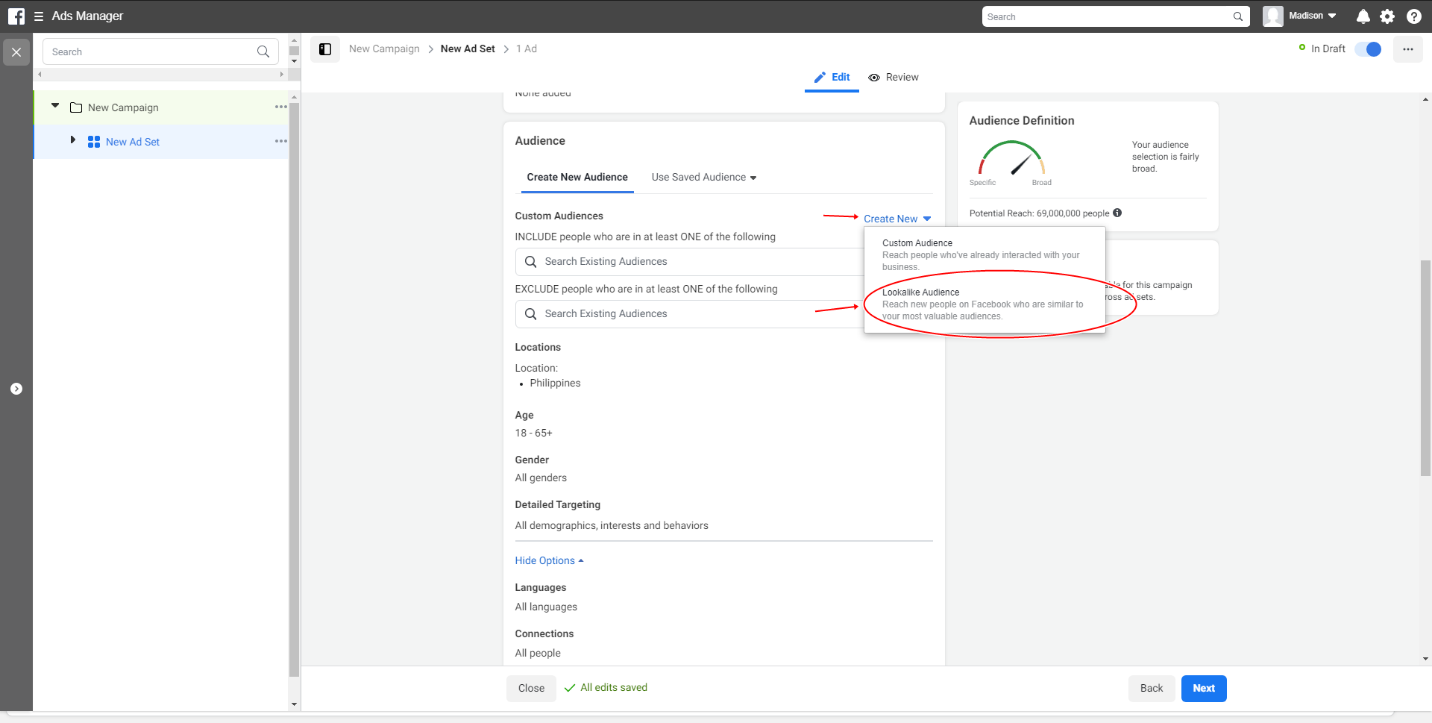
You will see the following fields to be filled out.
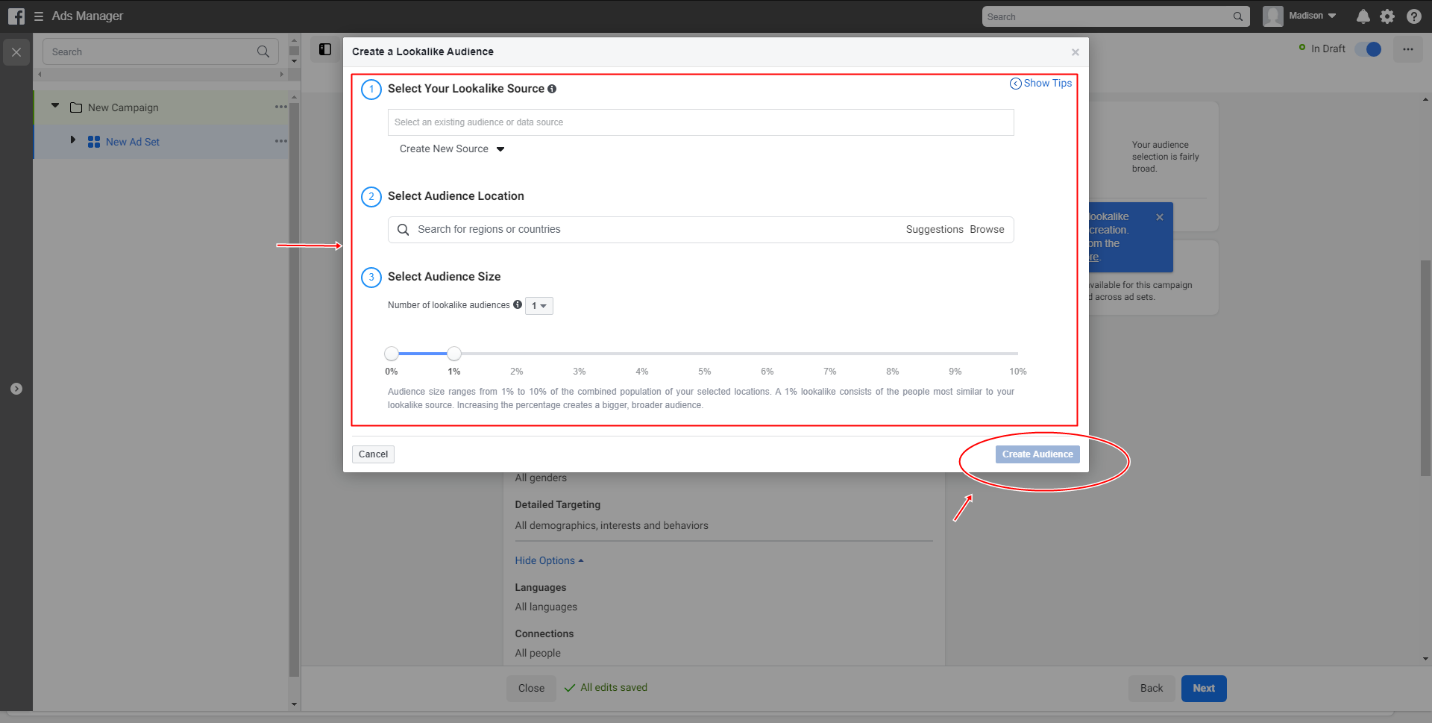
With a lookalike audience, you can reach new people who are likely to become your customers or clients because they’re comparable to your present customers. You choose a source audience, and Facebook identifies the characteristic qualities of the people in it. Then it will find people like them, using your selected location and desired audience size.
3. Select your source audience. This is based on source audiences which you can create using data from:
● Customer Information: newsletter subscription of a customer file list (.csv or .txt file)
● Website Visitor: create an audience of people who have visited your website (needs Facebook Pixel)
● App Activity: create an audience of people who installed, used, or purchased from your app
● Engagement: create an audience of people who engage with your Facebook page.
● Offline Activity: create a list of people who interacted with your business’ physical store, or have made contact with you through offline channels like phone calls. (.csv or .txt file)
4. Select the Audience Location that you would like to target.
5. Select Audience Size. There is a scale of 1-10. Smaller numbers mean high similarity, more significant numbers mean high to reach. Facebook will provide you a reach estimation for your chosen size.
Note that Lookalike Audiences needs 6 to 24 hours to process.
6. Click “Create Audience.”
You are now done setting up your Facebook Ads Manager, and your next mission is to create your first ad with Facebook.
II. Creating Your Ads

1. Click the drop-down arrow at the left of “New Ad Set” (or the name of your Ad Set, if you renamed it).
2. Click on “New Ad.”
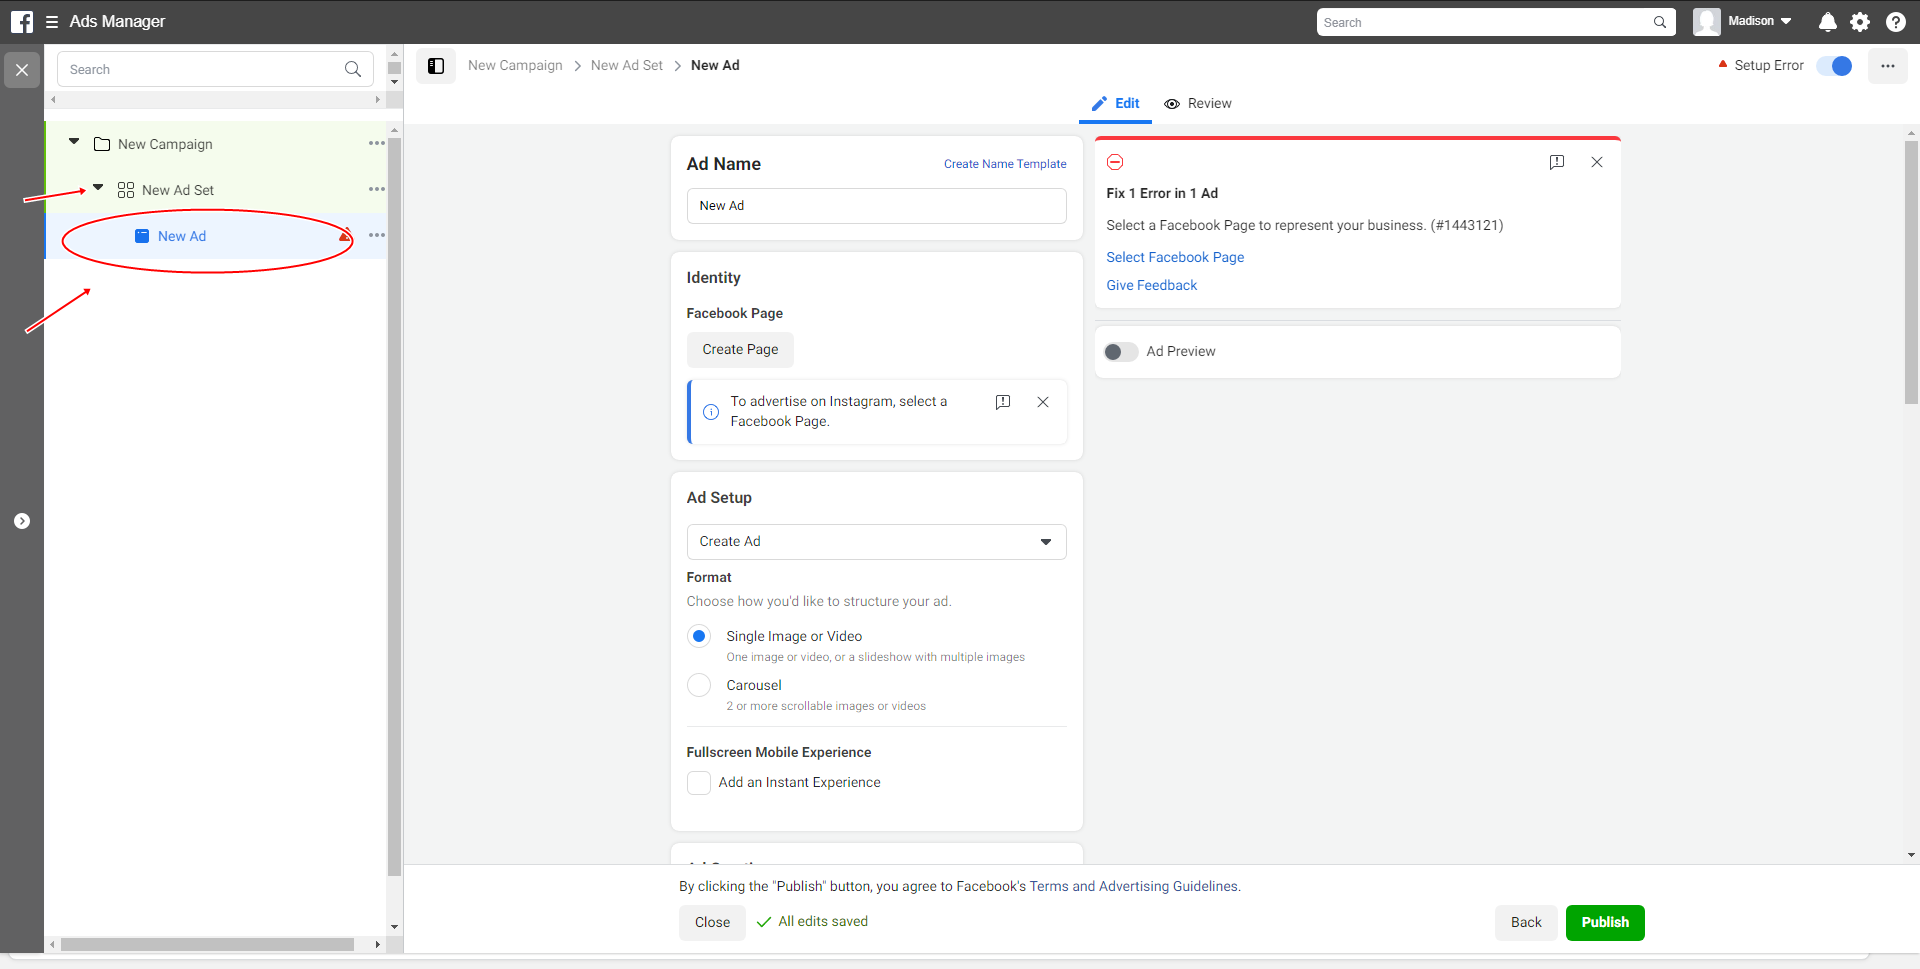
3. Select a Facebook Page to represent your business. This is important. You have to create a Facebook business page if you don’t have one.
4. Start Filling out the necessary fields: Ad Name, Identity, Ad Setup, Ad Creative.
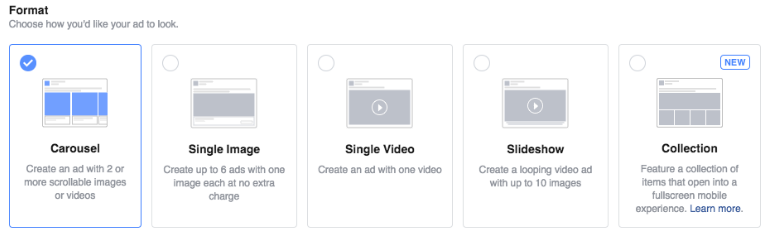
You can select how your ad will be displayed on Ad Creative.
You can also modify your ad placement.
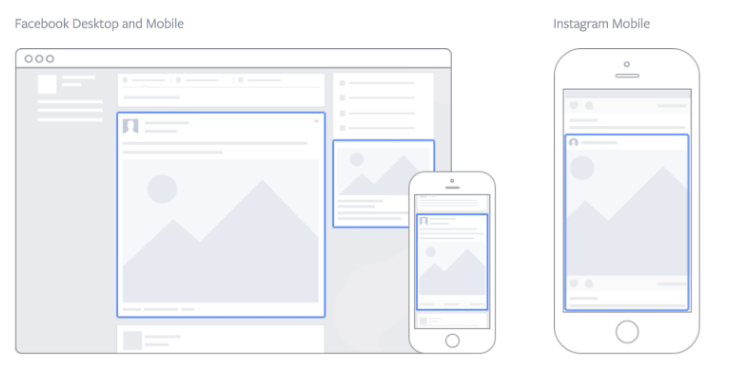
Facebook strongly recommends using the default. But you are free to tweak your ad placements if you go for manual ad placement. Facebook recommends:
● Facebook and Instagram:
o Increase brand awareness campaigns
o Boost posts
o Get video views
o Get installs of your app.
● Facebook only:
o Increase engagement in your app
o Promote product catalog
o Increase conversions on your website
o Send people to your website.
It is also up to you if you want to limit ad placement on mobile or desktop.
Add your media (photo or video), and headline, and catchy main ad text and link description. You can also choose a Call to Action button.
Note:
● Main ad text: up to 90 characters
● Headline: up to 25 characters
● Link description: up to 90 characters
When everything is filled out, and you think your ad is ready to run. Click “Place Order” or “Publish.” Facebook will screen your ad first to check if it adheres to their Terms and Advertising Guidelines. When approved, Facebook will notify you, and your ad goes live.
Read on Facebook Terms and Advertising Guidelines here: https://www.facebook.com/policies/ads/.
Congratulations on creating your Facebook Ad! One good feature of Facebook Ads Manager is that it is measurable. You will be able to monitor your ads and how it has performed; how many impressions, clicks, and conversions it has garnered, and this will be your next mission.
III. Monitor Your Ads

Facebook Ads manager shows complete transparency on your ads’ ROI (Return on investment). It will show you metrics such as:
Number of times your ad was clicked
How many times your ad was viewed
Percentage of people who purchased after clicking your ad
These are essential metrics. You can use them when you strategize your digital marketing.
You can monitor your ads by:
- Go to your Facebook Ads Manager
- Click Campaigns

- Click Ad sets
 or Ads
 .
. - Tick the box next to the campaign that you want to monitor.
- Click
 to open the side panel.
 - From the side pane, click Performance, Demographics, or Placement to view charts specific to the campaign you have selected.
Congratulations, you have learned your way through Facebook Ads Manager. You can plan your next ad using the data and metrics from Facebook Ads Manager.
Facebook Events
I. Creating Facebook Events
Creating a Facebook event allows you to publish an item or publicize a game on your Facebook business page. Facebook Events can help raise awareness and increase attendance or visits at your business’ events. It also keeps your customers or clients updated on your upcoming events. It keeps a calendar connection between you and your customers.

Below are the steps on how to create a Facebook event.
- Go to your Facebook page.
- Click See More below your page photo, then click on “Events.”
- Click “Create Event.”

4. Fill in all the required information.
5. Add a compelling event photo or video.
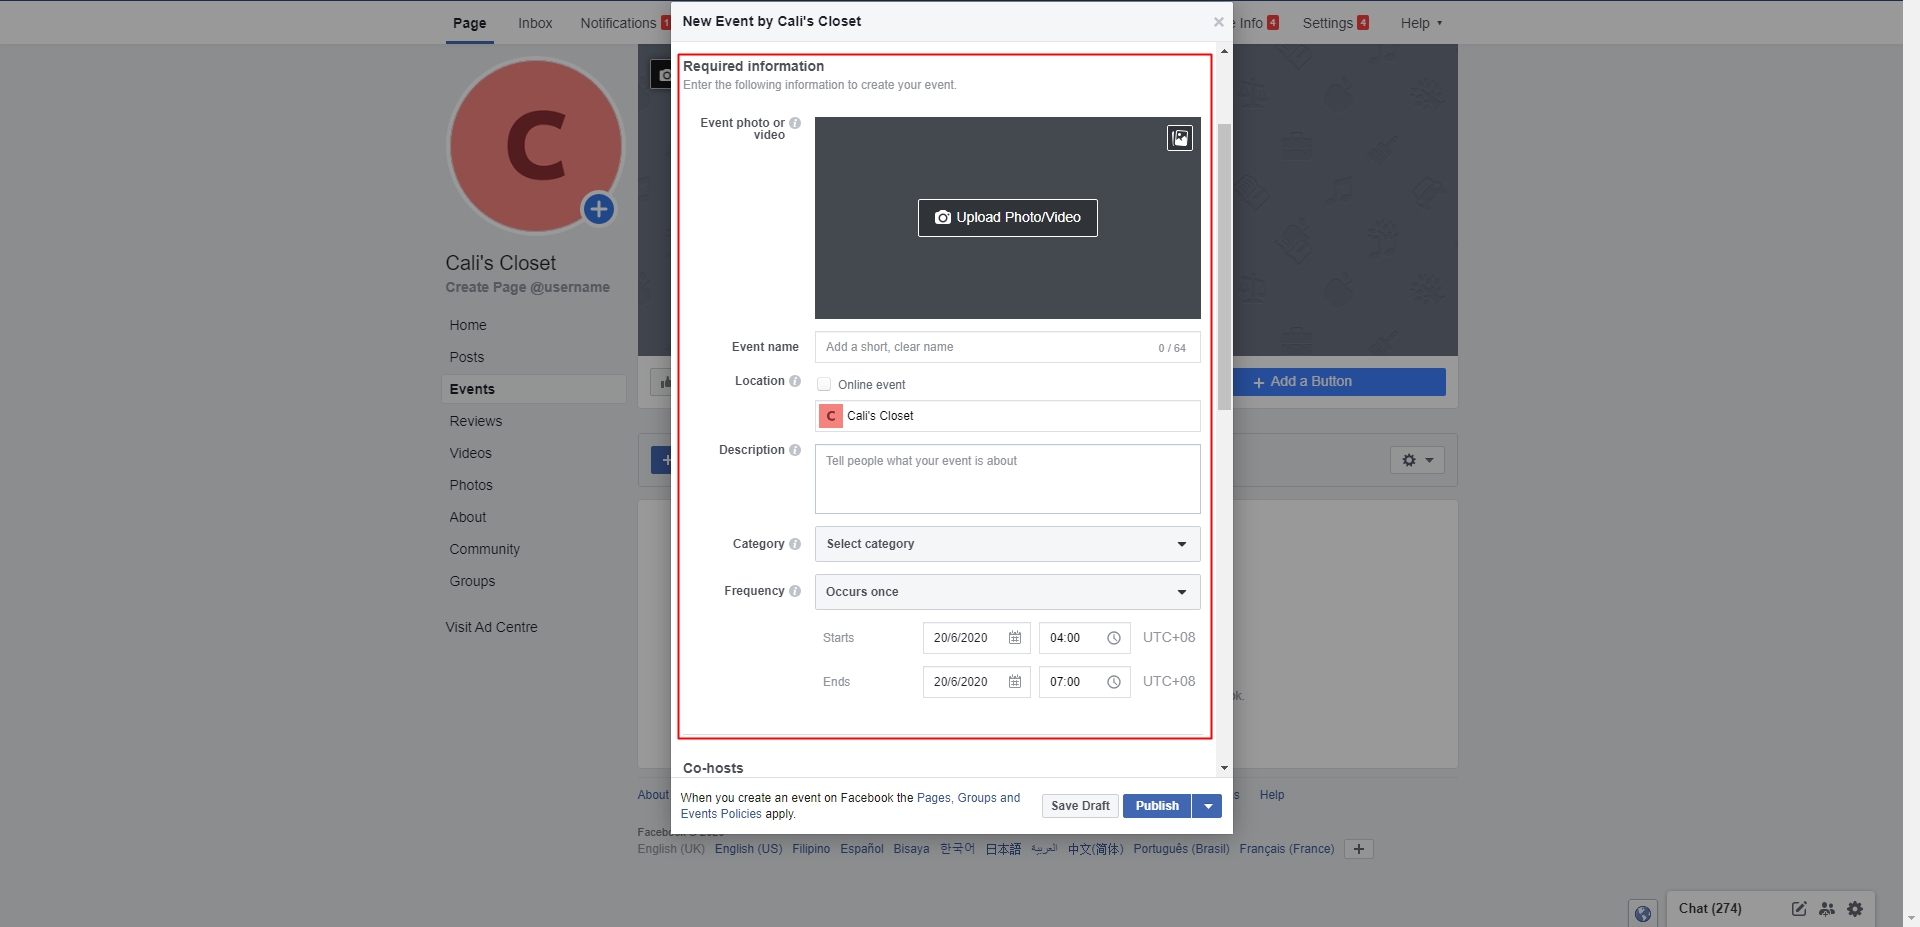
6. Customize your event more by adding optional features.
● Co-hosts: Add other pages, and friends as co-hosts. Co-hosts can edit and can help you spread the word.
● Details: Include other information for your event so that people know what to expect. It includes the schedule. You can also add keywords to describe your Facebook event, and specify if it is a child-friendly event.
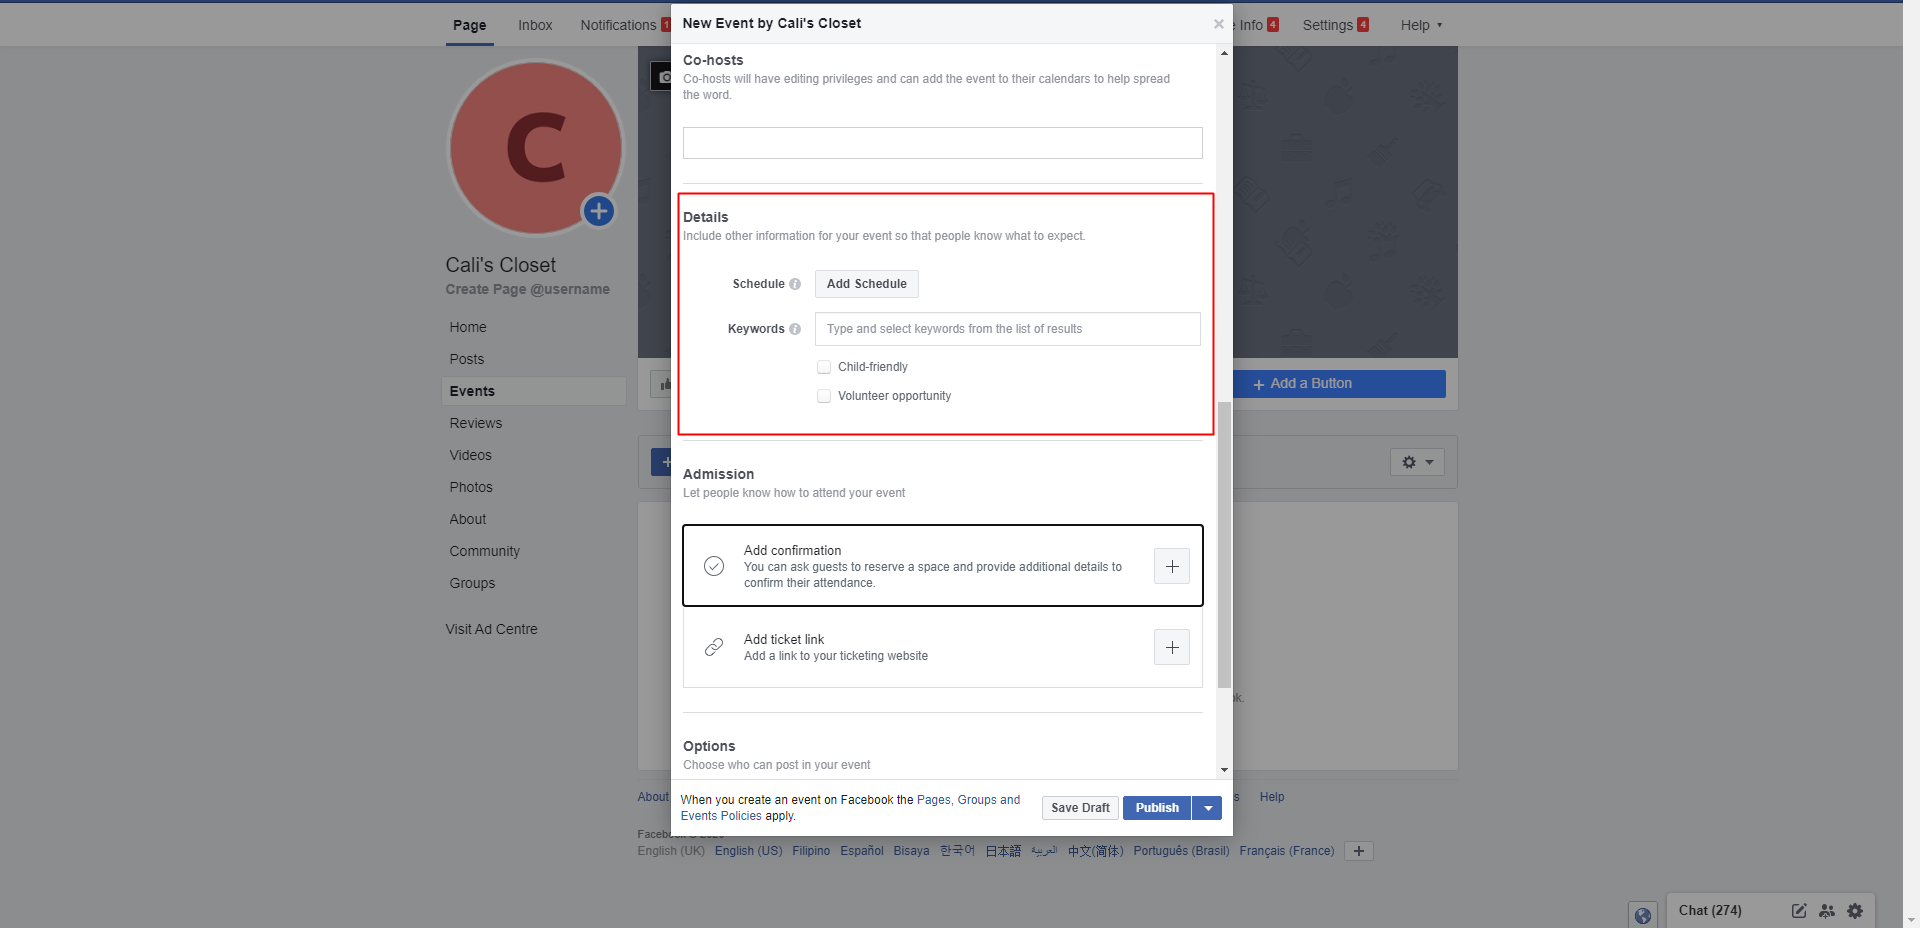
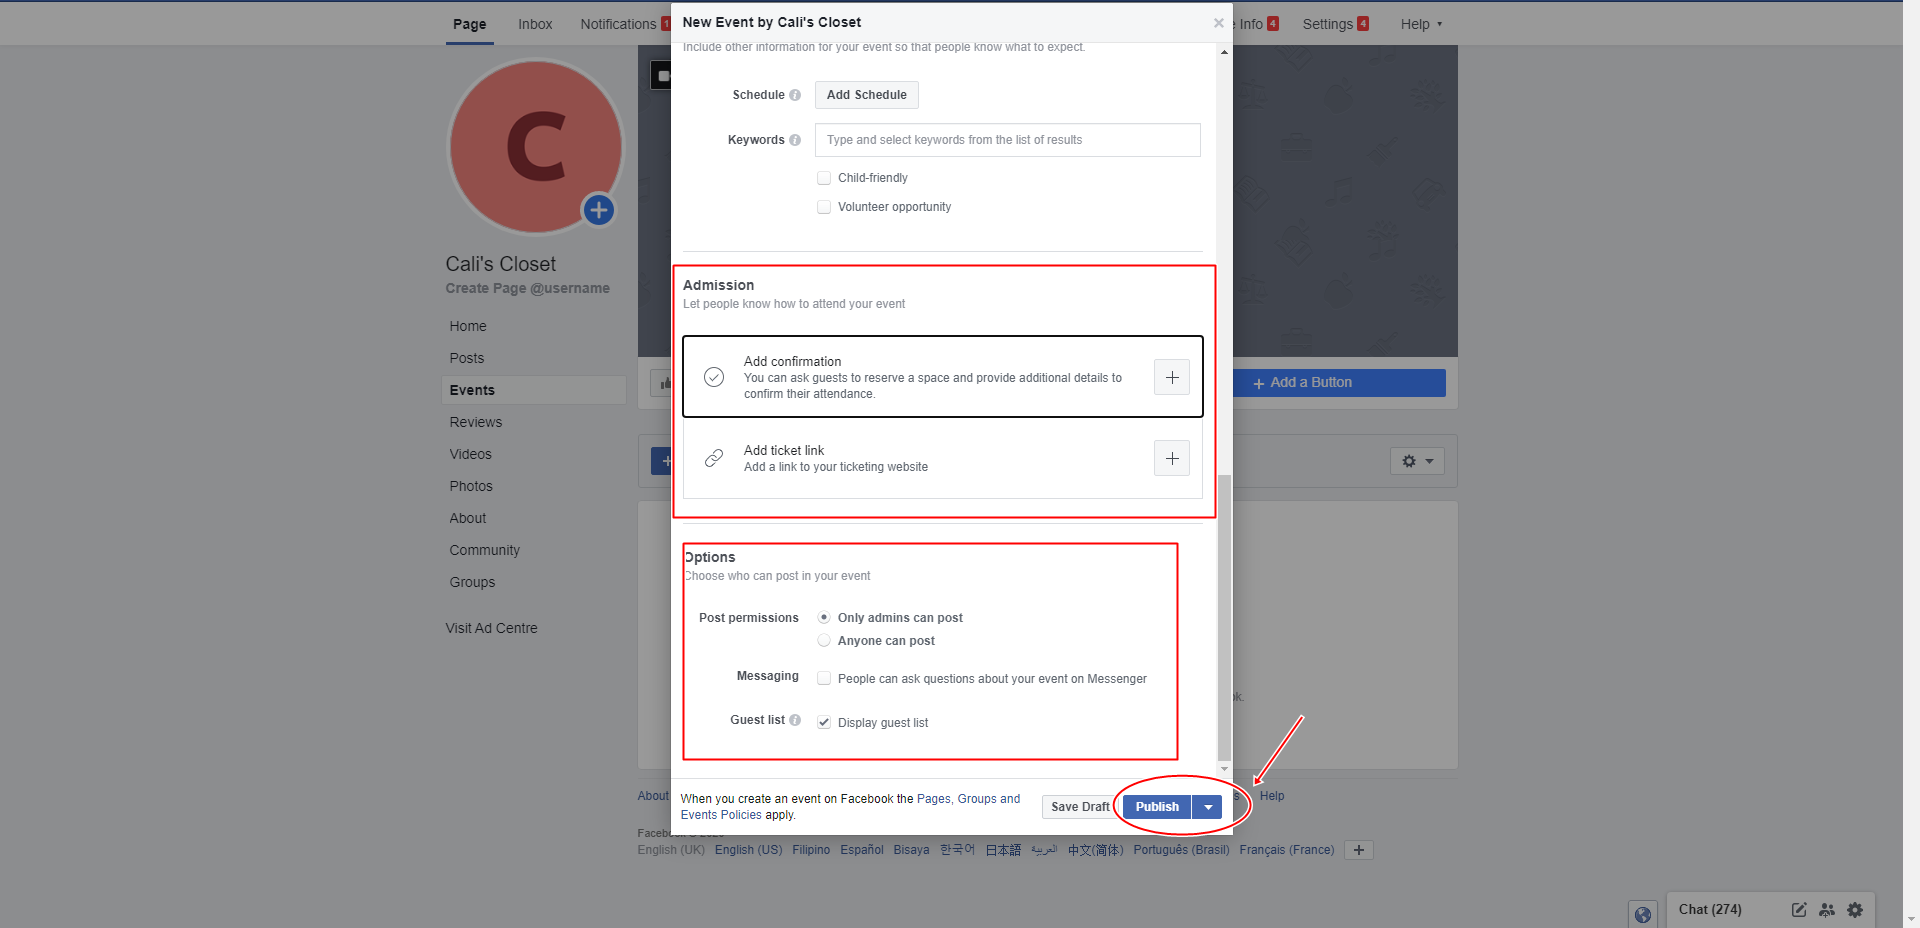
● Admission: Let people know how to attend your event. You can add a ticketing option or create free or paid tickets on Facebook.
● Options: Choose who can post and guest list in your event. You can manage a messaging setting.
7. When done, click “Publish.”
Congratulations on successfully creating an event!
Facebook Story
I. Create Facebook Stories
Facebook stories provide an opportunity to showcase your brand. It can impress followers and surge engagement. They can be multiple photos and videos, even polls, to convey your brand and engage with your audience. Currently, you can only post Facebook Stories using the mobile app.

Here’s how:
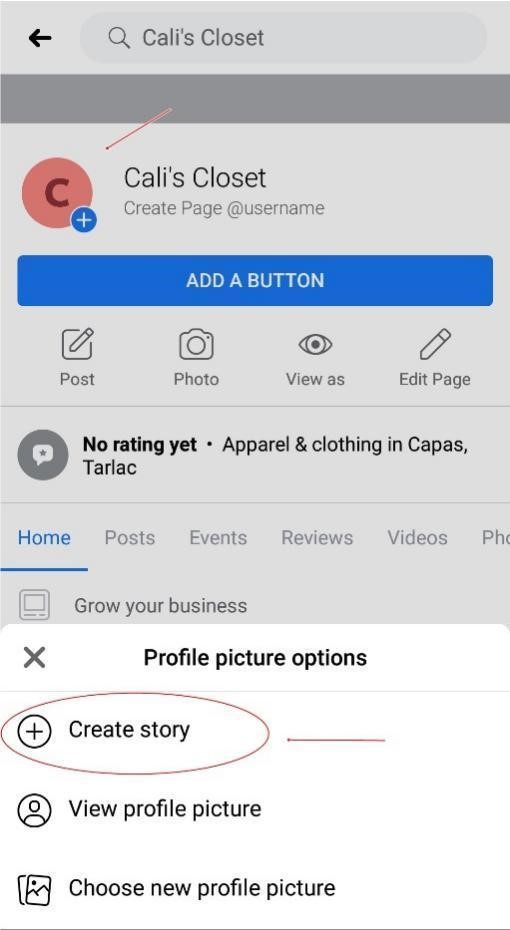
1. Go to your Facebook business page.
2. Click your page profile photo.
3. Select “Create Story.”
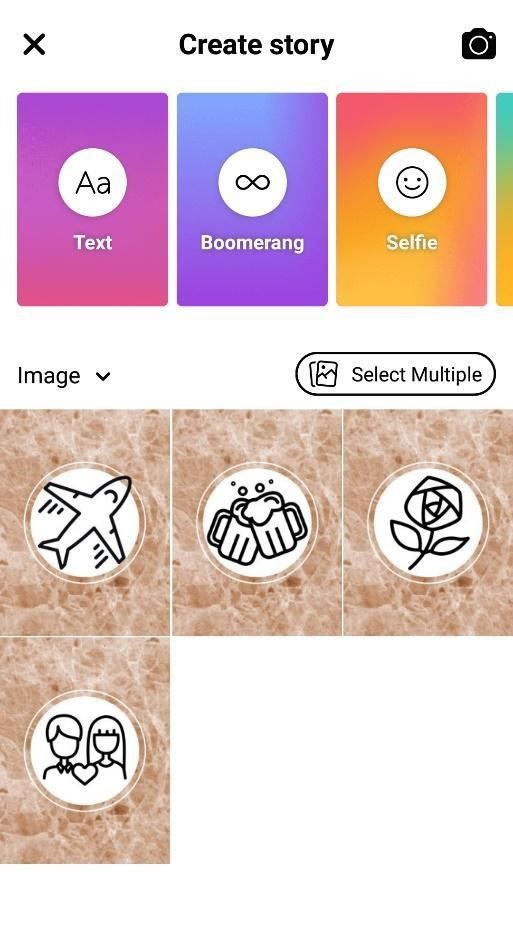
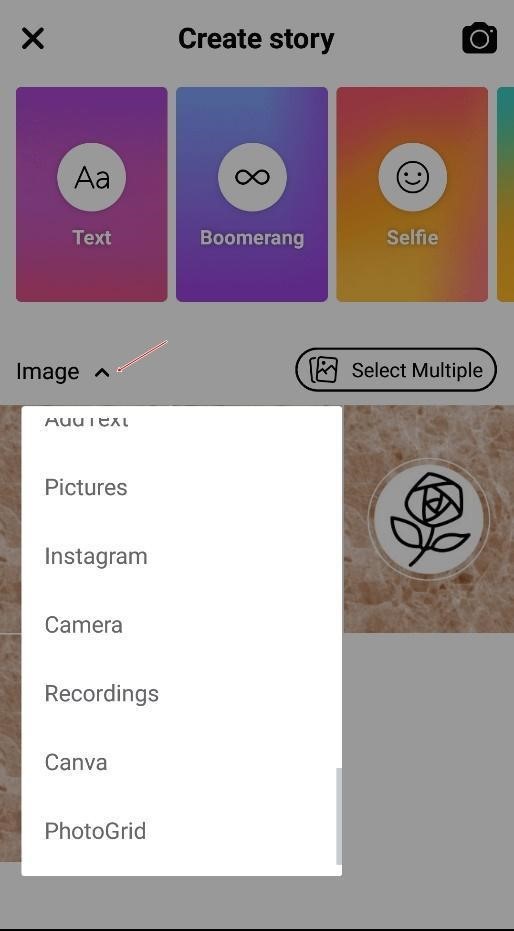
4. Create your Facebook Story by taking photos or videos, typing text, creating a Boomerang video, creating a poll, or uploading pictures and videos from your gallery. Click the button  when you want to take an image or video using your phone’s camera.
5. You can choose the album by clicking the drop-down arrow. See fb-stories-3.
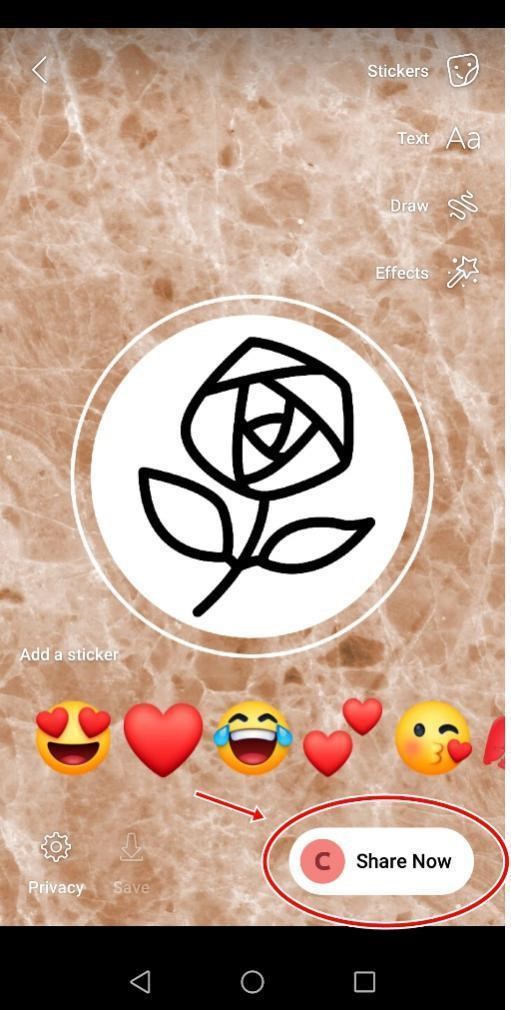
6. Once you’re done selecting your photo/s or video, you can further customize it by putting text, stickers, scribble with the brush; and customizing it to fit your aesthetic.
7. Click “Share Now” when finished.
Note: Facebook Stories disappear after 24 hours.
Facebook Shop
I. Change Your Default Page Template Into a Shopping Template
You can add a Shop section to your Facebook page, wherein customers can make their purchases.
Before you can add a Shop section, you must first change your page template to the shopping template. Below are the steps on how to do it:
1. Go to your Facebook page.
2. Click Edit Page Info on the top-right menu.
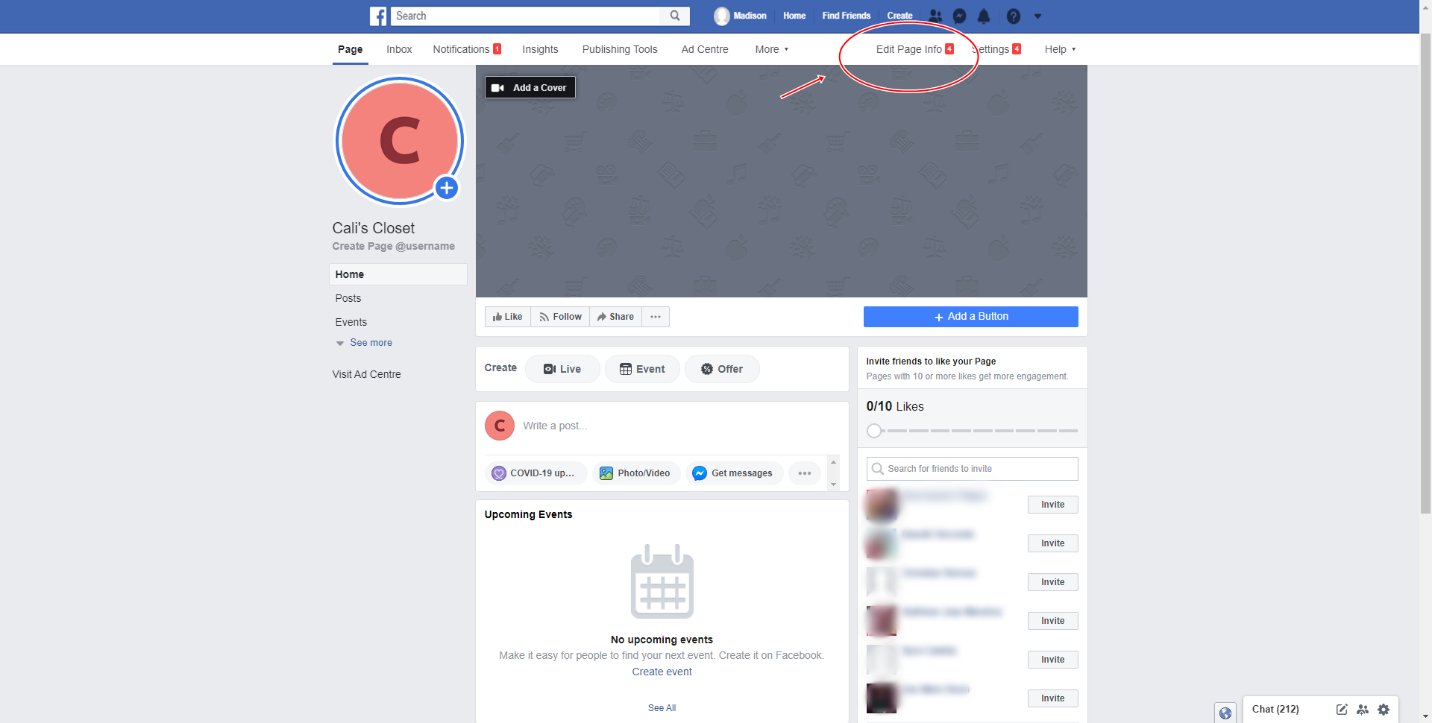
3. Go to Templates and Tabs.
4. Click Edit to the right of the Current Template.
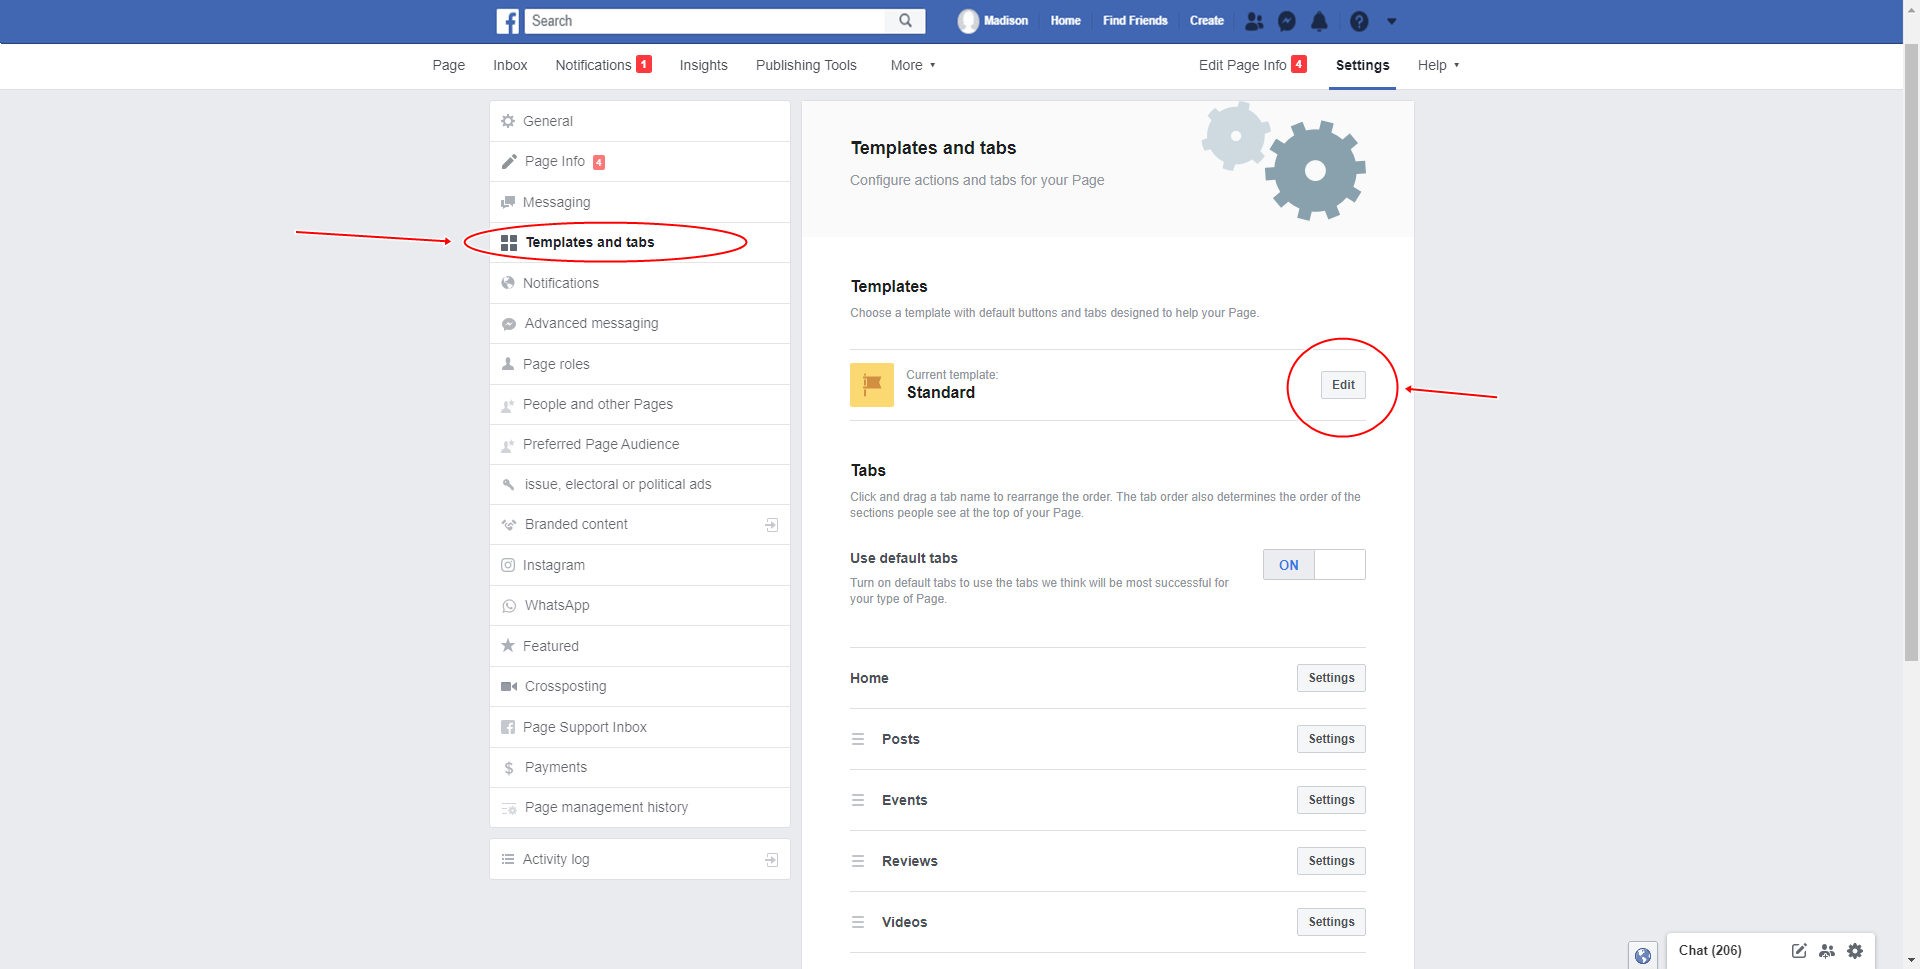
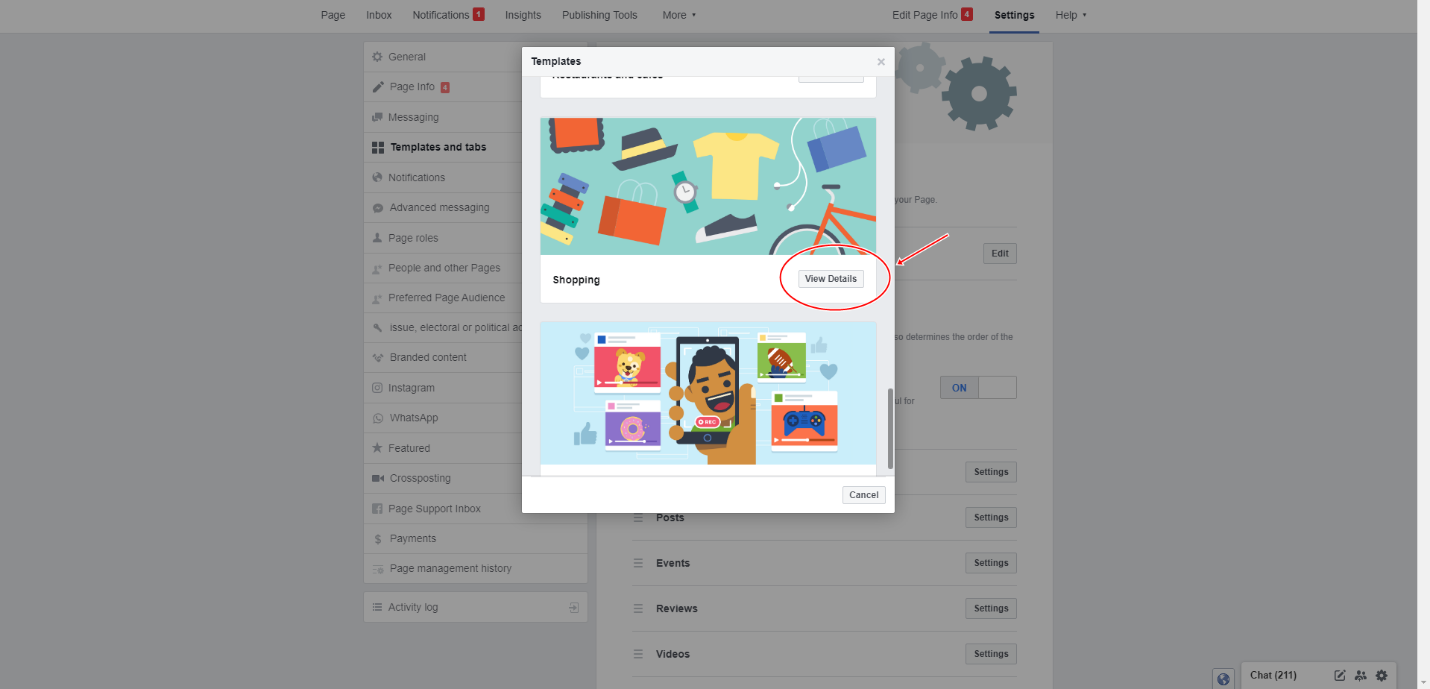
5. Choose a template with default buttons and tabs designed to help your Page. For example, you want a Shopping template. Click View Details on the Shopping template.
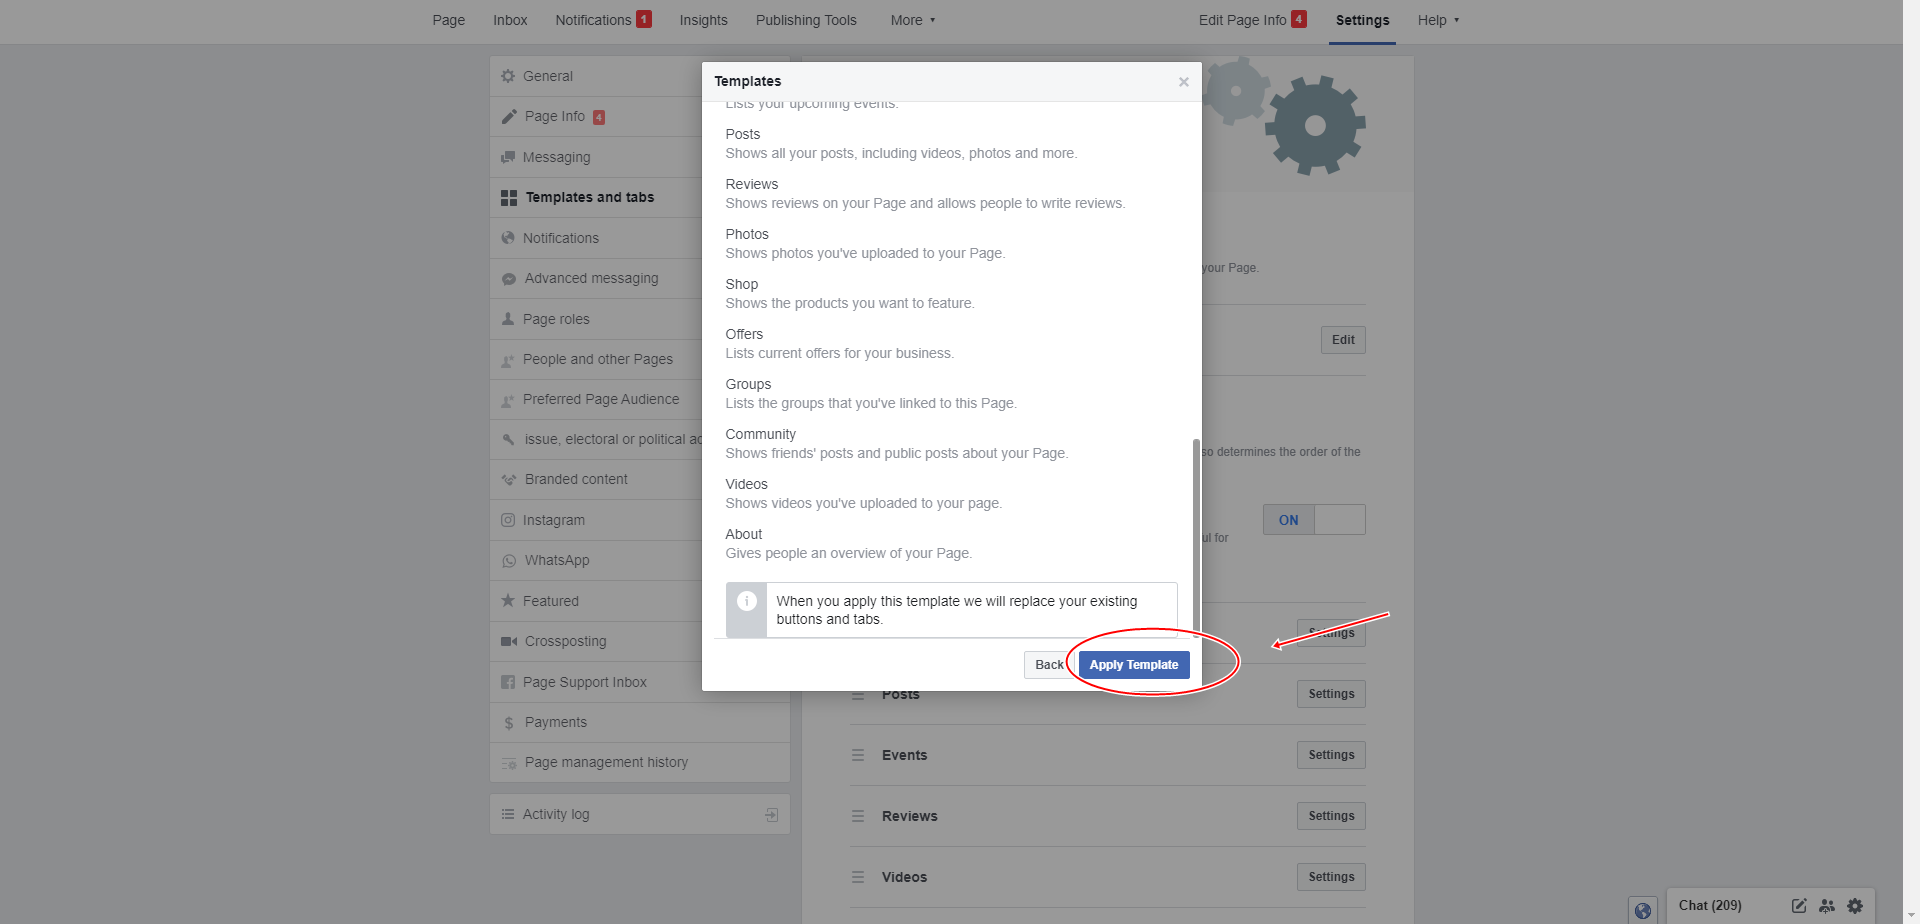
6. Click Apply Template.
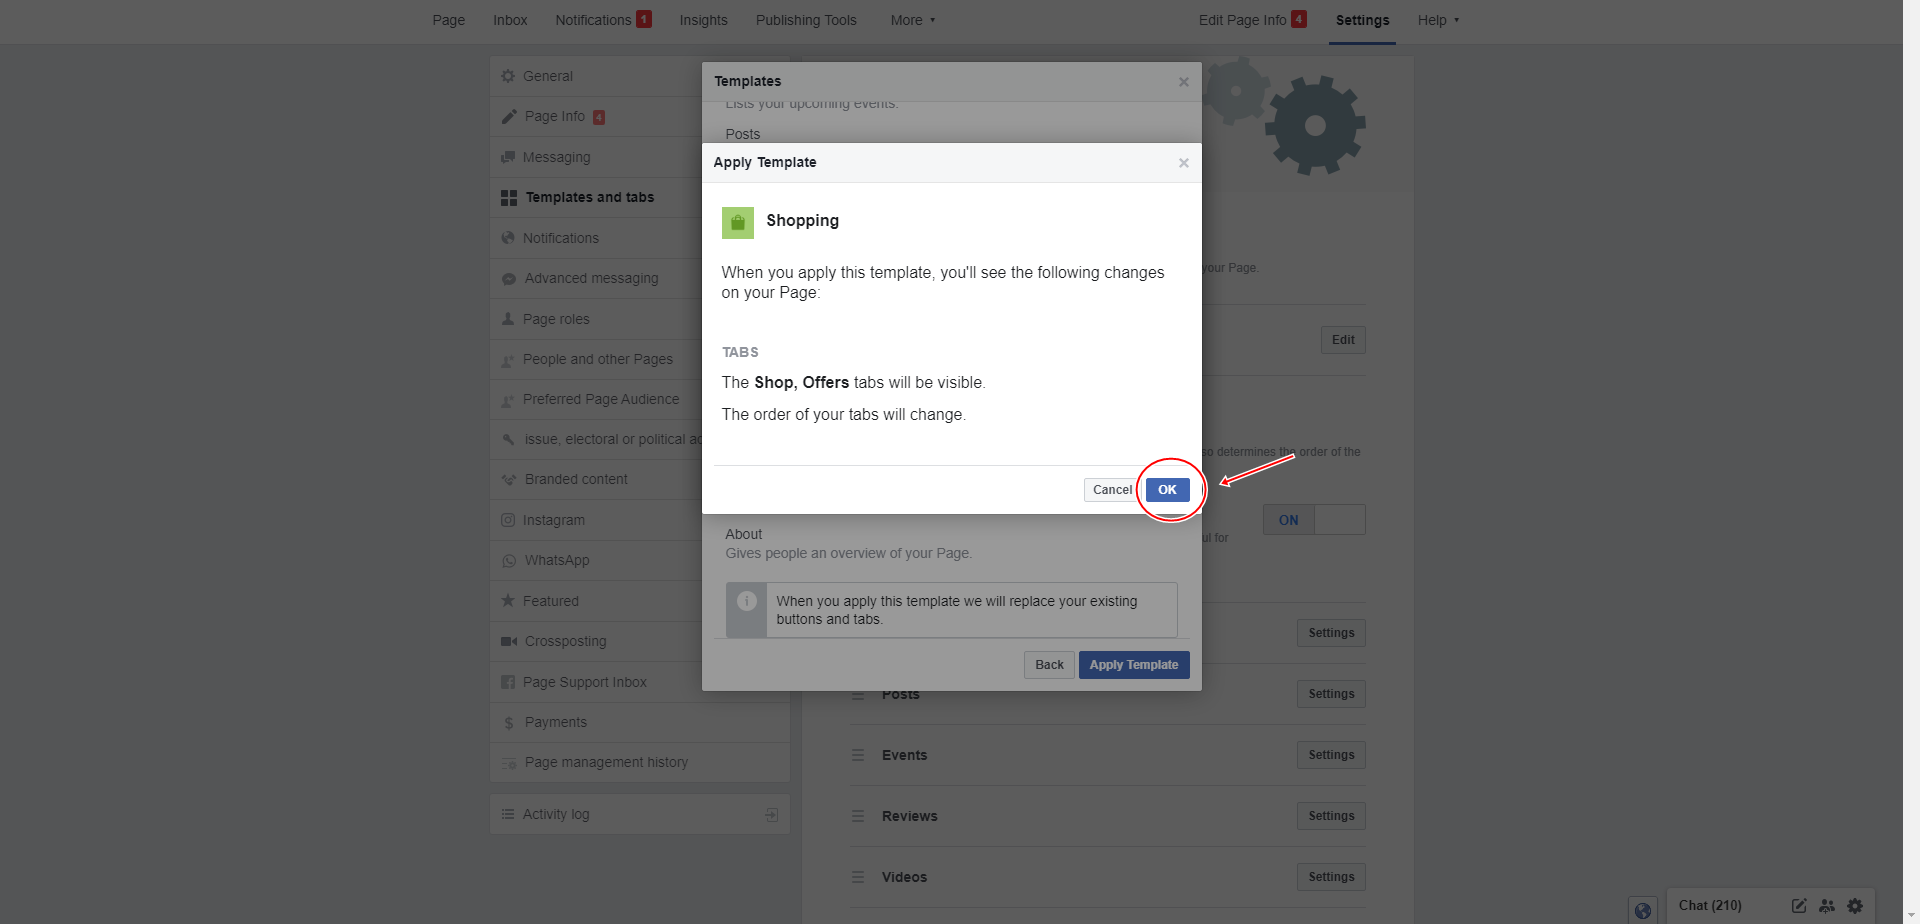
7. Click OK. Your Shop tabs will be ready.
Once you’ve successfully changed your default template into a shopping template, you can now add the shop section to your Facebook Page. Proceed with the guide on how to ass the shop section.
II. Add Shop Section to your Facebook Page

1. Scroll through the Templates and Tabs.
2. Find a Shop.
3. Click Setting beside the Shop.
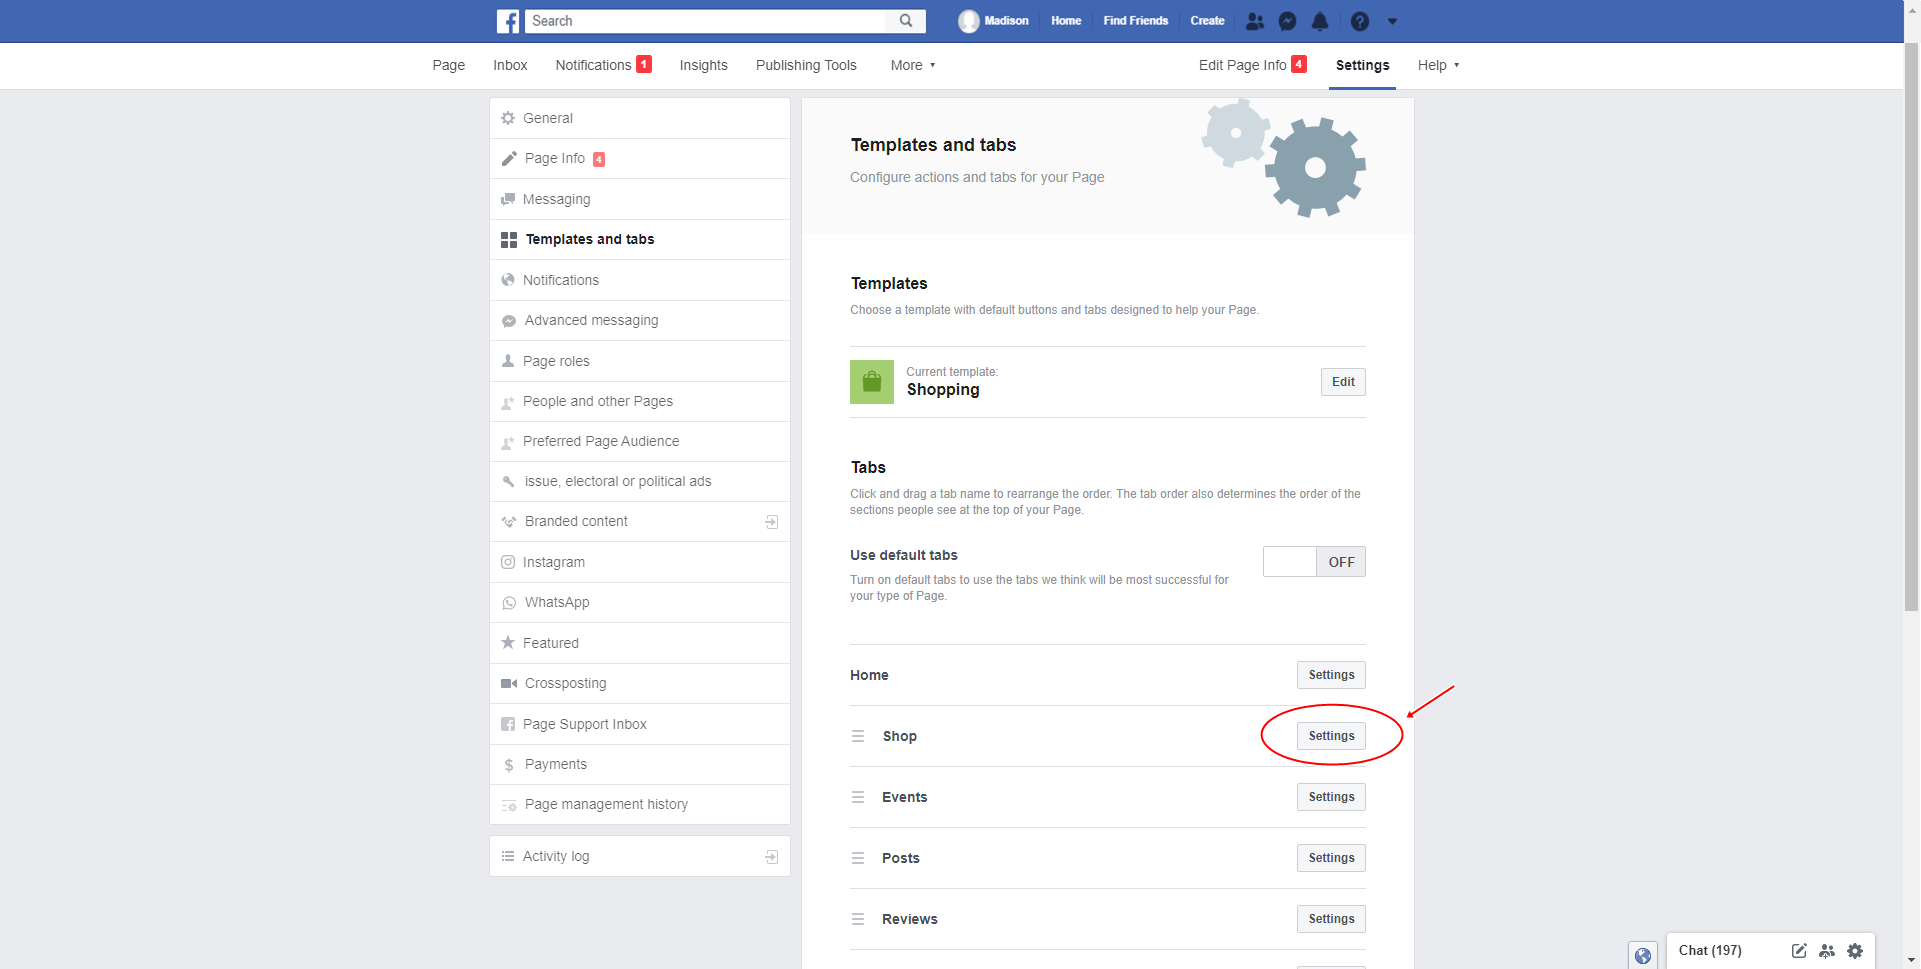
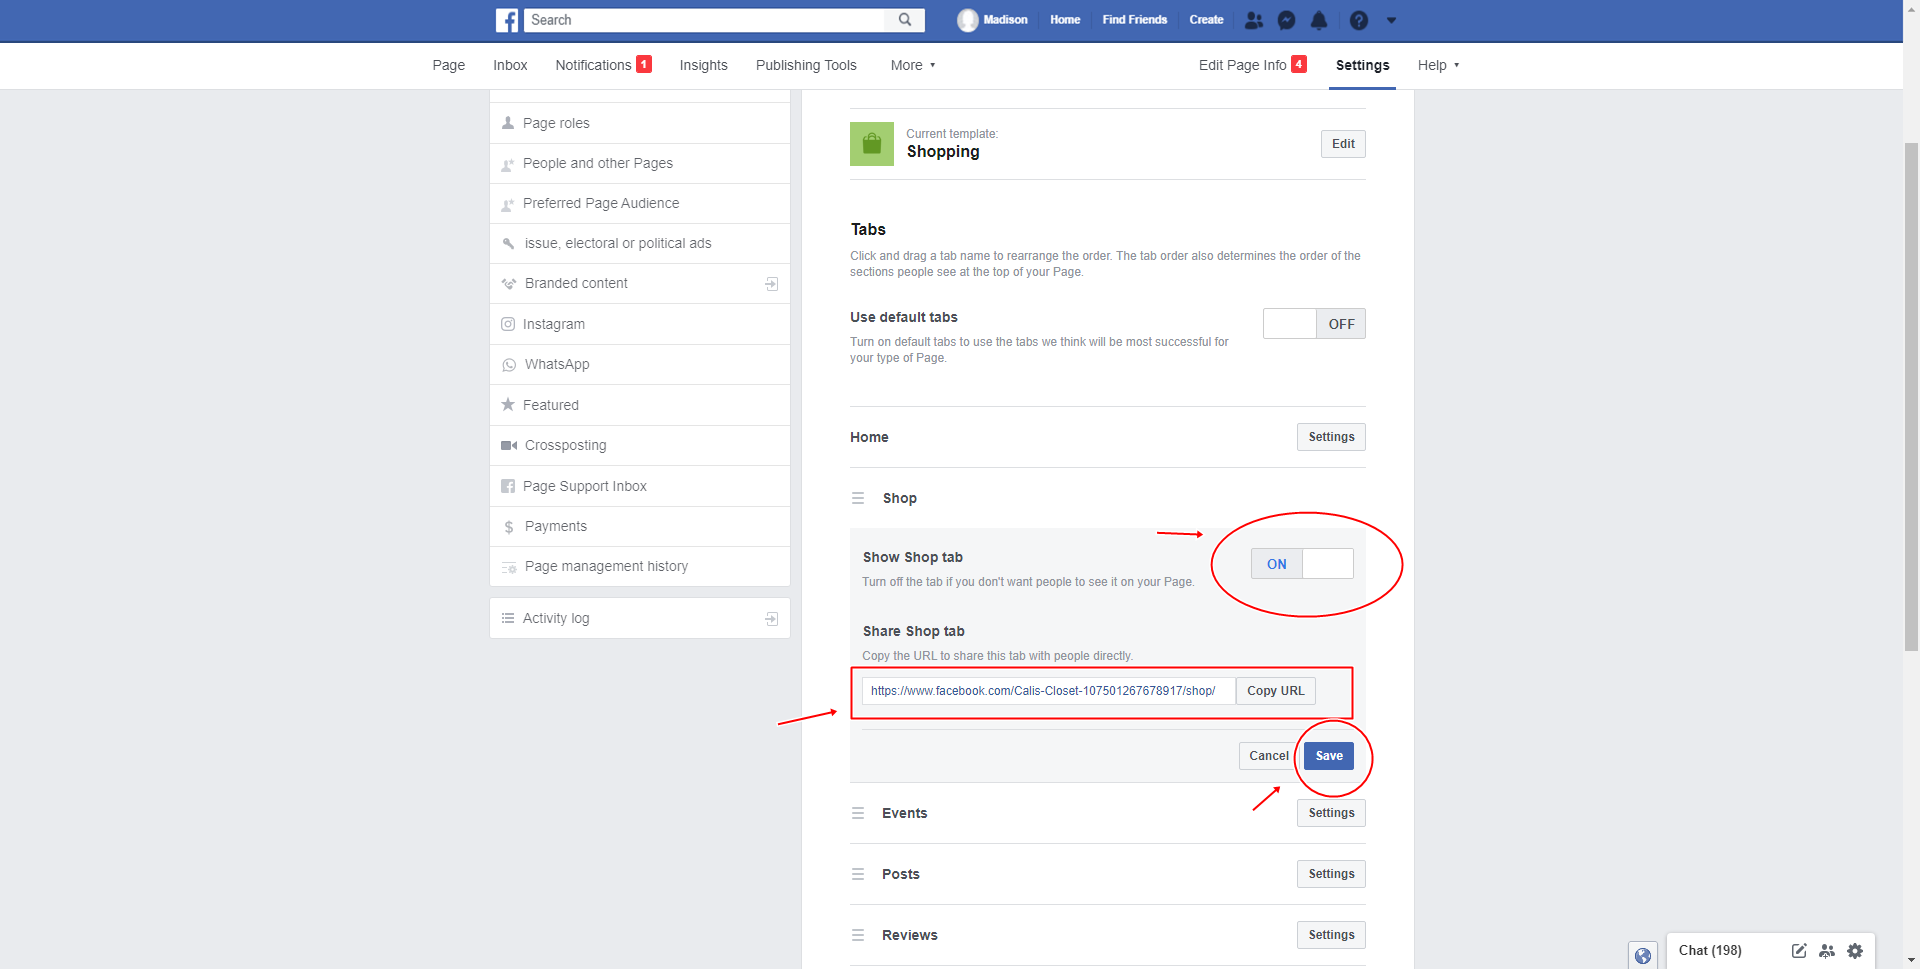
4. Make sure it is turned on.
5. Copy the URL of your Shop tab.
6. Click Save.
7. Go to your Shop tab link. (A shop tab will also appear on your Facebook Page home; below your page photo.)
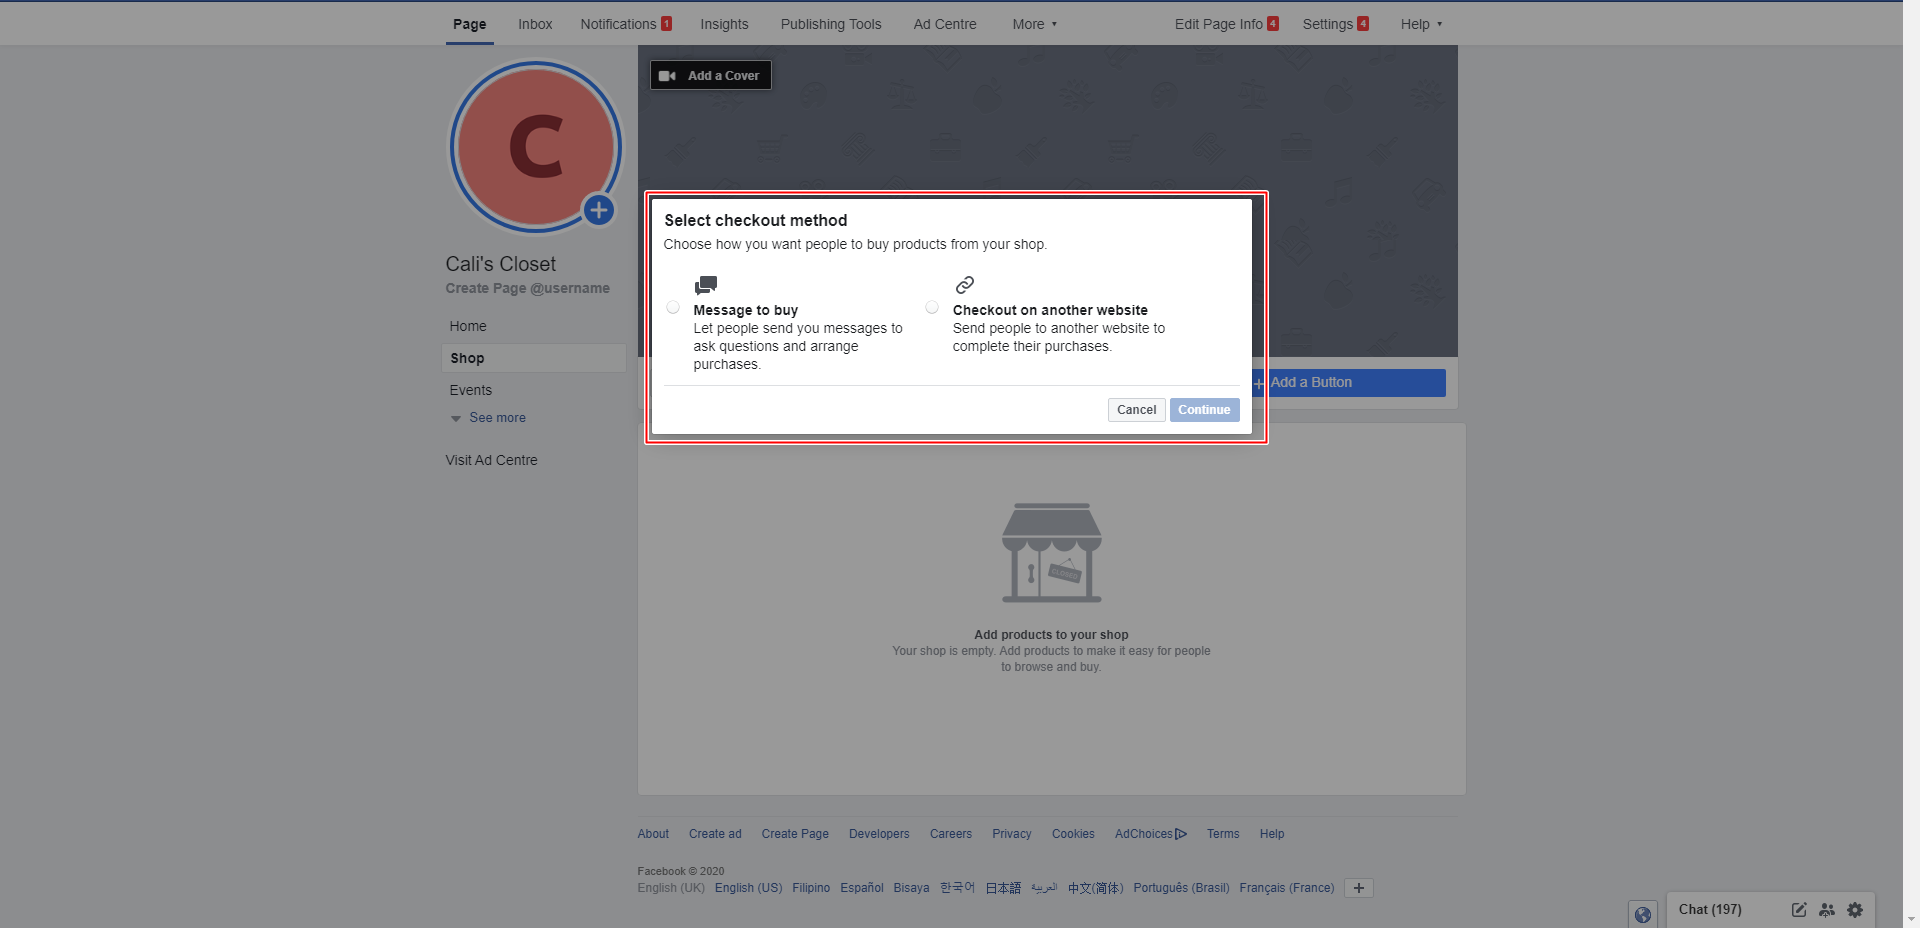
8. You will be asked to select your Checkout Method. Choose what is more efficient for you. Click Continue when you are done deciding.
● Message to buy: Let people send your page messages to ask questions and arrange purchases.
● Checkout on another website: Send people to another site to complete their purchases.
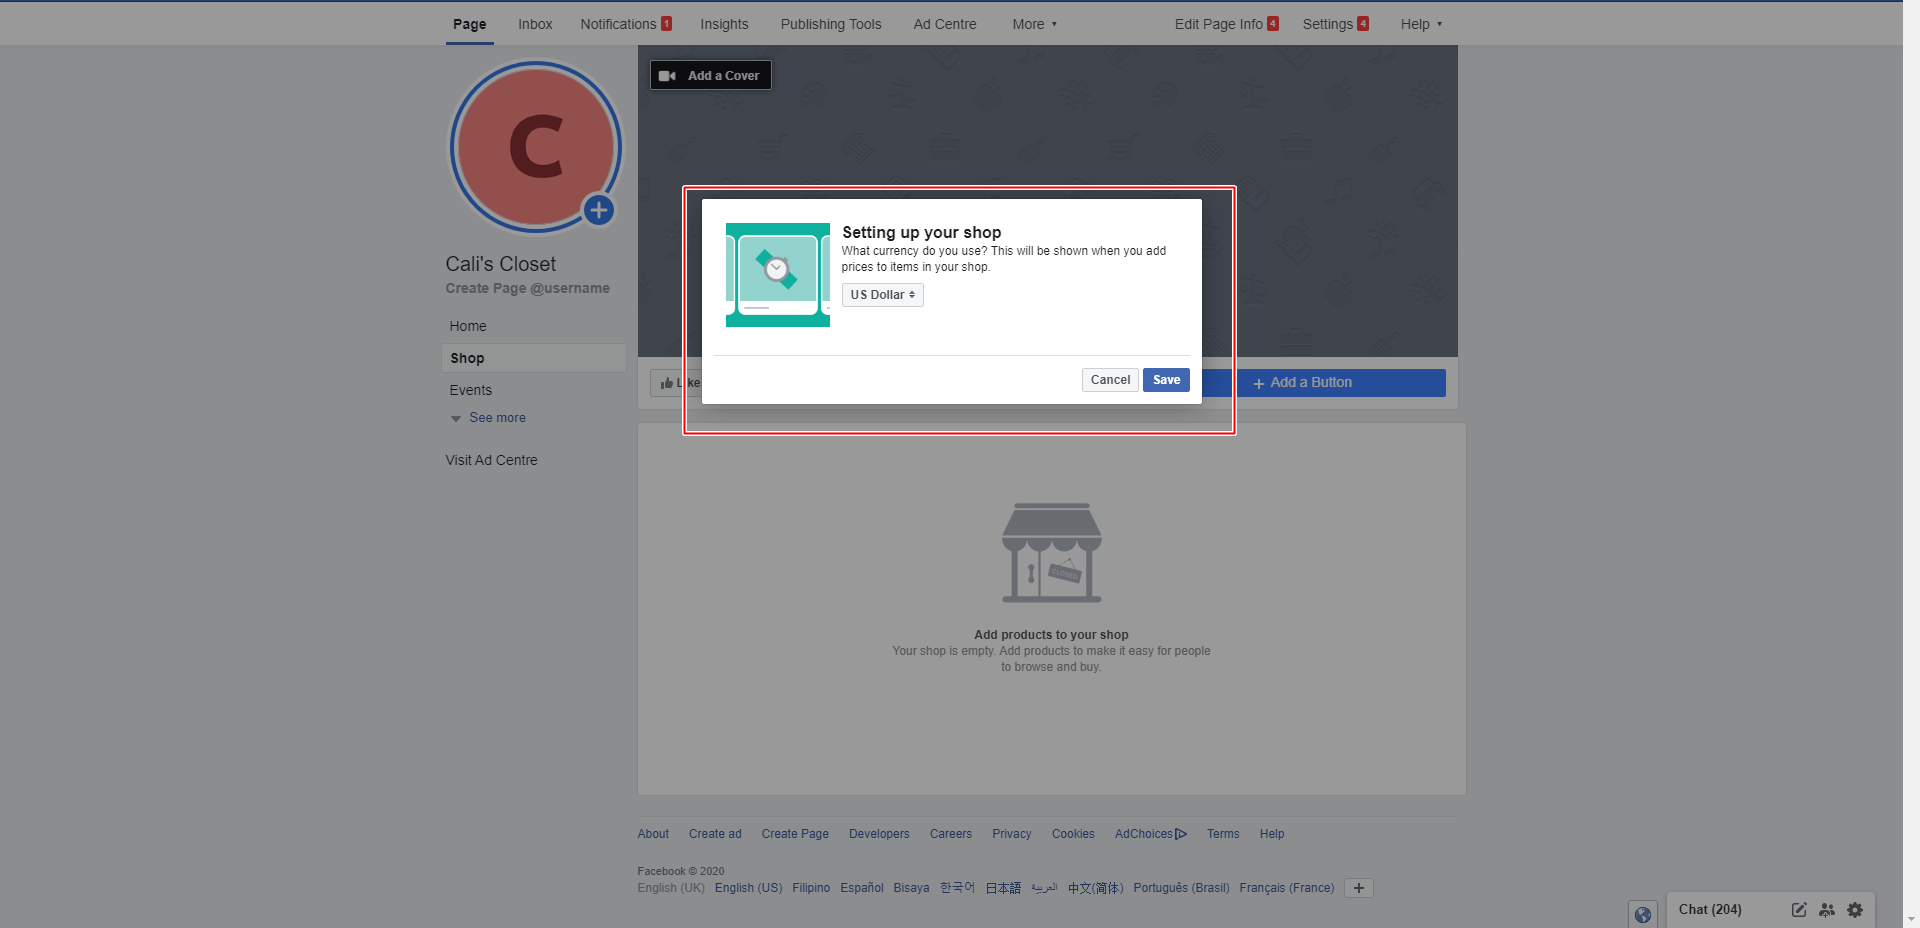
9. You will be asked to choose the currency you plan to use. This will be shown when you add prices to items in your shop.
10. Describe what your shop sells (200 word-limit) by clicking “Describe what [Facebook page name] sells.”
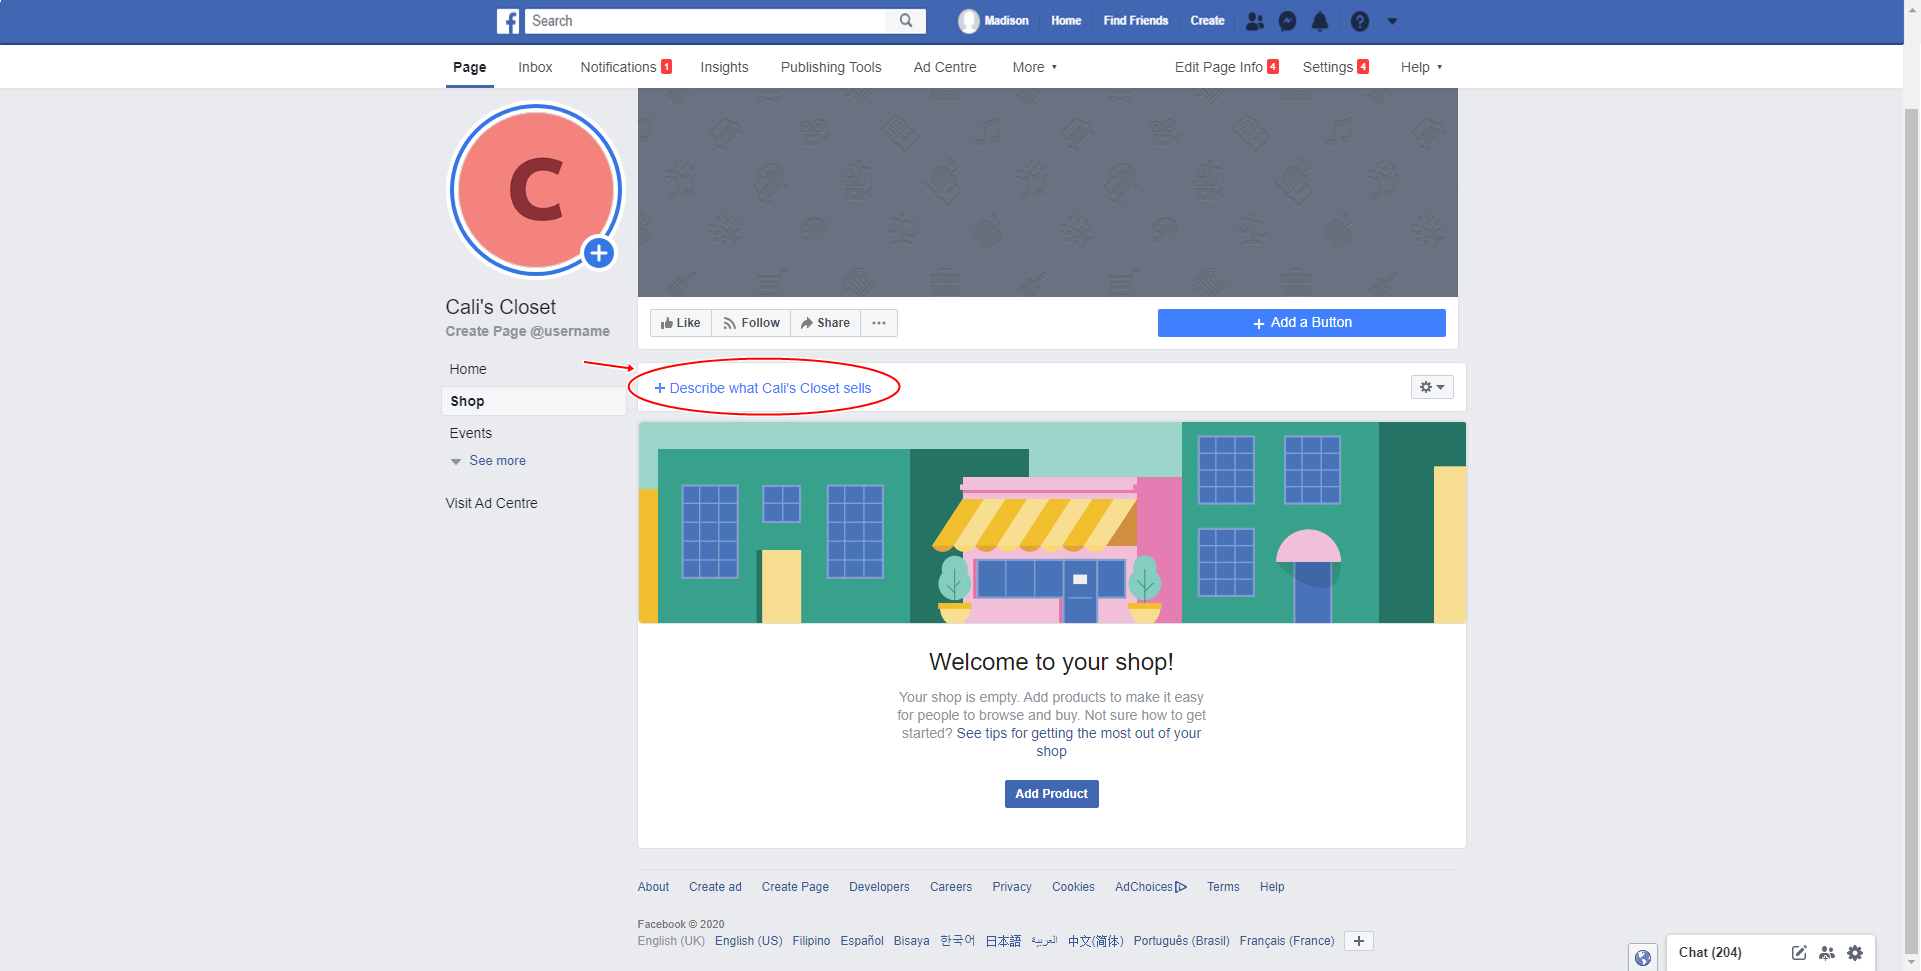
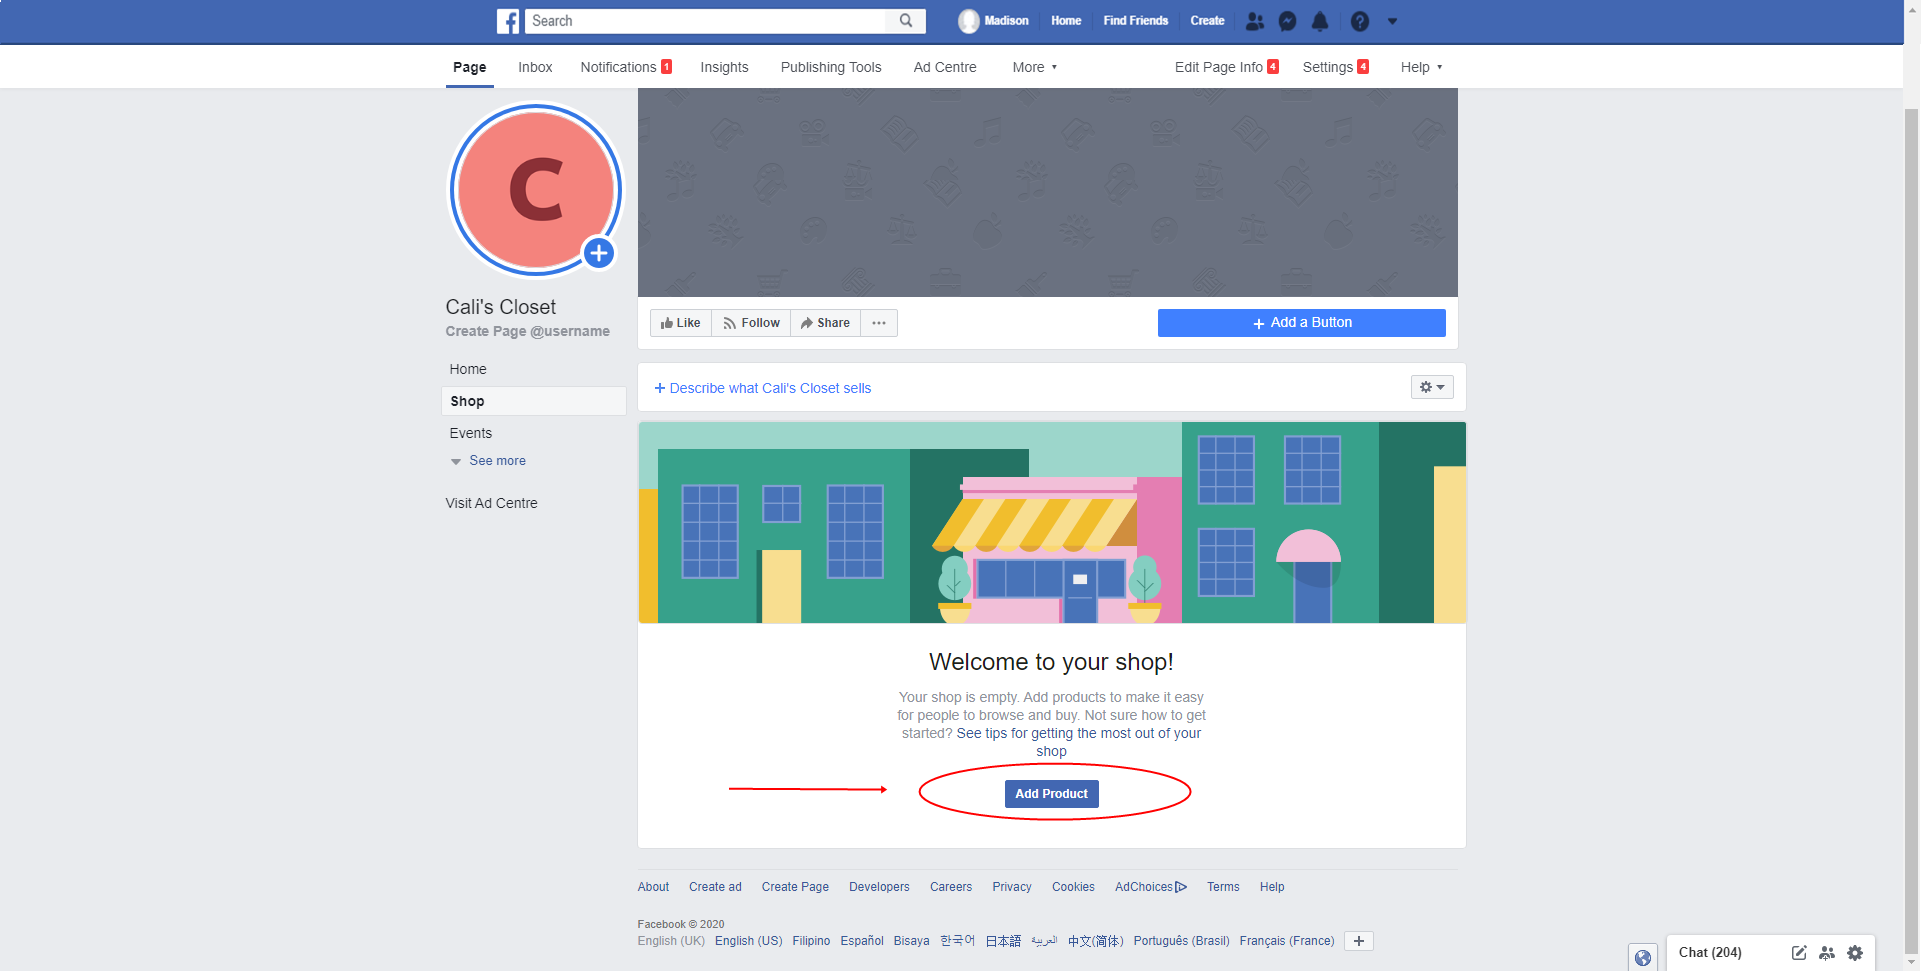
Congratulations, you now have a shop section that is visible to the public. But what is a shop section without products? Go and add your products. Follow the steps below.
III. Adding Your Product
1. Click “Add Product” on your Shop tab.
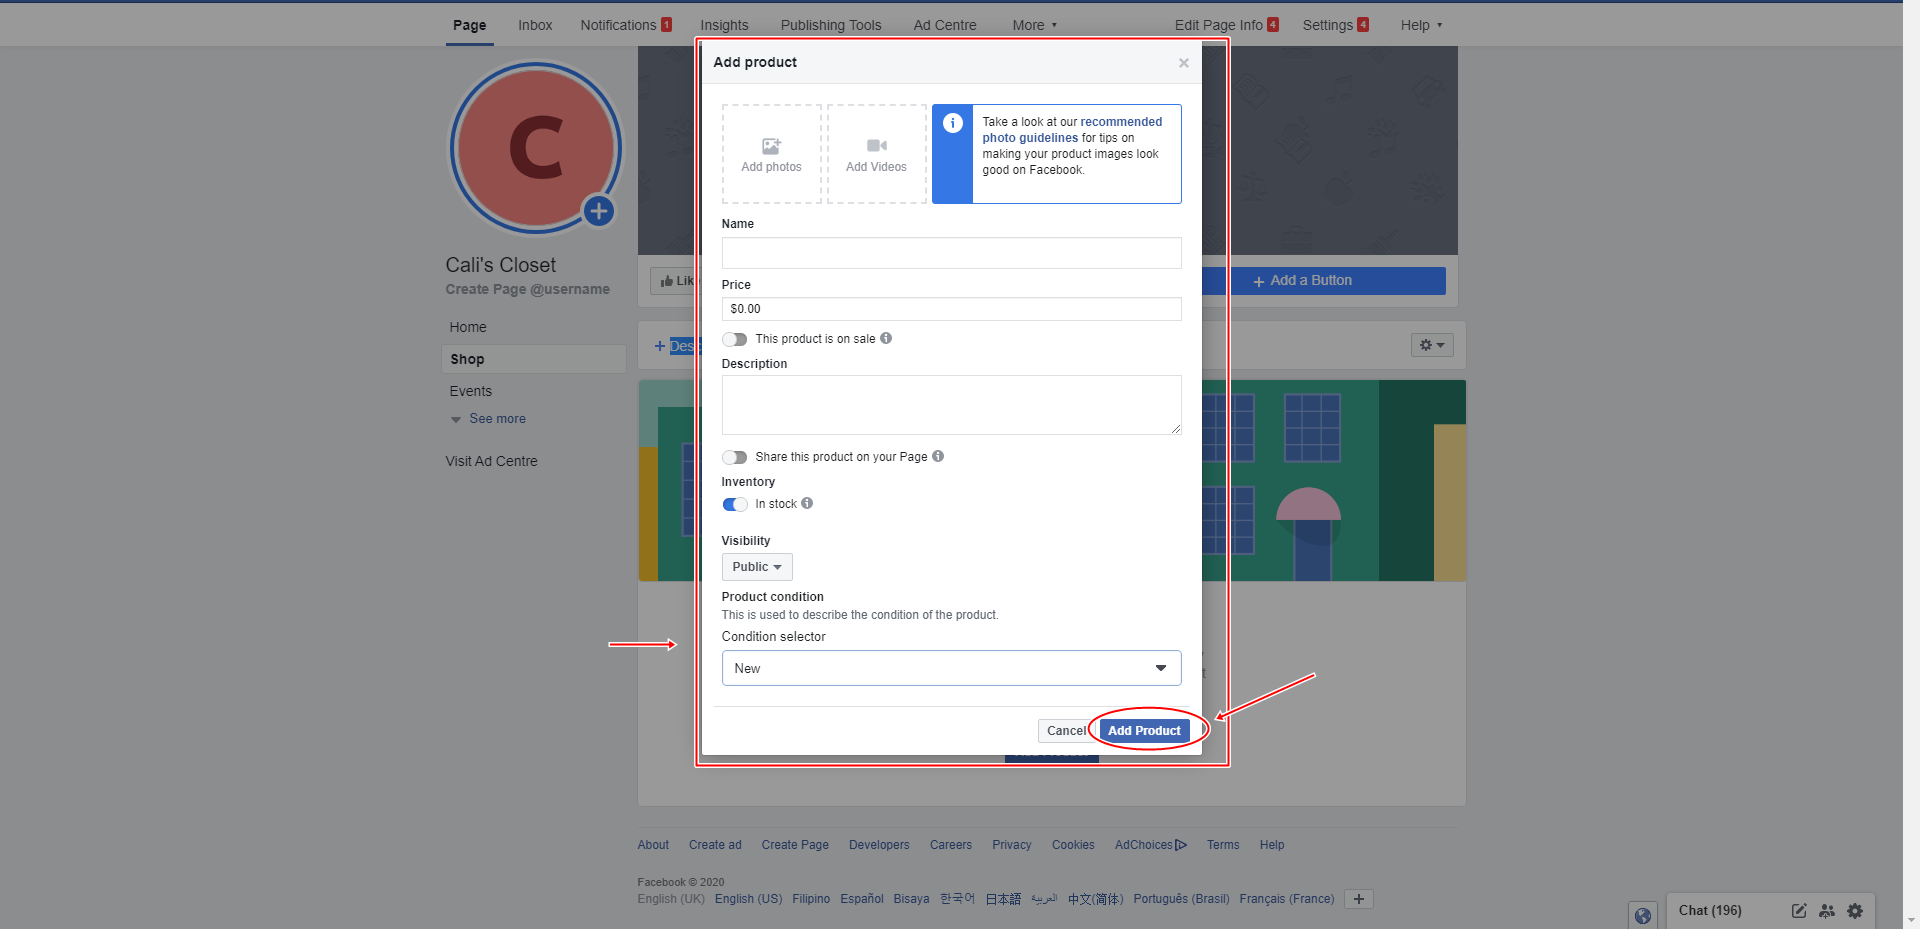
2. Fill in all the required information.
● Name: Enter your product’s name.
● Price: Add the price. Click “This product is on sale” option if there is a discount available.
● Description: Add a short story about your product.
● Share this product on your Page: Automatically post this product to your Page’s timeline as soon as it’s been approved.
● Inventory: Reflects whether the product is in stock or out of stock
● Visibility: Choose whether you want your product to be visible or not to the public.
● Condition Selector: This is used to describe the condition of the product.
3. Add enticing photos or videos.
4. Click Add Product when done.
You can also add a collection; follow the simple steps below:
1. Go to your Shop section.
2. Click on the gear button.
3. Click “Manage Shop.”
4. Click “Add Collection.”
5. Enter your desired name and choose visibility.
6. Choose the products you want to include in that particular collection.
7. Click “Save.”
Congratulations. Your shopping section is now all-set!
9. You will be asked to choose the currency you plan to use. This will be shown when you add prices to items in your shop.
10. Describe what your shop sells (200 word-limit) by clicking “Describe what [Facebook page name] sells.”
Congratulations, you now have a shop section that is visible to the public. But what is a shop section without products? Go and add your products. Follow the steps below.
Facebook Live
I. Set up a Live Broadcast
Facebook Live is a live video streaming feature of Facebook which grants you real-time engagements with your audience. Using Facebook Live, you can promote an event or announce a product launch.
Before going live, make sure that:
● You have a strong internet connection.
● You pick a good location with good lighting, free of background noises. The camera should be positioned to capture the best view.
● You give your live broadcast a clear and catchy description. This will entice more audiences to click, watch, and react.

How to go live:
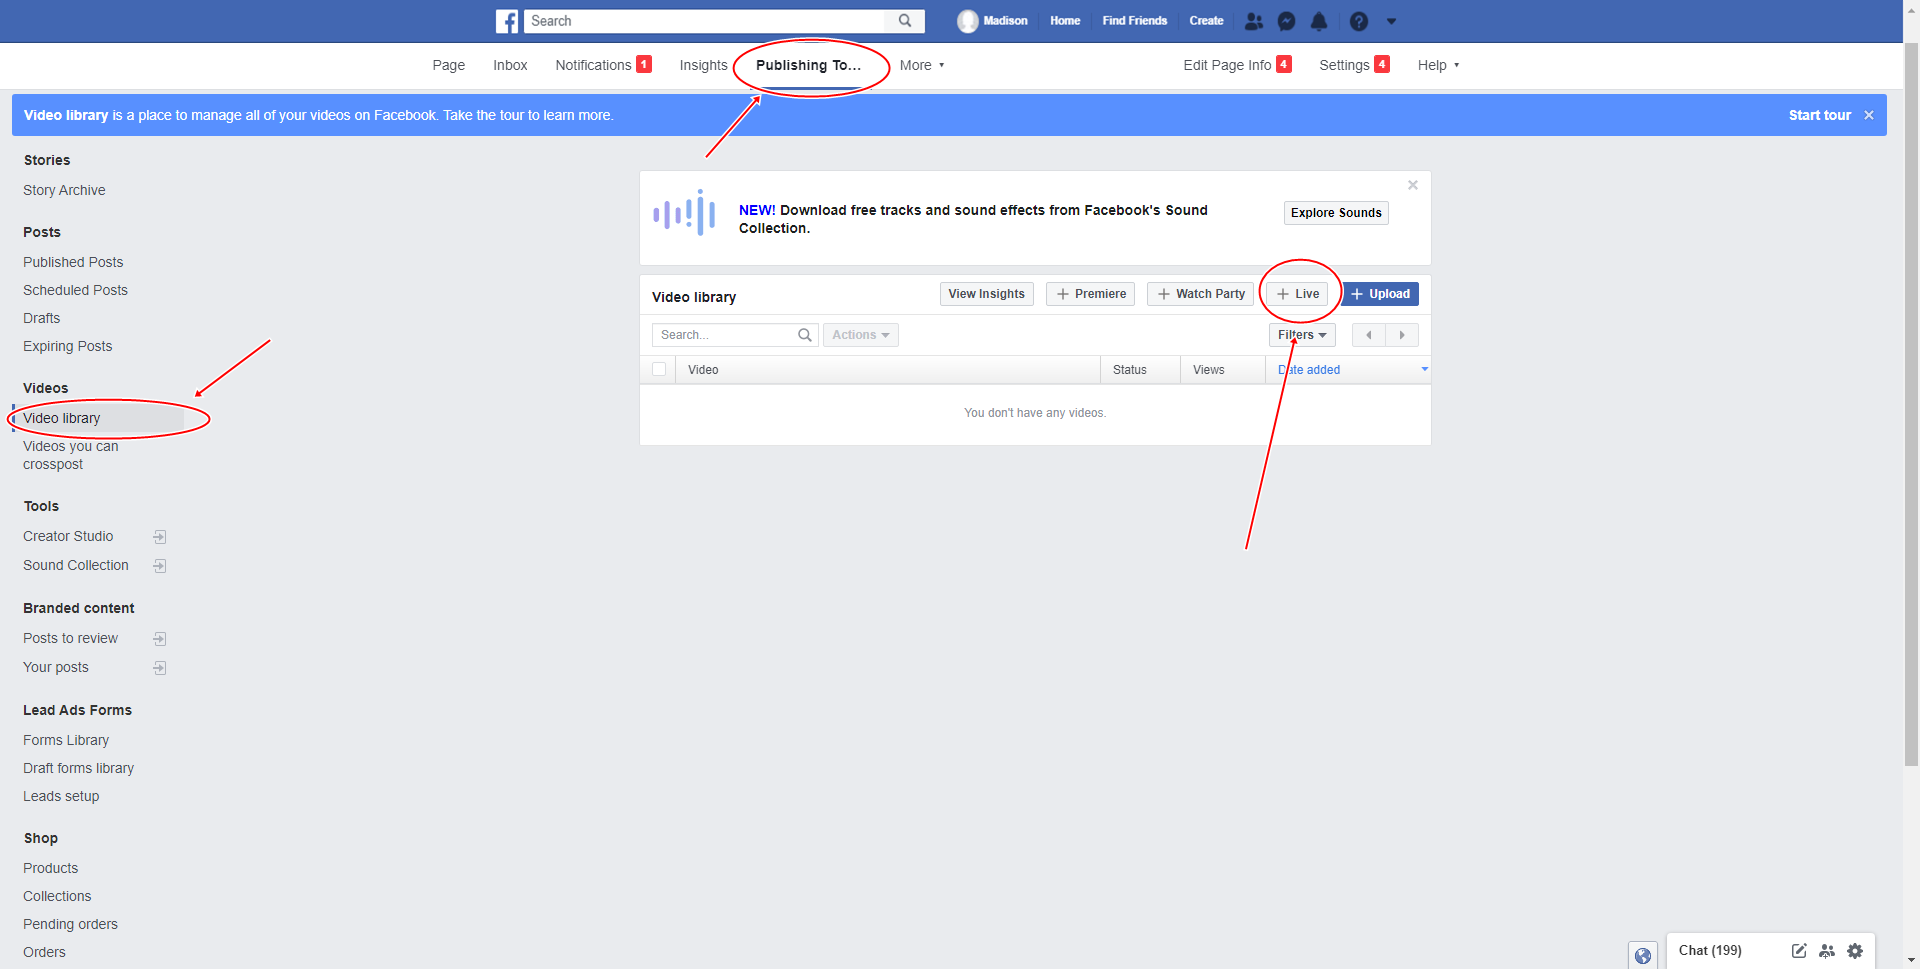
1. Go to your Facebook page.
2. Click on Publishing Tools on the upper menu of your Facebook page.
3. Click Video Library on the list of menus on the left.
4. Click Live.
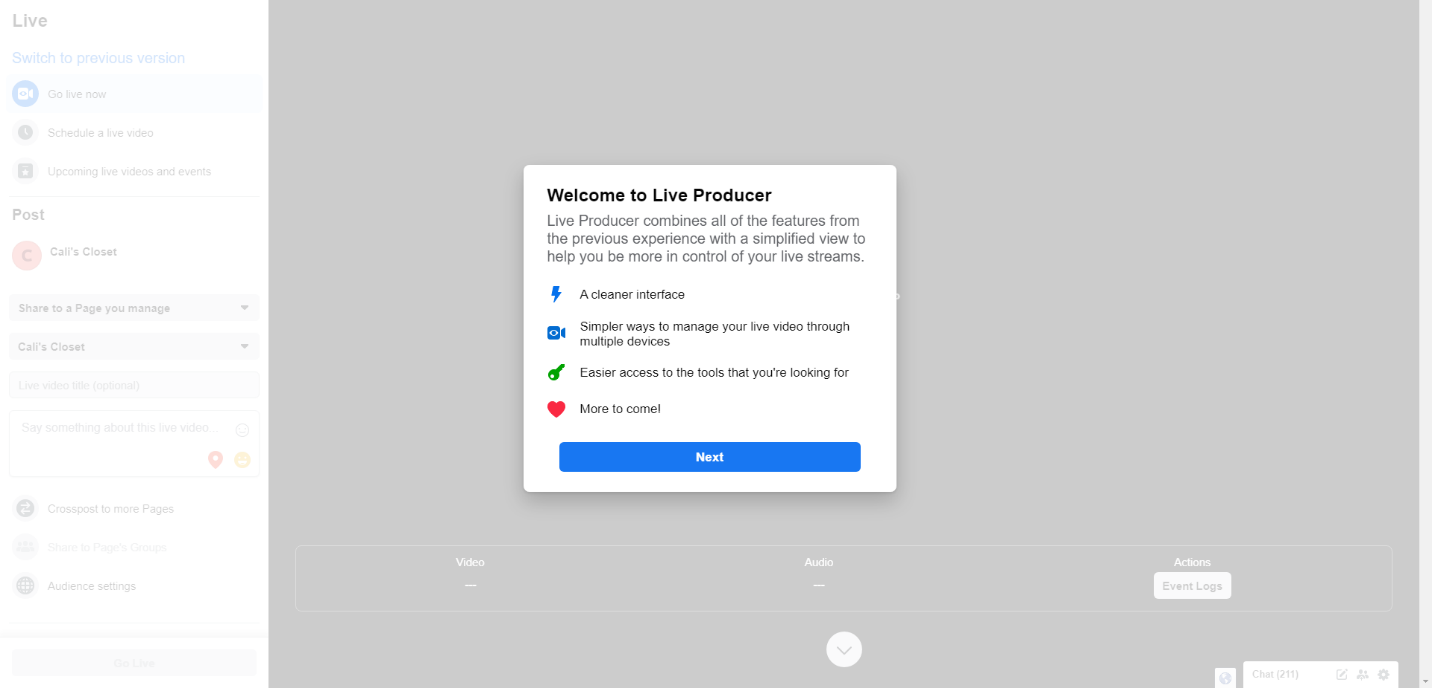
5. You will be directed to Live Producer. Click Next.
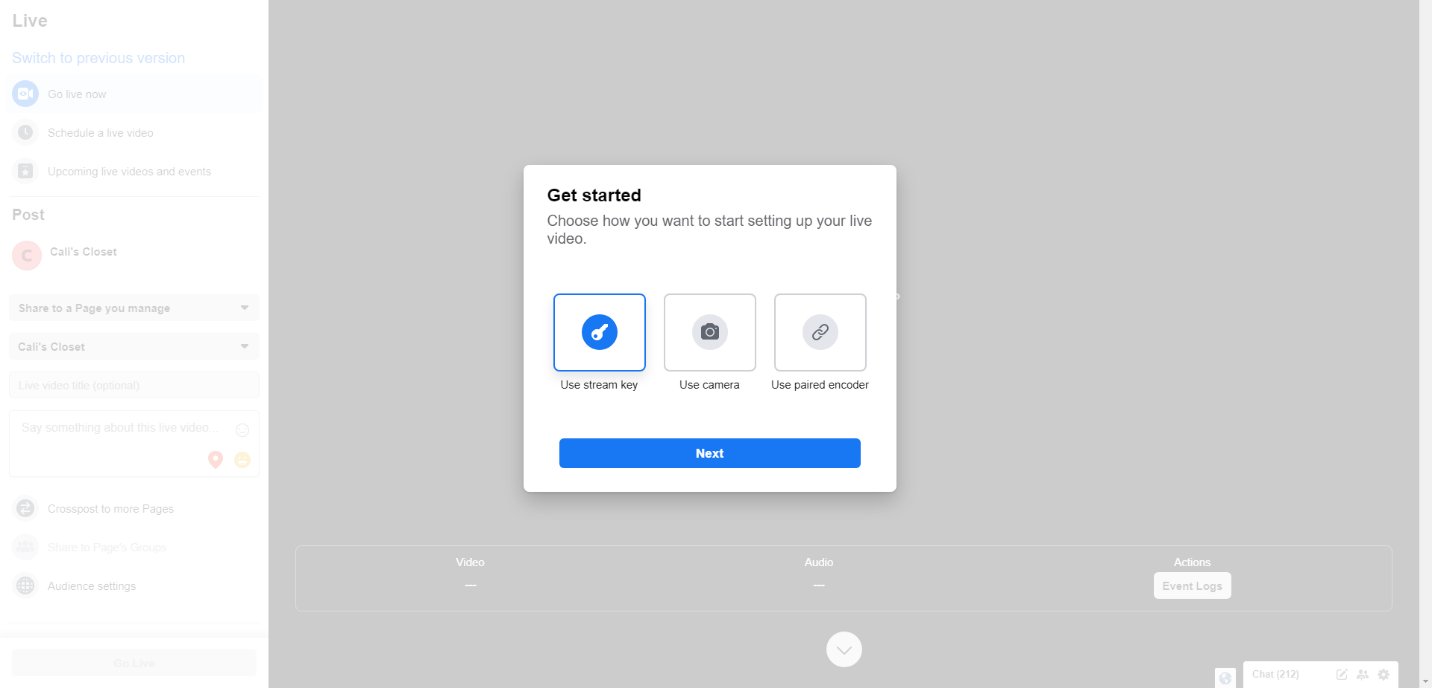
6. Choose how you want to start setting up your live video. First, choose how to create a live video. You can go live using your camera, streaming software, or a paired encoder. Once you’ve set up your live video, make sure that you review your post details. Then start your live video.
7. Click Next.
8. You will be directed to this screen (see: fb-live-4), where you can see how you are recording.

9. Manage your live broadcast using the tools at the right. Add video title and description. You can also modify the audience setting.
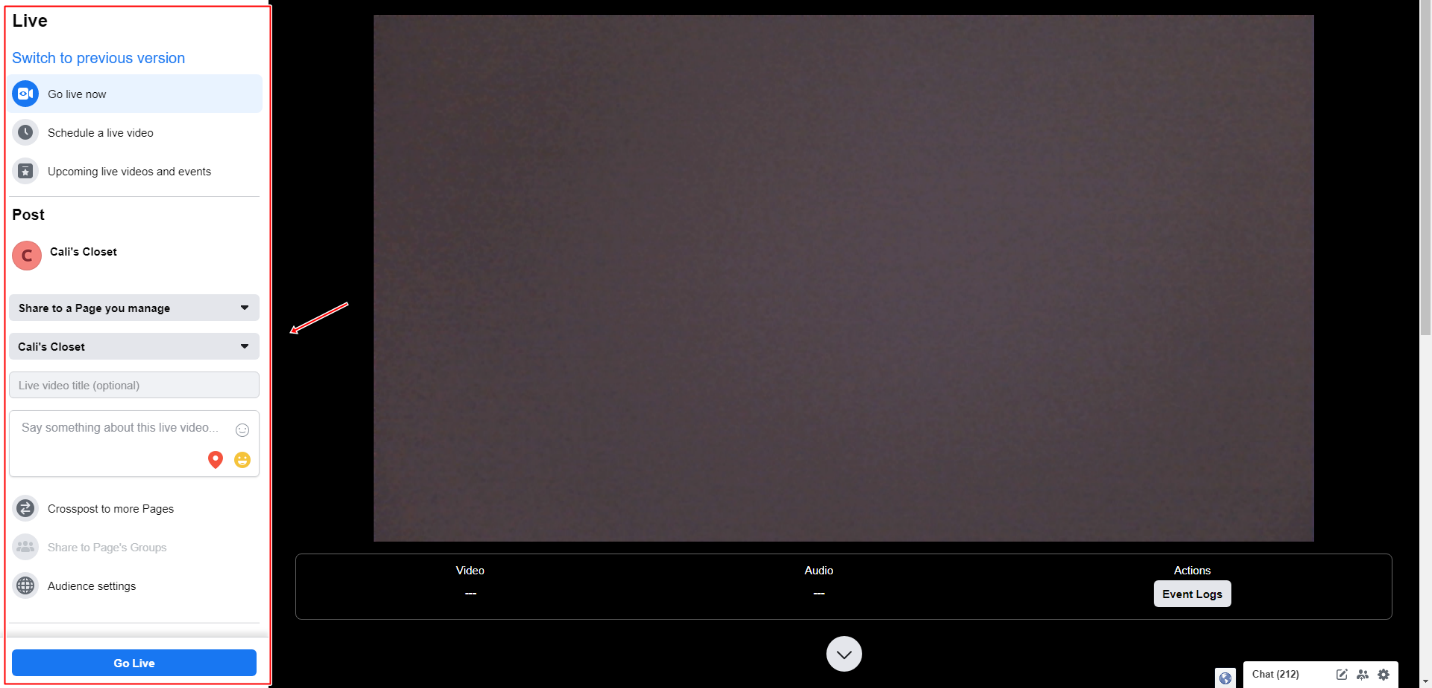
10. Scroll down to manage more of your live broadcast.
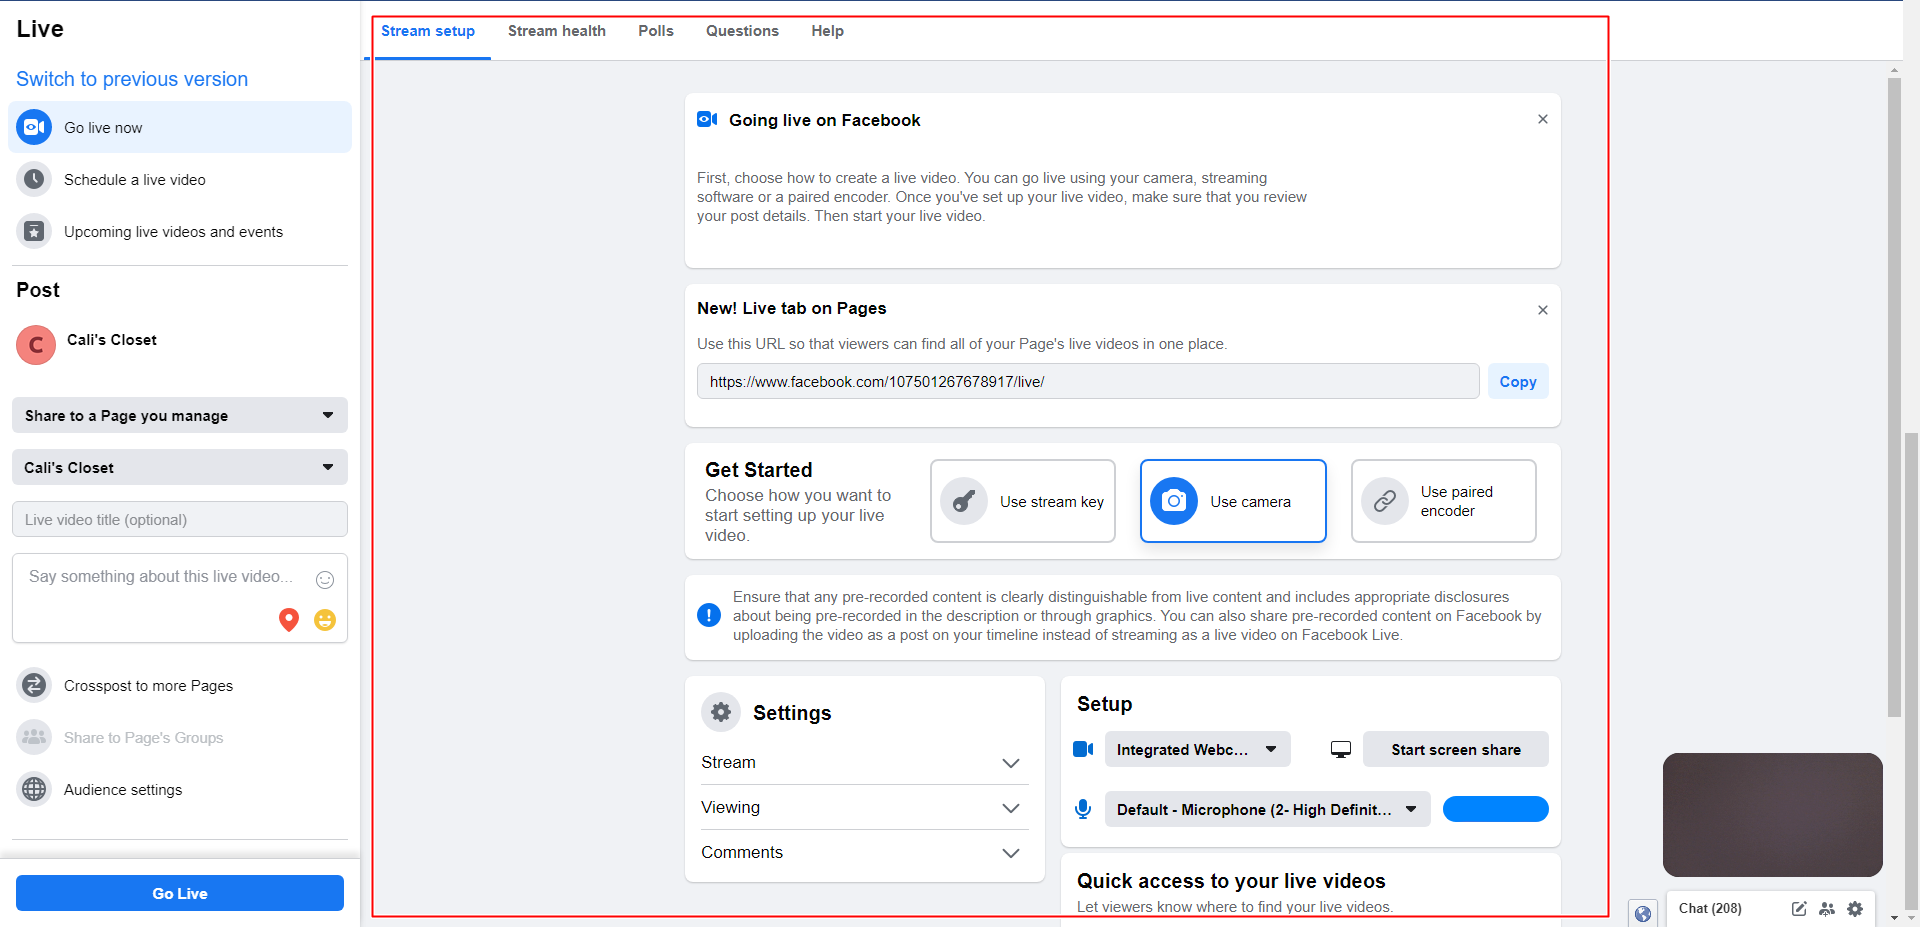
11. If you are done doing changing and altering settings, click Go Live. It will immediately begin the live broadcast. A red-light indicator will appear on your screen. Once the transmission is finished, a recording of the show will be posted to your Page.

Messenger Chatbots To Get Leads
What are Lead Generation Chatbots?
Lead generation chatbots are chatbots designed to recognize and have conversations with potential customers, instigate their interest in your business’ products or services, and build relationships.
By using lead generation chatbots, you can:
● Collect the contact details of your visitor/audience
● Automate active engagement
● Offer help and assistance whenever your live customer service is busy or offline.
● Increase engagement
● Gain your visitors’ subscriptions by offering them in a fun and engaging way

How Can Chatbots be Used In Lead Generation Strategies?
1. Getting to know your audience
Chatbots lets you discover consumers’ product interests, preferences, likings, as well as their disapproval. They can also be used to conduct surveys and ask questions. This information will help you realize the best-performing products you have and tailor a lead generation strategy to boost your sales.
2. Segmentation
Chatbots help in segmenting audiences based on their data. This helps keep your content relevant and appropriate. Meaningful content can step up your lead generation strategy.
Segmentation can also help in lead nurturing. You can offer your customer a fitting solution for a particular category/section. For instance, if a user celebrates Valentine’s Day, your bot can show the user Valentine presents available for the customer to give at Valentine’s.
3. Build relationships
Chatbots can help you establish trust with your audience by having a quiet and sensible conversation with them. Chatbots assures your audience that they will have instant support that will help them with their needs. This can surge your leads. You can offer customer support using chatbots. Whenever they ask for help, you can spark their interest and lead them to enquire or even purchase your product or service.

4. Improve forms
Filling out forms can be time-consuming, and it is neither engaging nor fun. Chatbots can step into the shoes of types. Chatbots have autofill options that can process data collection fast. They can collect lead information without inspiring boredom to the user.
5. Educate the audience
Chatbots can educate your audience about your product or service. This can initiate your customer’s interest and increase lead generation.

Right Tools to Use
Facebook is a social media giant with tons of marketing potential. Make the best out of it by using the right tools that can help you understand your audience and their behavior. You can also find ways on how to maximize your engagement rate.
Default Facebook Tools Are Not Enough
Facebook Insights is Facebook’s analytics platform and metrics. It shows your Facebook page’s engagement rates, demographics, and reach. You can learn about how ‘viral’ each of your posts are.
However, Facebook Insights has its limitations, such as:
● Insufficient listening tools for identifying trends.
● Limited cross-platform publishing and analytics for brands with several social accounts.
● The interface may be a little hefty to navigate for newbies.
Optimizing Facebook ads is a research-heavy process. If you lack vital information and are not knowledgeable enough in Facebook advertising, you could easily put your ad money to waste, with no results. It is important to use Facebook advertising tools to understand your audience’s data, maximize engagement rate, optimize your ads, build lasting relationships with your customers or clients, and produce click-worthy and enticing Content.
Some Powerful Facebook Advertising Tools
Here are some of the most powerful Facebook Advertising tools that can bolster customer engagement:
1. Facebook Ads Manager
Facebook Ads Manager lets you access all of Facebook’s marketing tools. It is extremely easy to use, and you get full autonomy on your ad; you choose your audience, set your budget, customize your ad as much as you want, and track your results.
Facebook Ads Manager lets you:
● Increase your posts’ reach
● Promote your Facebook page to get more likes and following
● Direct people to your website
● Increase conversions
● Gain app installs and app engagements.
● Establish contact with people near your business
● Increase attendance at your Facebook events
● Invite people to claim your offers or discounts
● Earn video views
● Get leads
2. Facebook Ads Manager App
You can control your marketing campaigns even without a desktop computer. This is extremely helpful for marketers who frequently travel. With Facebook Ads Manager App, you can:
● Track your ad or ads performance
● Edit existing ads
● Edit schedules
● Edit budget
● Create ads
● Receive push notifications
The app is available on both Apple and Android.
3. Facebook Pixel
Facebook Pixel is a code embedded into a website that keeps track of the visitors’ behaviors and actions while on the site and links them to their Facebook user profiles. This analytics tool can help understand the behavior of people as they explore through your website. This data is utilized to assign people to different target groups, which will then be used in creating ads.
4. AdEspresso
AdEspresso is an extremely useful Facebook ad creation tool that is easy to use even by newbies. Facebook requires specific ad modifications and targeting options that can be challenging and time-consuming, but AdEspresso makes ad optimization simple, increasing the ROI of your campaigns. It allows you to test several ad variants to determine which one of your options would produce the best result. AdEspresso also gives a fully-customized report of your Facebook Ads performance.
AdEspresso services:
● Create Your Campaigns
● Analyze Your Campaign
● Optimize Your Campaigns
● PDF Reporting
● Education
● Synchronization CRM
● Automatic Page Post Promotion
● Campaign Approvals
Some AdEspresso features:
● Clean, simple, and easy to understand visual analytics.
● Customizable dashboards that let you key out top-notch ads will show you the numbers that mean the most to you.
● Complete and comprehensive metrics for deeper understanding
5. Hootsuite Ads
Hootsuite ads tool features:
● Create ads quickly; you only need a few minutes and a few clicks to get started.
● The application scans your Facebook page and its news feed automatically to search for the best posts and analyze them.
● Guides you with your ad objectives by giving you the autonomy to modify your marketing campaign.
● Efficiency in bulk post and schedule.
● It has advanced marketing features that allow you to access paid and organic Content uncomplicatedly.
6. Qwaya
Qwaya is a Facebook ad management platform. Its key functions are:
● Ad scheduler: arrange a specific schedule for your ad campaigns
● Ad and campaign rules: set and define performance-based standards to pause your campaigns
● Ad rotation: auto-rotate your ads to decide what ad variation in running.
● URL builder: save your work for easier access and reuse for future ad campaigns.
● Google Analytics integration: seamless plug-and-play integration with Google Analytics.
● Multi-user: add several users for teamwork
● Campaign organizer: organize your ad campaigns using the uncomplicated drag-and-drop system.
● Split testing: Audience A/B testing and Ads A/B testing.
● Multi-product ads: advertise and sell multiple products.
● Excel export: Export your crucial data in .xlsx or .csv file formats.
● Free training session: all plans come with a free training webinar for the newbies.
● Targeting and ad templates: numerous advertising templates are aiming for different audiences that you can choose from
7. Canva
Canva is one of the most popular online graphic tools, and it’s free, user-friendly, and incredible to make great designs. It has been an amazing, empowering tool for businesses. It allows you to hold on to your brand while you produce plans for your business with ease and convenience. Make the best out of Canva by using it to establish a professional and eye-catching online presence. Use Canva for branding and to increase your brand awareness. You can use Canva in creating:
● Profile picture
● Cover photo
● Logo
● Facebook Stories
● eBook
● Content Materials: letters, certificates, presentation slides, business cards, invitations, menu, infographics, any many more
● Shareable Content: graphics, gifs, etc.
8. Pixabay
Pixabay is a site where you can get thousands of free images, photos, videos, illustrations, and vector graphics. You can use the images in creating your social media content.
9. Pexels
This site is the same as Pixabay, where you can get free images. However, this site offers photography only.
Best Time to Post
Overall Best Times to Post
Most social media management platforms believe that the following are the overall best times to publish a post:
● The best time to post is 9 am because people are just beginning work and people go online for the first time.
● People tend to scroll through Facebook during lunch breaks (11:00 am to 12:00 pm); hence, resulting in a surge in click-through rates.
● Late afternoon, specifically 3:00 pm – 4:00 pm, are ideal times for posting, both for B2C (Business-to-consumer), B2B (Business-to-business).
Keep in mind that every brand’s audience is unique. The best time to post on Facebook depends on your industry, product, and or service. There are a variety of other factors that answer the question, “When is the best time to post?” and they vary significantly.
Knowing the peak engagement times, however, can give a better opportunity to bolster your engagement potential.
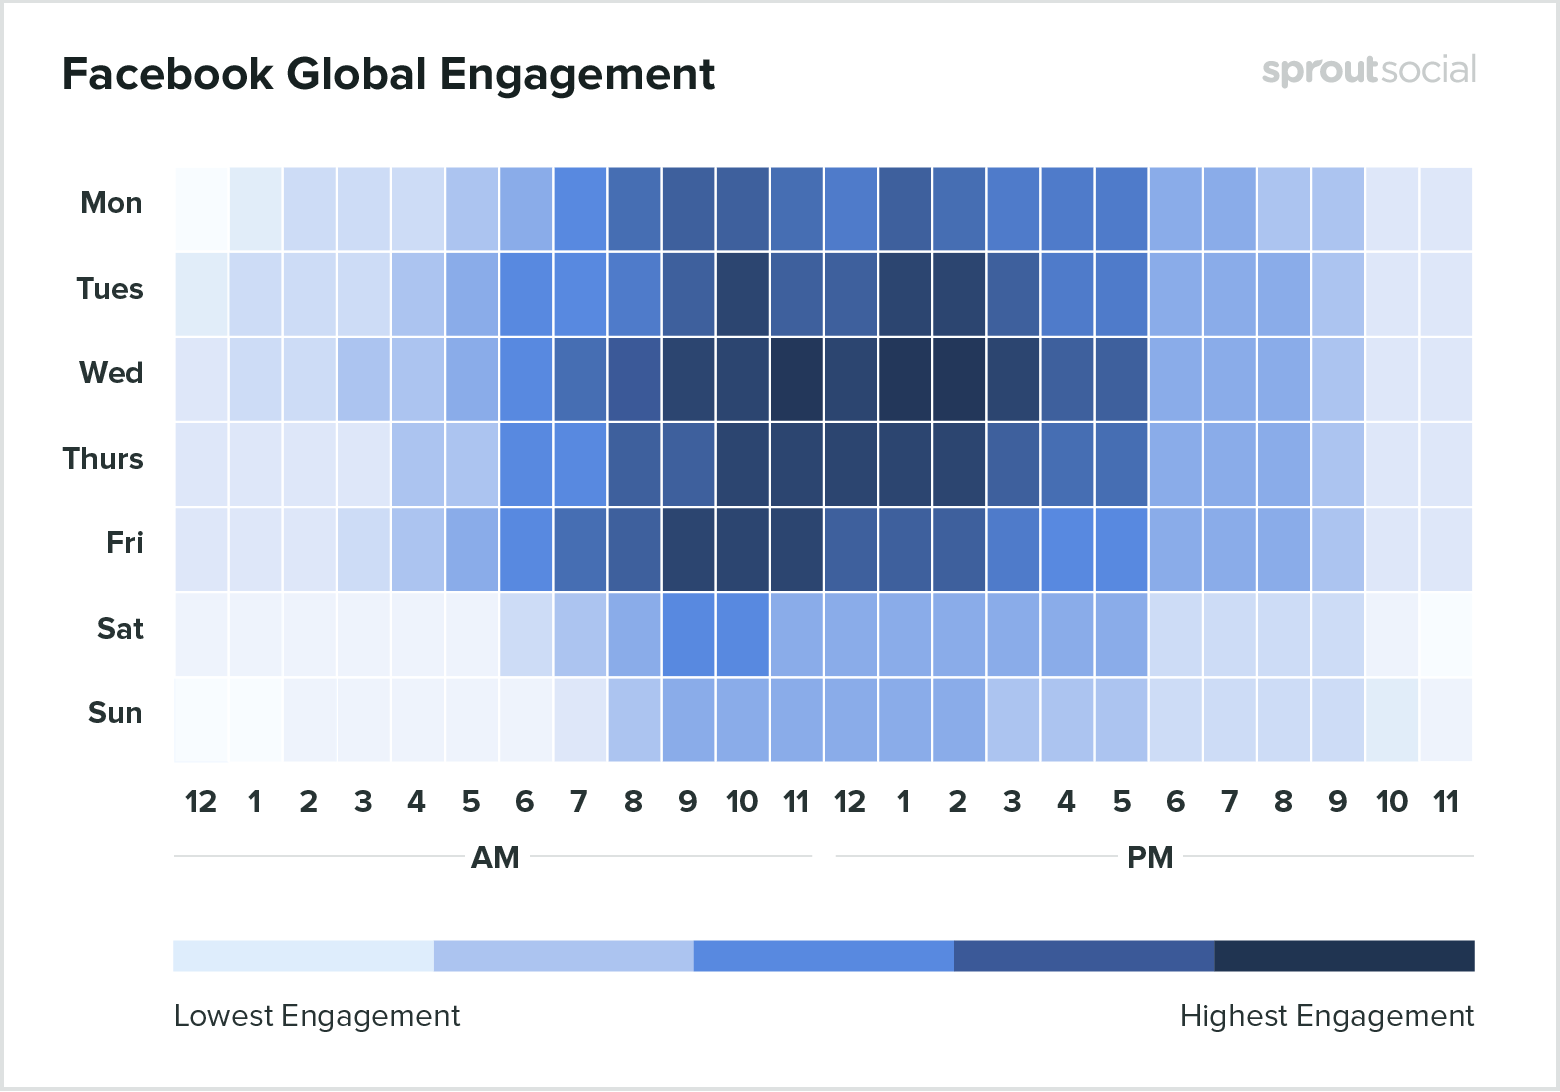
Peak Engagement Times on Facebook
Sprout Social conducted a study wherein they investigated and deeply analyzed over 20,000 data from its social media software, which records customer interactions. They compiled the findings by the platform. The study was published on March 10, 2020.
You can read the full report of Sprout Social here: https://sproutsocial.com/insights/best-times-to-post-on-social-media/.
For Facebook, the Peak Engagement Time are:
● Best times: Wednesday, 11 am, and 1–2 pm.
● Best day: Wednesday
● Worst day: Sunday
● Safest time: Weekdays, 9 am- 3 pm
● Least amount of engagement: before 7 am and after 5 pm.
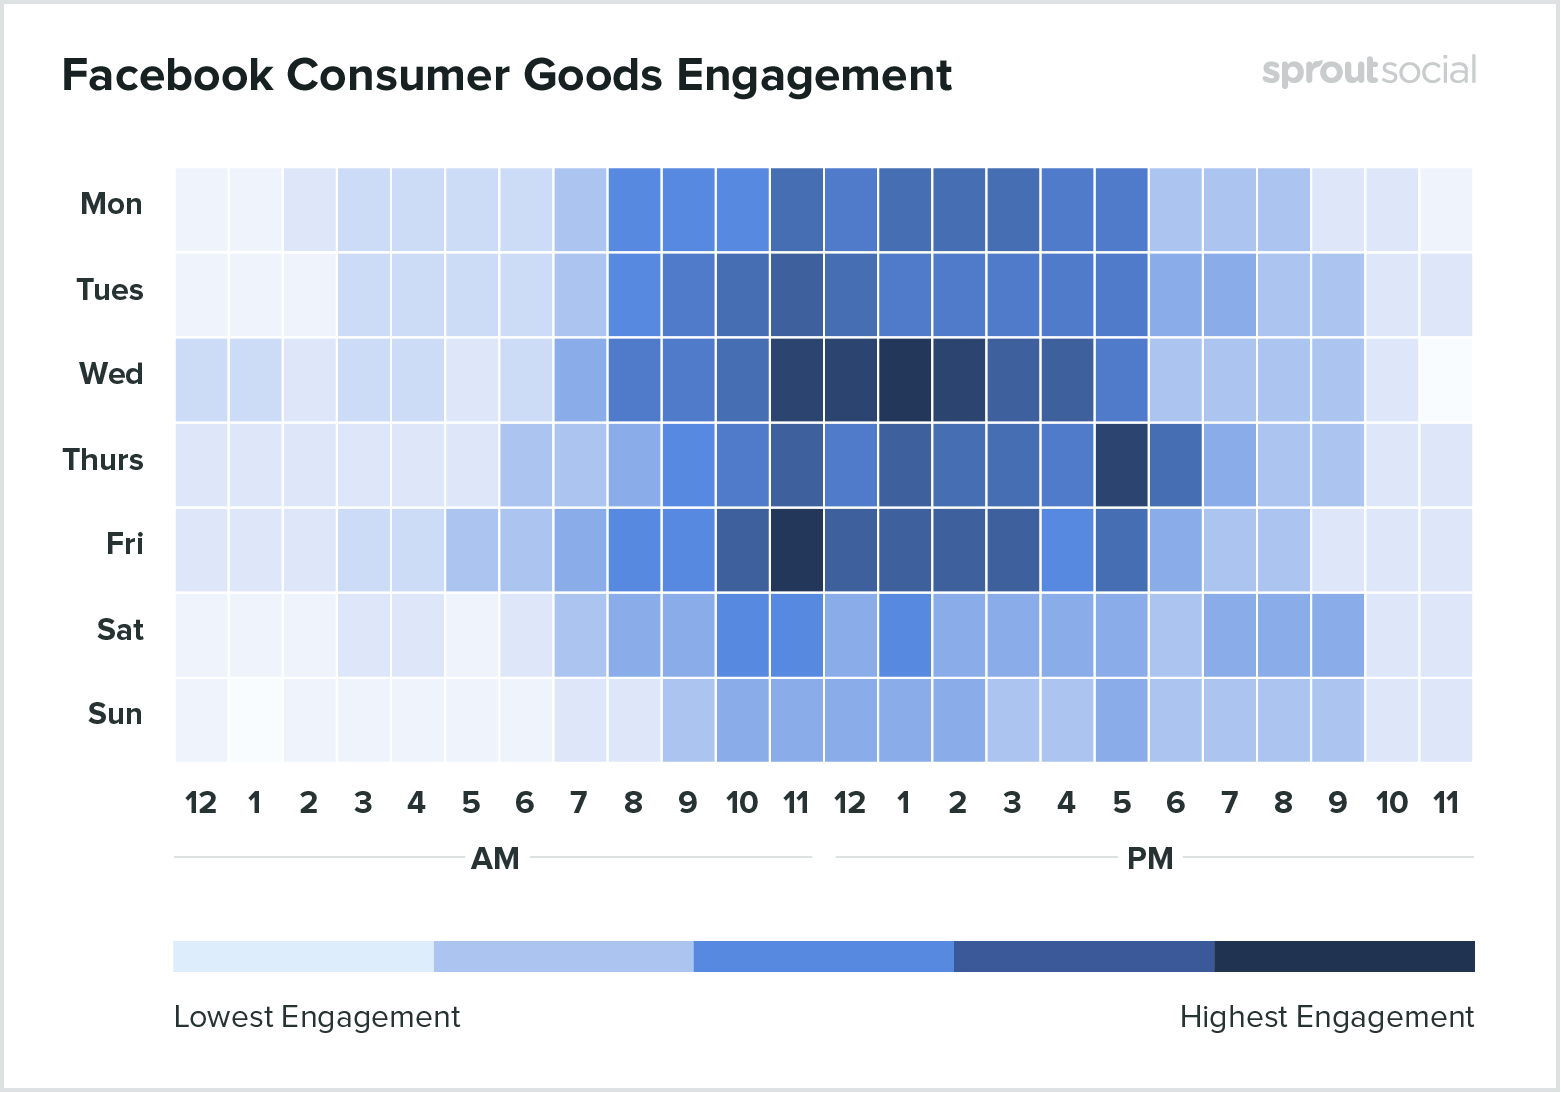
For Facebook, the Peak Engagement Time are:
● Best times: Wednesday at 1 pm and Friday at 11 am.
● Best days: Wednesday and Friday
● Worst day: Sunday
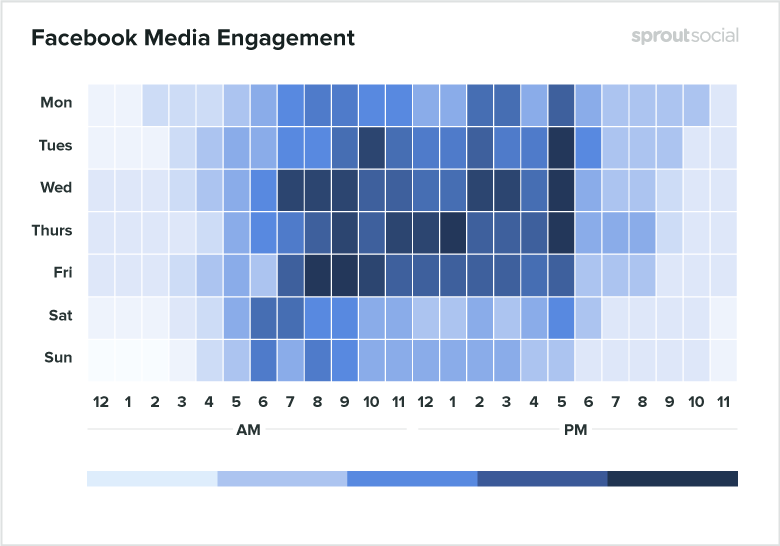
Peak Engagement Times on Facebook for Media:
● Best times: Tuesday, Wednesday, and Thursday at 5 pm, Friday from 8–9 am.
● Best day: Wednesday
● Worst day: Sunday
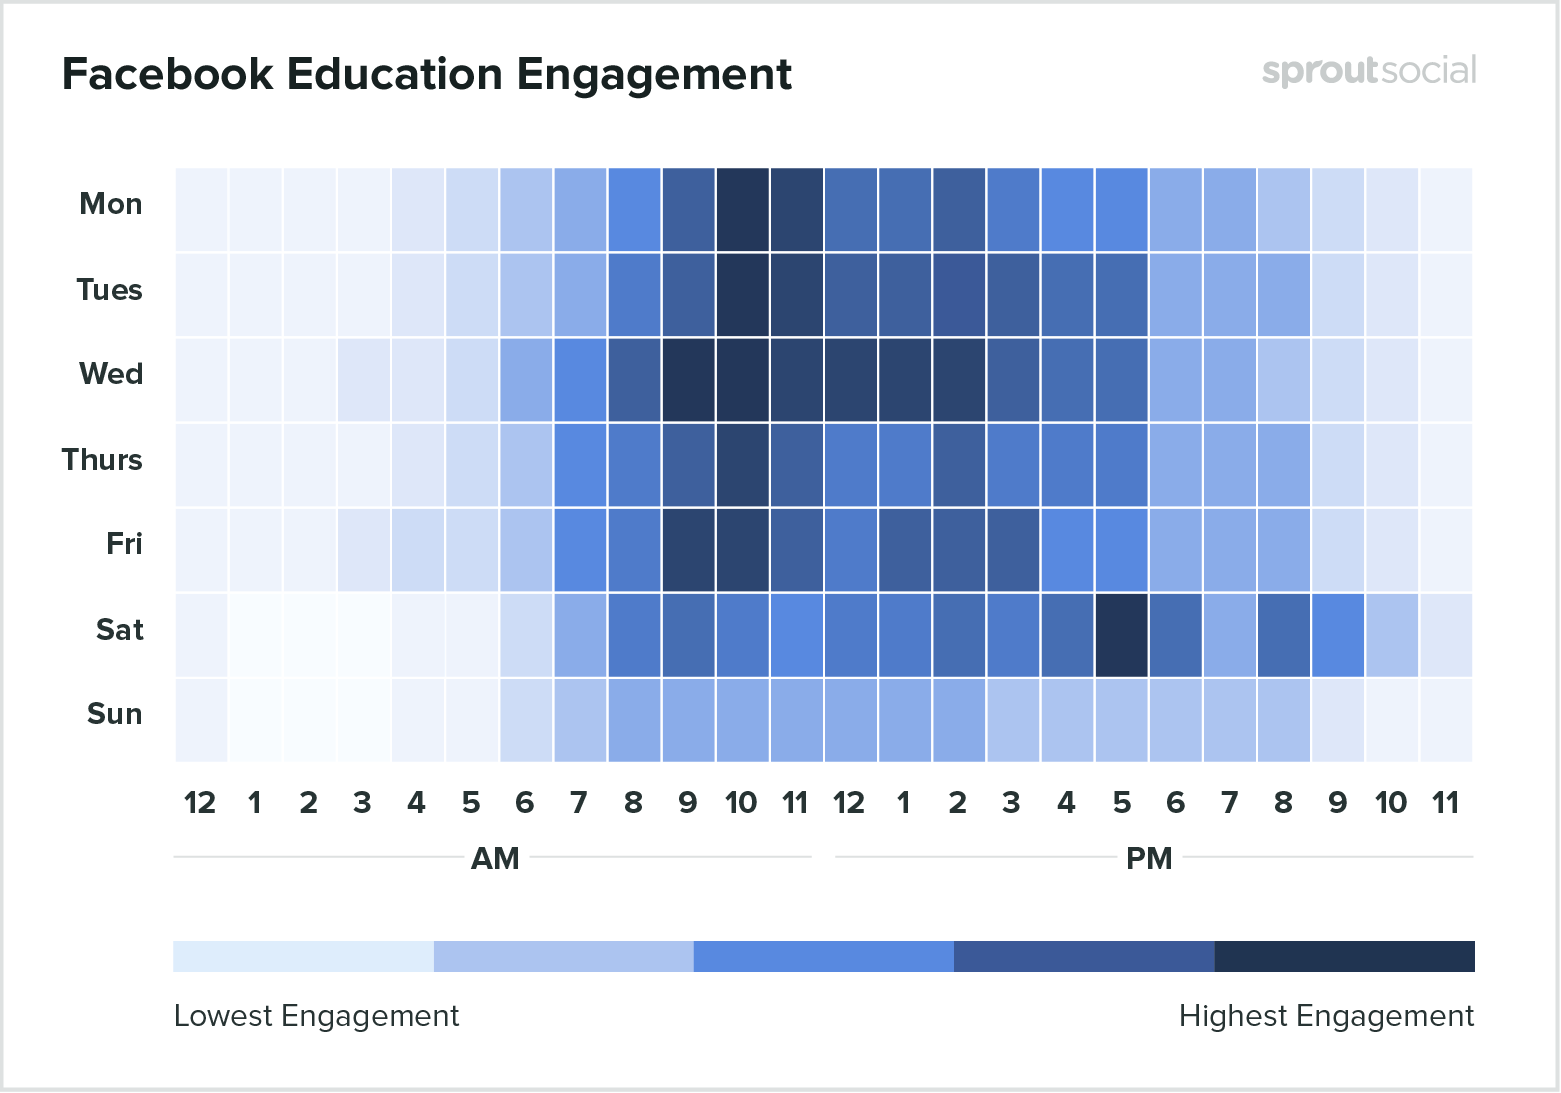
Peak Engagement Times on Facebook for Education:
● Best times: Wednesday at 9 am and Saturday at 5 pm.
● Best day: Wednesday
● Worst day: Sunday
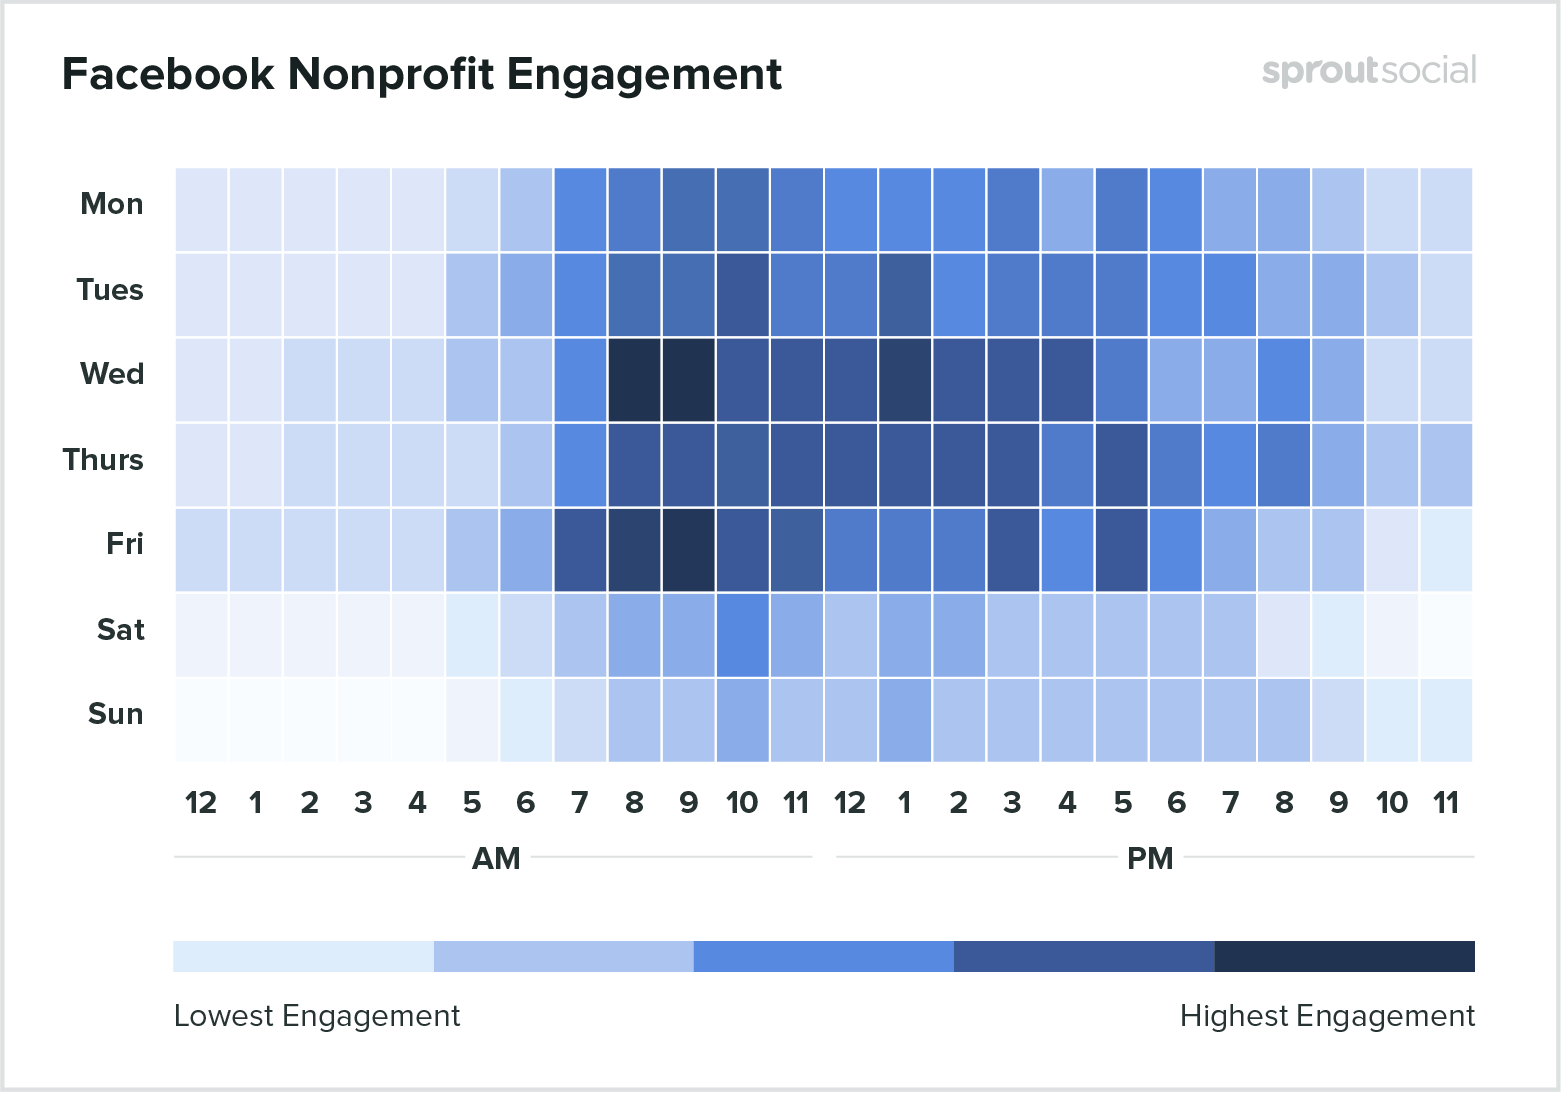
Peak Engagement Times on Facebook for Nonprofits:
● Best times: Wednesday and Friday at 8–9 am.
● Best day: Wednesday
● Worst day: Saturday and Sunday
Peak Engagement Times on Facebook for Tech:
● Best time: Wednesday from 9 am-noon
● Best day: Wednesday
● Worst day: Sunday

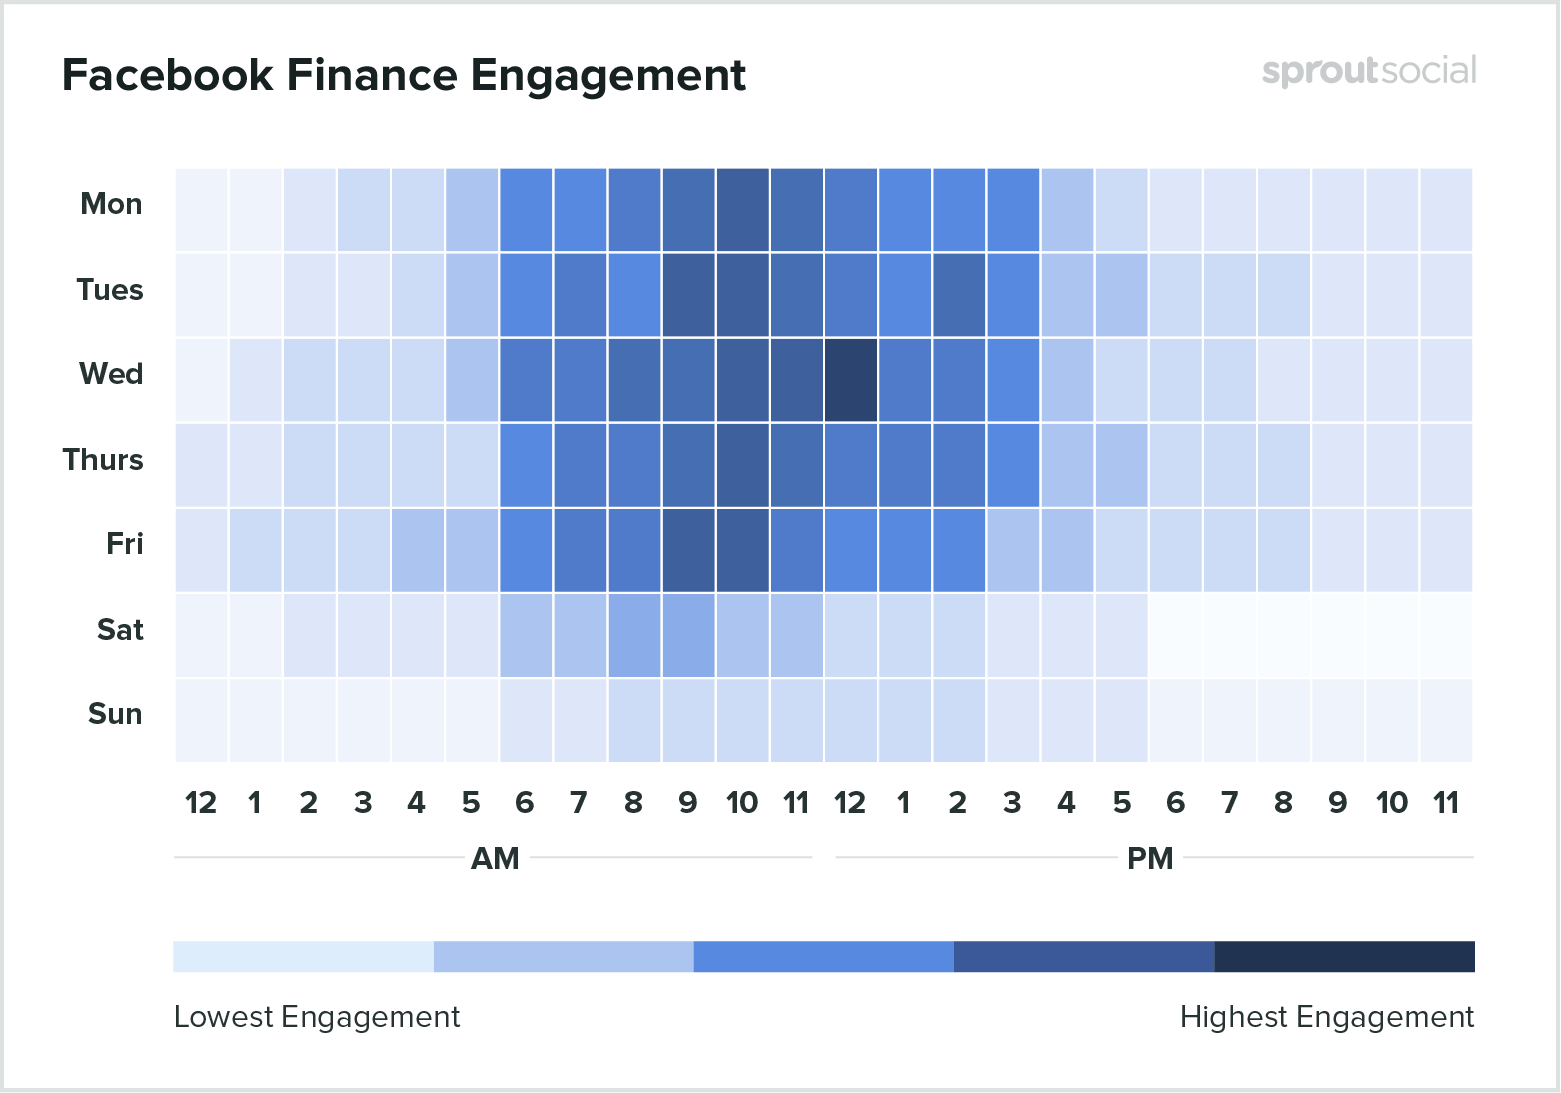
Peak Engagement Times on Facebook for Finance:
● Best time: Wednesday at noon
● Best day: Wednesday
● Worst days: Saturday and Sunday
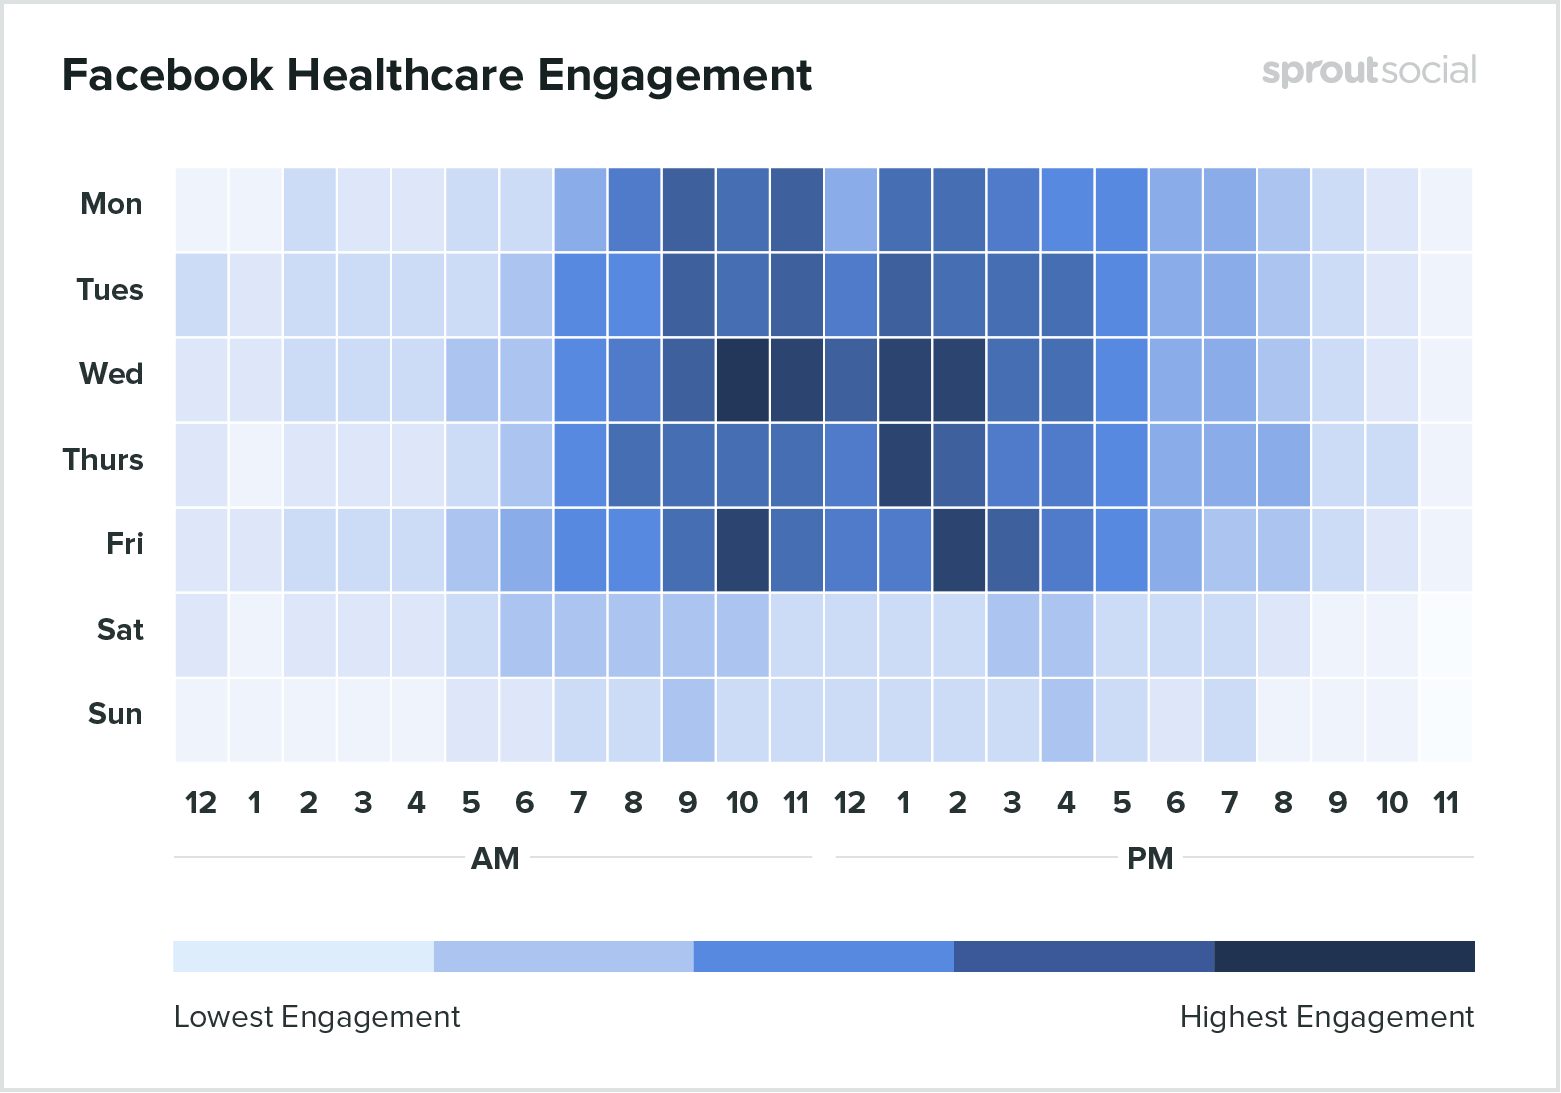
Peak Engagement Times on Facebook for Healthcare:
● Best times: Wednesday from 10 am-noon
● Best day: Wednesday
● Worst days: Saturday and Sunday
Peak Engagement Times on Facebook for Recreation:
● Best times: Tuesday at 2 pm, Wednesday at 1 pm and Friday at 11 am.
● Best day: Wednesday
● Worst day: Sunday

How to Monitor Your Competitors
You can take inspiration from other businesses’ accomplishments, and also, study the competition. Research and study what worked for your competitors and other businesses in all industries and what did not and use this knowledge to fine-tune your own strategy. Want to monitor your competitors’ Facebook ad campaigns, and know their ad strategy? Here’s how.
1. Know the five W’s.
Who are your competitors?
Identify who your competitors are. First, you have to recognize your own by answering: What’s my industry? What’s my product or service? Who is my target audience?
Find companies that would have the same answers as your brand. Those are your competitors. Limit your list by finding out brands with target audiences the same as yours, a marketing strategy similar to yours, and pick brands that are often compared to you.
Where are they active?
Visit your competitors’ Facebook pages and other social media profiles, gauge where they are most active, and where most of their engagements come.
What is their strategy?
Visit each of your competitors and assess their Facebook page. Evaluate their Content.
● What are the types of content they publish?
● Are they using paid ads?
● Are they using hashtags?
● Do they partner with influencers?
● Do they use links?
When are they engaging?
Measure the time of the day that your competitors are most active, and the amount of time they spend on interacting. Determine:
● How often do they post?
● When do they post?
● What are the time and day of their posts with the most engagement? Least engagement?
Why are they successful in failing?
Study your competitors’ strengths and weaknesses. Learn from their successes and failures.
All these five W’s will help you monitor your competitors, and guide you through strategizing your marketing and advertising.
2. Uncover the keywords they are using.
Identify the keywords that they are using and are effective. You can target these phrases on your next posts; or improve them even more.
3. Use competitor analysis tools
There are so many competitor analysis tools available that can help you stack up against your competitors. With the right tools, you can spend less time and effort trying to visit each of their Facebook pages, read, and study every post. Let the smart devices do the legwork.
Conclusion
After reading this complete guide, you should have a solid foundation to start using Facebook for business. Remember that Facebook and the whole social media marketing world constantly change and add features, so get active, stay connected, and be knowledgeable of the growing trends. Track what works and what does not and use the knowledge to adjust your marketing strategy. You should be able to keep up and shift your strategies
Never be afraid to try new things not mentioned here!Best of luck with your business!