

The Complete Guide to Building A WordPress Website
Are you thinking about creating a website with WordPress; if so, The Complete Guide to Building A WordPress Website is for you!
Web Developers love WordPress for its simplicity. It is only a matter of minutes to get a website built on WordPress, and you can easily do so even if you are someone with no programming language knowledge. The WordPress learning curve is so easy that in less time, even novices get used to working with WordPress.
And this is what our guide aims at, to layout simple ways of building a WordPress website.
What Is WordPress?
WordPress was introduced by Matt Mullenweg and Mike Little in 2003, it is a content management system with open source access and free usage. Because of its ease of use and its powerful features, it soon became the most common CMS.
Matt and Mike resorted to building a WordPress website. But what the world knows about WordPress today is that it is a content management system. Any kind of website can be created in WordPress, be it a simple blog or a complex website at the enterprise level. In short, WordPress is anything for everybody. You can create websites for eCommerce, websites for news and magazines, personal websites, portfolios, websites for music and video, websites for education, online community, and any niche you can imagine.
A survey shows that in 2020, over 455 million websites over the World Wide Web use WordPress.com for content management. It is a colossal website share. That means the market share of WordPress is 35 percent of all the world’s websites. This enormous achievement for WordPress is driven by its versatility to be used to create any form of a website.
Why Use WordPress?
You may wonder why you must know how to use WordPress. As highly a skilled WordPress development agency, here are some of our reasons that will persuade you why you should start building a WordPress website.
WordPress is very easy to use!
No content management system can topple WordPress’s ease and convenience to use. There are also thousands of ways for you to learn the WordPress. For each small aspect of WordPress, there is a great abundance of learning material. In minutes, you can get acquainted with the dashboard and tools and can build your first website in a breeze.
WordPress gives you full freedom
WordPress provides you with complete freedom and control over your website. The look of your website can be personalized to your heart’s content. You can make your website a source of revenue as you please. Even an online shop can be linked to your blog.
WordPress can save you money
It is DIY-driven, and there are lots of resources and guides available online to teach you much stuff you can do on it. It is recommendable that you know how to do-it-yourself to save money in hiring for a developer every time you want to tweak your website.
The Complete Guide to Building A WordPress Website
If you are now convinced to make your WordPress website, the next chapter will discuss the next step: start building!
Table Of Contents
● Web Hosting And Installation Of WordPress
● Steps In Building A WordPress Website
● Design And Optimization
● How To Choose A WordPress Theme
● Free Vs Premium: Which One To Choose?
● Where To Find Free And Premium WordPress Themes
● How To Install Premium Themes
● Understanding Posts, Pages, And Archives
● How To Create A Post Page
● How To Add Content To Your Website
● Launching Your Site
● Promoting Your Website In Social Media
Web Hosting And Installation Of WordPress

Starting Your WordPress Website
Here are 5 simple steps broken down to guide you in building a WordPress website:
- Select a Domain Name
- Set Up Domain Name and Web Hosting
- Install WordPress on Your Web Host
- Install a WordPress Theme
- Install necessary WordPress plugins
Select A Domain Name
Perhaps the most significant element of your blog is its name. It has to be simple and easy to remember, and importantly it must portray your website’s main content (purpose). In most scenarios, it will turn into a brand name, so when picking a domain name, be careful. Take the time to do this step.
You could be surprised to discover that your chosen domain name may already be taken while attempting to register it. And even though you modify the domain suffix, it will still be unaccepted. If your name and the .com suffix appear in another domain, all visitors will most likely go to that site first, and nobody can promise that they will make it to yours afterward. A unique blog name that can be used with .com is best to explore since .com is the most frequently used suffix.
Points to remember while you are finding the right name:
- If necessary, use the .com domain. As stated before, the first search by users is done with .com. And it is easier to be right on the top of their search list for google/yahoo/bing.
- Use characters only. Avoid numbers and hyphens in your domain name. They are complicated and more difficult to learn.
- It is better to have short names over long and descriptive ones. Think as if instead of a blog, you are seeking the name of a brand because it will also be featured in the logo of the site. Being as plain and brief as possible is better.
- Your domain name has to be easily recognized so that people will find you instantly and consistently.
Set Up Domain Name And Web Hosting
If you have found a domain name, registering it and setting up web hosting is the next thing you’ll need to do.
The definitions of a domain name and WordPress web hosting are below if you are new to WordPress web hosting.
Web address: Your web addresses, such as Google.com or IsItWP.com, reflect the internet site or URL of your website. It’s what is in people’s browsers and what people type to reach your website. Usually a domain name costs about $14.99 a year.
Website hosting: Your website hosting profile is where you keep all of your website’s data and information. Consider it as your website’s home. When a visitor attempts to access your blog by entering your domain name, they will be directed to your website’s files stored on your web hosting server. Usually, web hosting costs $7.99 a month.
A good and reliable hosting company is important when building a WordPress website. Your host is a place where your blog nurtures. If the host is bad, then your blog will certainly encounter issues. So, make sure that your host is trustworthy and offers outstanding support and services for customers.
There are a few hosting companies recommended by WordPress, and Bluehost is among them. To set-up your Bluehost account, follow the steps below.
Steps In Building A WordPress Website
Take the following steps to create your Bluehost account. These are very comprehensive steps, but you can always check on the Knowledge Base and support service of the host for more information. The below example uses BlueHost forthis guide, but other companies like Hostgator and Godaddy are also excellent web hosting companies for your WordPress website.
Of course we can also assist you WordPress web hosting which will also provide you a FREE $250 dollar a year advertising voucher, and initial SEO during setup at no additional cost!
Step 1: Go to bluehost.com. Click on the “Get Started” button.

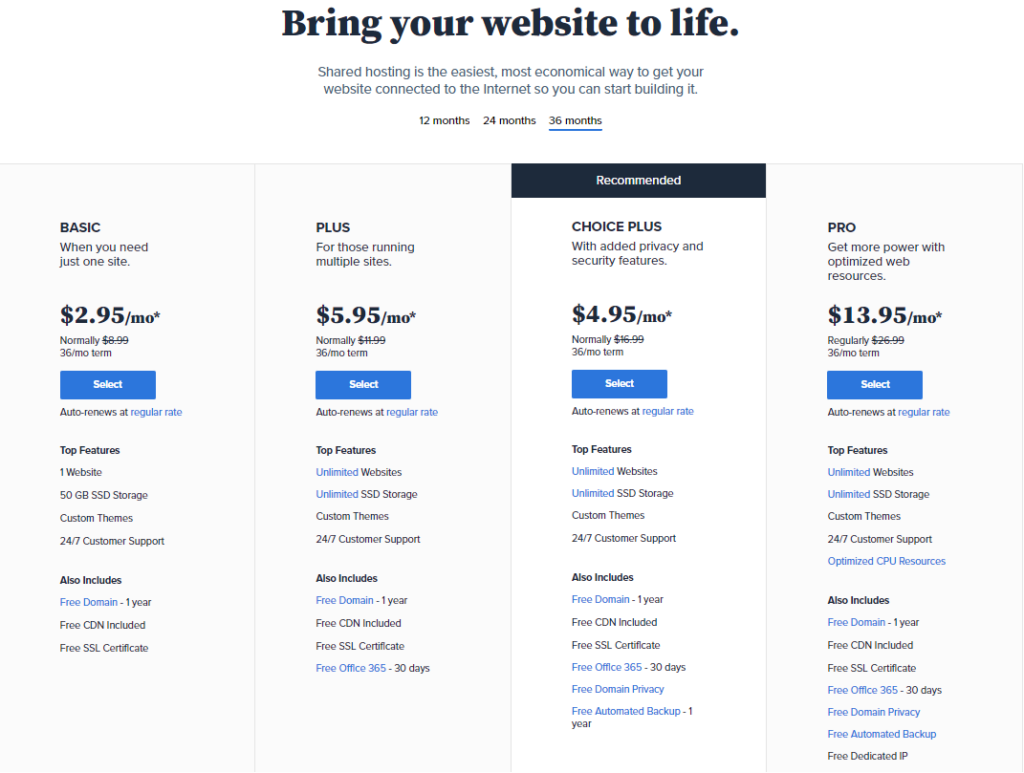
Step 2: Pick a plan that best suits you and your budget. Many individuals who are fresh to building websites would choose a simple plan. You can simply upgrade your hosting plan instead of starting in a free host and taking on the burden of moving all theme files and data to a fresh host while the site is developing.
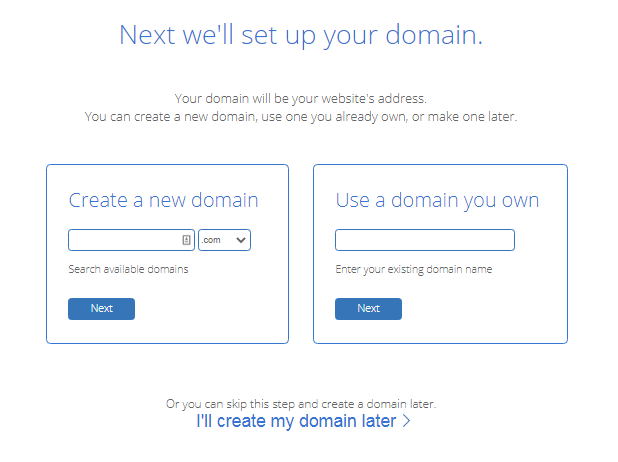
Step 3: Now that you have a domain name already, you can have it registered for free because Bluehost allows free domain registration for new accounts. Go to the “new domain” box to register a new domain name, then select “next”. If your domain name is already registered, you can still register it by clicking “I have a domain name” button.
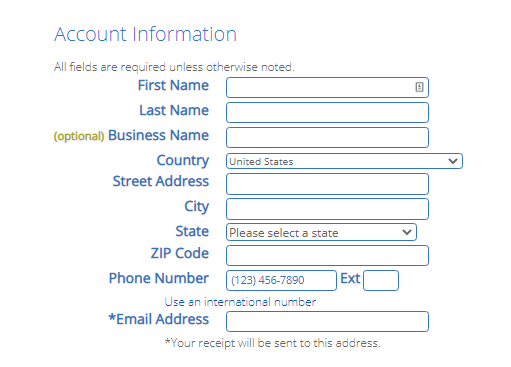
Step 4: Your contact and account details should be encoded.
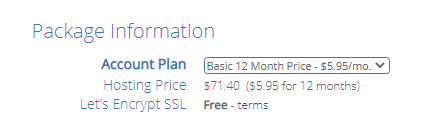
Step 5: Look for the “Package information” tab. You will see several payment plans you will choose from. You can also buy a few more useful services. The “Domain Privacy Security” privacy service is the most recommended one. It is important to secure all your data, such as contact number, address, name and other personal files from public access.
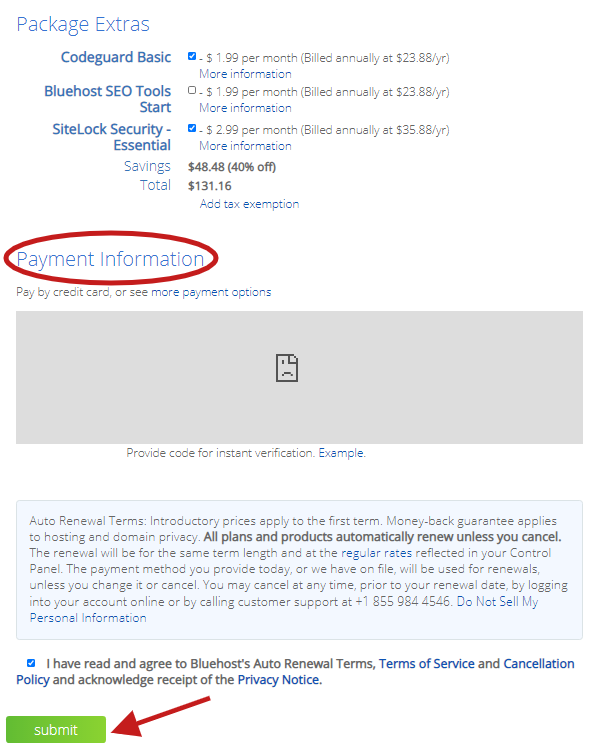
Step 6: Enter billing data and then agree to the Terms and Conditions and click submit.
Step 7: You will be directed to a page where you can buy some more services, but in the meantime, these are not necessary, and you can always add them later. Proceed by clicking “No Thanks.”
Step 8: You are now done! You’ve finally got your Bluehost account. Set a password next.
Step 9: Configure your Bluehost account password. If possible, the password should be strong with symbols, capital letters, and numbers, so that your website is as secure as possible. Tick “Agree” under “Privacy Policy and Service Terms” and then press “Next.”
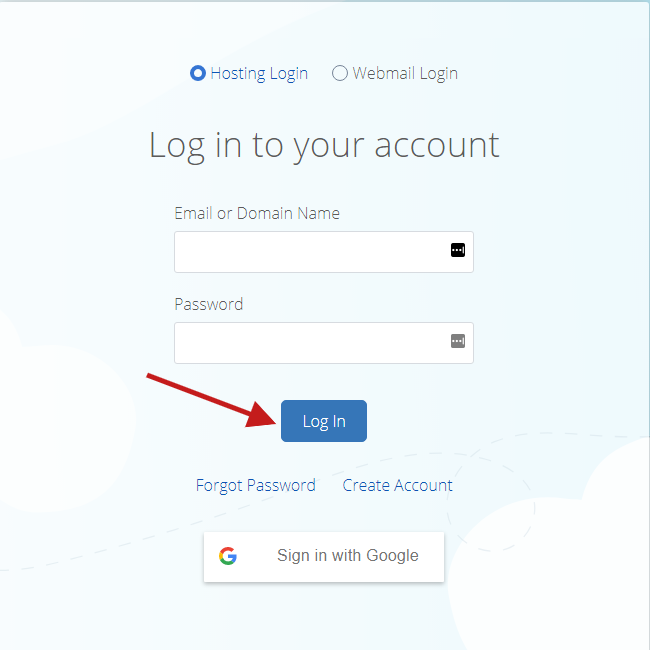
Step 10: Log in to your account with the newly created password. Next, click on the ‘login’ button in blue. It will lead you to the Bluehost portal automatically, where you can manage the account.
Install WordPress On Your Web Host
You don’t have to go through a separate WordPress installation process with Bluehost, because Bluehost does it by default now. All you have to do is pick your WordPress theme, then enter your blog’s name and tagline, and you’ll be ready for WordPress.
You’ll now be asked to select a WordPress theme after subscribing to your hosting plan. During this process, you can pick just about anything because later you can always change your theme (we’ll show you how to do so in a later phase of this tutorial). The most important part is starting to create your blog, so go ahead and pick any theme that takes your fancy just to get you going.
Then you’ll then be asked to pick your blog’s name and tagline.
If you are using another hosting provider other than Bluehost, installing the CMS to connect your new domain to your website is necessary. For example, if you have availed of GoDaddy’s hosting service, you may start to log in to your GoDaddy account and click “Web Hosting,” and then click “Manage.” Scroll down and under “Options & Settings,” you will see a section with the title “Popular Apps.” Click on the WordPress app to begin the installation. Your website will be installed on your hosting account after 24 hours. At this point, you can then set up your “Primary Domain” within WordPress so that your visitors can see your website when they click on your custom URL.
Point Your Domain To Your Host
In WordPress, go to “My Site,” and click “Domains.” Select the custom domain you want to make primary. Then click, “Make Primary.” Click “Update Primary Domain” to confirm the change. There will be a green box with a checkmark that says Primary Domain on your chosen one.
Install A WordPress Theme
WordPress contains lots of templates, style formats, colors, fonts, and other visual options. Whenever you like, you can customize your website using WordPress themes and templates.
There is a default theme that will automatically be provided by WordPress. But a custom theme will make it extra attractive and professional for your website.
There are a number of themes you can easily install and then, if necessary, change them in the future. By looking at the official directory of WordPress, you can look at the vast abundance of themes. There are free themes, as well as an entirely different universe with premium themes. Third-party sites or independent theme stores that sell WordPress themes are also available.
Simply “Setup” until you discover the ideal theme for your website. By adding your content, posts, and pages, you can then begin to personalize it.
More about themes will be discussed in the next chapter of this guide.
Install Necessary WordPress Plugins
Plugins are great to include for added functionality. They can be added without having to deal with any code yourself. However, be careful not to over-do it since plugins are added to the website as an extra code, so the more plugins you add, the more possible issues may emerge (site speed, security, etc.). Try to maintain only those that you truly need.
The plugins bundled in the theme kit are not included in this restriction. These plugins are included because they are required for the theme to add key functionality that you’d get one way or another (such as the sliders, for instance). The plugins included are also checked and monitored by developers so that they are fully secured.
Plugins can be installed directly within your WordPress dashboard from the “Plugins” tab. Click “Add New.” Then search for your desired plugin and then click “Install Now.”
Some of the essential plugins you should consider getting.
- Yoast SEO – helps you make search engine optimization tweaks and make your site more accessible to the search engines in general.
- Google Analytics for WordPress – this one integrates your website with the most popular traffic analysis solution on the web.
- Wordfence Security – improves the security of your WordPress site.
- UpdraftPlus – does automatic backups of your website.
- Optimole – optimizes your images.
- WPForms – lets you add interactive contact forms to your website, which your visitors can use to reach you directly – much better than displaying your email in plain text on your site.
- Also, look through this list of the most popular WordPress plugins of all time. You might find something interesting there as well.
Now that your website is set. You can begin publishing content, as well as tweak and customize your website’s design, and optimize your site to boost traffic.
Design And Optimization
Themes are a crucial part of your website because your website’s visual presentation depends on it. In this section, we’ll discuss themes, how they work, and the different ways with which you can add themes to your WordPress website.
A theme is a collection of templates and stylesheets used to create the appearance and display of a website powered by WordPress. From the WordPress admin area under Appearance » Themes, they can be configured, managed, and installed. Many WordPress themes are available, both free and paid.
Free Vs Premium Themes
Free themes are usually produced by independent developers with little or no support, although high-end vendors often also provide free themes as a lure for their premium offerings. The quality and customization choices, however, can vary greatly because of their lack of cost, and they seldom meet the standard set by premium themes.
For a good purpose, premium themes usually cost money. They should be feature-rich, responsive, and well-supported by the support staff of the vendor. As a rule of thumb, as compared to their free counterparts, you should expect a higher level of quality from premium themes throughout.
WordPress itself has a few themes. These are rather basic themes, one of which will be auto-activated when WordPress is first installed. In addition to this, through pirate streaming, you can find countless free themes and even premium themes free. However, since usually, nothing good is ever free, there are downsides to pirate streaming too. The themes included are secure, but you will need to make several customizations to the CSS and code for your site to stand out in a sea of beautiful and interesting WordPress sites. It is wasted time, even for a professional. Premium, but pirate themes are also often not safe. They will come with malware, and if your site/server gets hit, no one can take responsibility. It will be stressful too since you will never know if the uploader will continue to upload the updated versions of that theme.
How To Choose A WordPress Theme

Since your WordPress theme handles the design of your site, it plays an important role in making your site successful. Multiple areas are affected by your theme, such as:
- User experience
- Performance (how long it takes your website to load)
- Branding
You want to put some thought into choosing the best theme. We will share some tips in this section about how you can do that.
If you’re not a developer, determining whether or not a theme is “high quality” can be difficult. To understand a theme, developers have the luxury of looking directly at the code, but non-developers don’t have that advantage.
Here are some tips to help you choose a great theme, even if the underlying code cannot be analyzed:
- Read the feedback– user reviews are included in most theme directories. A perfect way to rapidly evaluate the quality of a theme is to use the wisdom of the crowds.
- Check the last update date– most directories also display the last update date. You want to make sure that the theme from the creator also receives regular maintenance. Ideally, within the last six months or so, your theme should have received an update.
- Look at the demo with various devices– Most Internet traffic occurs on mobile devices nowadays. So, when you’re looking at the demo theme, don’t just look at the desktop version. Open the demo on your smartphone to ensure you like how both versions look.
- Customization options– If you’re not a developer, you’ll want to consider easy-to-use customization tools so that you can make the theme your own and customize it whenever you feel necessary.
- Performance testing– You must pick a theme that will quickly load your site. It is the hardest one to test as a non-developer. Ideally, with a tool like GTmetrix, you can test the theme’s performance by installing the theme on the test site and evaluating it. Alternatively, the demo site of the theme can also be analyzed.
Free Vs Premium: Which One To Choose?

You may come across the argument that premium themes are generally better than free themes. It is not entirely true, and this argument does not apply to all individual themes.
Many themes work on a model of “freemium,” which means that the core theme itself is free, but you can pay to add more features. Between free and paid versions, it’s the very same core theme, so you certainly can’t say one is better than the other.
With that said, if you find a free theme that you like and it does what you need, it’s all right. You do not “need” a premium theme to have a successful website.
If you have the budget and you want to buy a premium theme when building WordPress Website, here are also some reasons why you shall go for it:
- Support– Free themes usually do not come with support or have minimal support. You’ll normally get one-on-one help straight from the developer with a premium theme.
- Feature-rich– Premium themes usually have more functionality because the developer can spend more time in them since they are paid and well-supported.
- Regular update– with a free theme, since it is not a source of profits, there is a high chance that the developer will abandon it and no longer update it. In premium themes, developers are paid to continue maintaining.
Where To Find Free And Premium WordPress Themes
The official WordPress.com theme directory is the best place to find free WordPress themes.
The official directory has over 7,600 free themes as of August 2020, all of which are expected to follow basic coding standards.
There’s no official directory to find paid WordPress themes, unlike free WordPress themes.
Envato’s ThemeForest marketplace, containing more than 11,000 premium themes as of August 2020, is the largest marketplace for premium themes. Pricing varies by the theme, but for a theme from ThemeForest, you’ll usually pay ~$60.
Many theme developers sell directly from their websites, as well. Via Google or word of mouth, you will find these independent sellers.
How To Install Premium Themes
Installing free themes was already discussed in the previous section. This part will guide you on how to install premium themes when building a WordPress website.
You should have got a Zip file containing your theme when you bought a premium theme. If you still don’t have this file, you should be able to download it from wherever you bought the theme from.
Here’s how to install it once you have the Zip file:
- Go to Appearance, then Themes in your WordPress dashboard.
- Click the Add New button.
- Click the Upload Theme button.
- Use the Choose File button to select the Zip file on your local computer.
- Click Install Now.
- Click Activate to make the theme live.
Now that you are acquainted with themes and customizing the appearance of your WordPress website, the next thing you shall learn is how to create content for your website.
Understanding Posts, Pages, And Archives
Although they are all web pages, there are clear distinctions between the three that you must know when building a WordPress Website.
Posts
Posts are basically regular and time-specific pieces of content. They’re what you use to make sure your website is relevant and interesting. By default, posts are identified in reverse chronological order on your home page, although this can be changed.
Posts can be grouped into various categories and tags so that visitors to your site and search engines can locate them with ease. Additionally, your posts will be fed directly to visitors who have signed up to your Simple Syndication (RSS) feed. This makes the sharing of your posts and, in turn, the growth of your traffic easier and faster.
Pages
Pages are the evergreen elements of the WordPress platform. They’re a more ‘permanent’ fixture, and your About and Contact pages are obvious examples.
Pages are not given tags, but they can be arranged into hierarchies (for example, under the About Page Hierarchy, there is a Testimonials page). A page can also be devoted entirely to your blog posts, as we can see later on this guide.
Archives
As the name suggests, an archive is what you and your visitors to the site can (possibly) use to keep track of your numerous blog posts. In WordPress, you have an option to set up an archive page that shows your previous posts in categories that are easy to navigate. By the month of publication, subject matter, post authors, or virtually any other criterion you want, you can choose to archive articles.
Additionally, you could add an archive widget to the sidebar or footer of your WordPress account. This more organized technique helps your followers to locate previous posts without having to leave the page on which they are.
How To Create A Post Page

How To Create Blog Posts
Creating a separate page provides the blog with a central ‘hub’. More readability, less clutter, and ease of navigation can increase the likelihood of visitors returning to your site. You may also tailor the Posts page to your exact specifications. For instance, to create a dedicated layout, you can use custom page templates without sacrificing your chosen theme.
A Posts page will also help to boost the Search Engine Optimization ( SEO) of your blog, along with assisting visitors in finding and sharing posts. The process of finding similar and linked posts is faster and simpler with the use of tags and categories.
The good news is that it is easy to build a post page. Although several themes provide a dedicated template for the blog you can use, here are the steps on how to set up a suitable page manually.
Step 1: Create your page/s
Navigate to Pages > Add New to get started. You will need to build two pages if you have not already done so, one for your home page, along with your posts page.
For convenience, you’ll want to call one page Home, and if you have an alternative available, under Page Attributes, set the Template drop-down option to Front Page Template (or similar).
Also, under the Discussions section of the page, you should uncheck all of the boxes (if they appear), then hit the Publish button once you’re ready.
Follow the same steps to set up a Posts page, but name it Blog for convenience (although this could be whatever you want) and choose a relevant template if one is present.
Step 2: Modify your home page settings.
You would want to change your Home page setting. You’ll need to navigate to Appearance > Customize on your WordPress dashboard first to do this. Tap on the Homepage Settings tab from there.
Then, rather than as a list of posts, you can opt to display your home page as a static page. You can then indicate what particular page to use (which should naturally be the page in the previous step that you titled Home). Finally, because your blog posts are no longer on the front page, you will need to determine what your new Posts page will be (which should be the page you’ve named Blog).
When you are done, don’t forget to press Publish or Save Draft at the top of the screen. The changes you have made will then be executed. You will also find that options are available to add a new page to act as your home or post page. It gives you a fast and easy way to build a page from this screen directly.
Step 3: Add your pages to a menu
Finally, new pages need to be added to the navigation menu. Of course, given that your navigation gives visitors a simple overview of the layout of your site, it is important to add all your pages to it.
Access Appearance > Customize Screen to add your pages to the menu and then press the Menus tab. Pick the relevant one from the list of menus, and press the Add Items button.
Then, open the Pages accordion menu, find your page on the Blog, and then click to add it to your menu.
If necessary, repeat this for your homepage, and when you’re done, click Publish. Your changes will be saved, so to view the changes, check the front end of your site.
How To Add Content To Your Website
Contents you add to your WordPress website are displayed in the form of posts and pages. Posts are used for blogs and portfolios. The newest are automatically placed at the top. Pages, on the other hand, are static, and added content remains in the same place.
To add a post, go to the admin dashboard, click “Posts,” then click “Add New.” You can then proceed to write the title of your post, insert photos, change the format, and so on. If you want your new post go live there and then, click “Publish.” If you’re going to keep it as a draft and make changes later, click “Save Draft.’
You are set! You have curated content and has customized your website; the next step is to launch your website and get people to visit it.
Launching Your Site

How To Get Your Site Found And Indexed By Google
Step 1: Create an XML map with Yoast SEO plugin
An XML Sitemap is a file containing your website details. It’s a list of your most significant pages. It is a helpful tool that lets Google find your website and explore it. You can be helped by Yoast SEO to create a sitemap. All you need to do is allow the XML sitemap option, and it will create the sitemap automatically.
Step 2: Set up an account in Google Console
You need to tell Google about the sitemap. A tool that can help you with that is the Google Search Console. You need to create an account to add your Sitemap to the Console. With Yoast SEO, it can help your site be verified with Console.
Step 3: Add the sitemap to Google Search Console
You’ll find the XML Sitemap tab in the Google Search Console. The sitemap you built can be added there so that Google knows where to find it. If you change the content on your blog, it will automatically update your XML Sitemap.
Step 4: Add and or upload the most relevant pages to the Google Search Console
You can ask Google to crawl individual pages, too. You’ll find a URL inspection feature in the Google Search Console, where you can ask Google to crawl or recrawl a URL. There’s a cap, so think about which pages are key for your site or your business and submit them there.
To get your search engines to find, index, and rank your website, a great way to begin is submitting an XML sitemap in Google Search Console.
First, install the Yoast SEO plugin when building a WordPress website. Yoast SEO is one of the best SEO plugins for WordPress and will help you attract visitors to your website with the right traffic.
Promoting Your Website In Social Media

Aside from getting your site indexed by Google, one crucial step to get visitors is to share your website on Social Media.
Your WordPress website may be the most informative and beautifully designed, engaging, and exciting, but you need to let the world know that it exists. You can have the best product, but no one will know about it without effective advertising and promotion. Just because you’ve launched your website on the Internet doesn’t mean everybody’s going to flock to it. In reality, if you do not get out there and share it, nobody will know it exists. To help you get the word out there, there are multiple services available, but they cost money. Social media is one way of getting the word out for free.
The Complete Guide to Building A WordPress Website

It is not an easy process to build the perfect website. It takes time and continuous effort also to maintain a website. This is why we created The Complete Guide to Building A WordPress Website!
If you do not have everything in place to make your website outstanding, don’t be stressed. Start your way out as best you can. There are plenty of other guides and articles you’ll find, but a great website needs experience above all else, which you can only achieve by giving things a go and sticking around.
And remember that once you do you’ll need to get found!
To get your search engines to find, index, and rank your website, a great way to begin is submitting an XML sitemap in Google Search Console. Also install the Yoast SEO plugin when building a WordPress website. Yoast SEO is one of the best SEO plugins for WordPress and will help you attract visitors to your website with the right traffic.
As you can see there is a lot that goes into WordPress hosting, Woocommerce site development, and WordPress Search Engine Optimization. If you’re in need of ANY WordPress services we invite you to reach out to 10Tier.com and we will be happy to assist! We love building on WordPress and helping our customers succeed online!